Free Crochet Pumpkin Doll Pattern for Halloween
Make a cute crochet pumpkin doll for Halloween with ribbed panels, a scalloped collar, clear assembly diagrams, and a plum-and-orange color option.

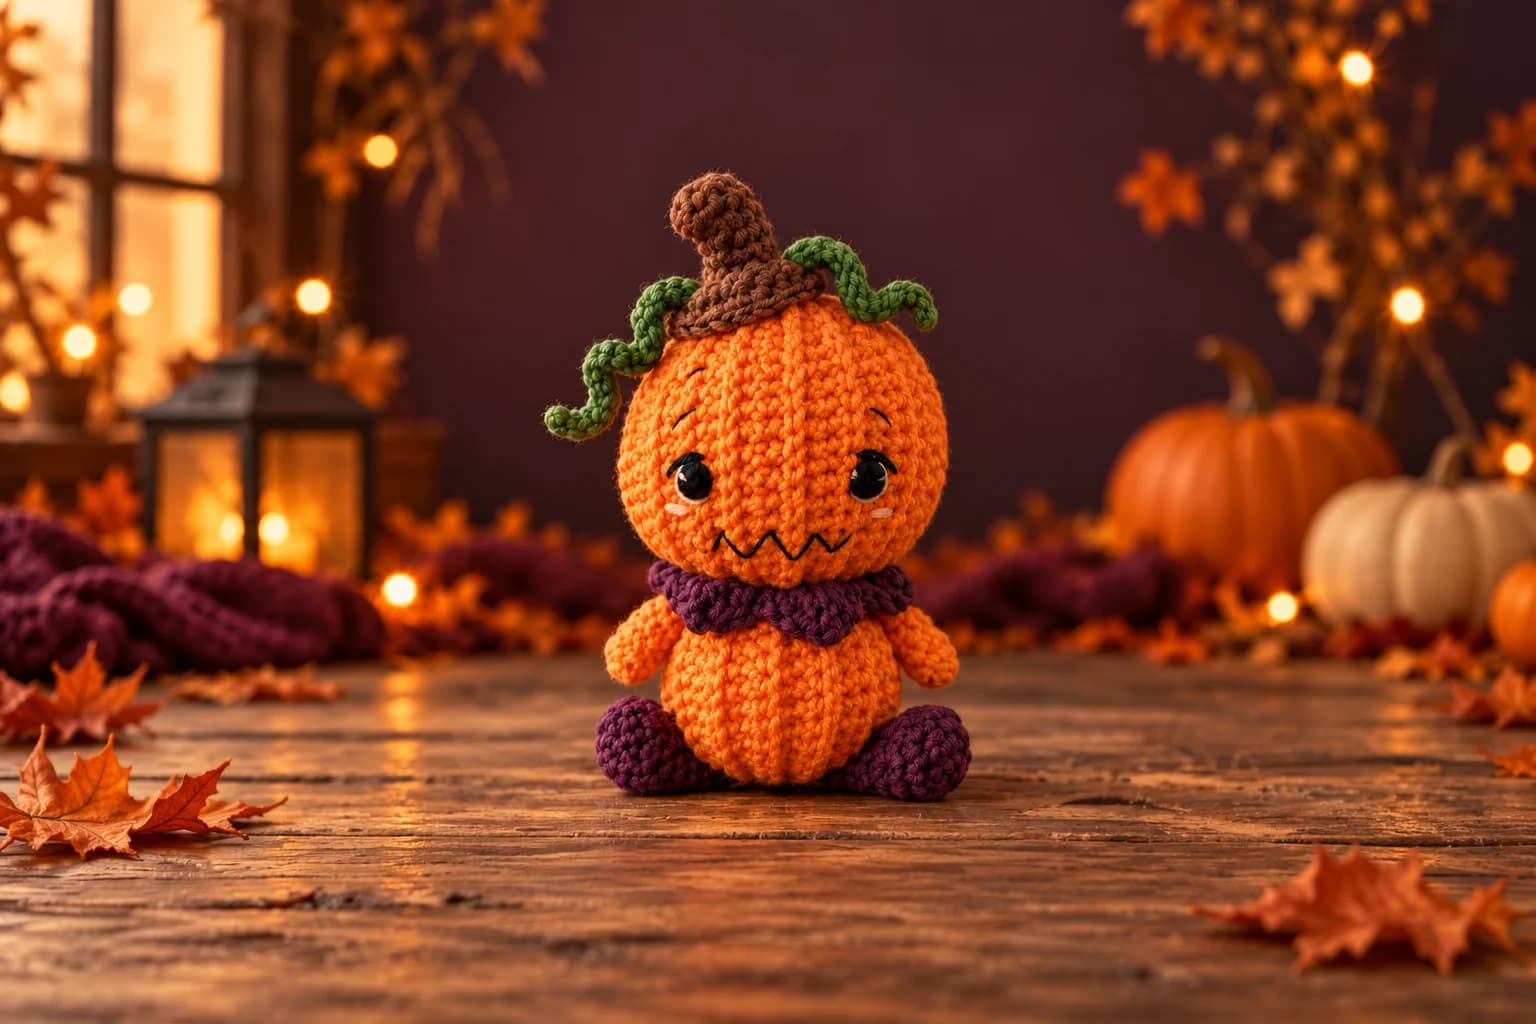
This free crochet pumpkin doll pattern makes a little Halloween character with a ribbed pumpkin head, a smaller round body, a scalloped collar, and two curled vines. The head and body begin as flat rectangles, so you can check their stitch counts before joining and stuffing them.
The original design is by Kamila of @ovejita.tejedora. This English adaptation is published with permission and keeps the source construction. Our color option pairs burnt orange with plum feet and collar, a brown stem, and moss-green vines. The instructions also explain an embroidered face in place of the source's plastic eyes.
Make the panels first, crochet the small pieces next, and assemble everything after checking their positions. You will use US terms throughout. This is a sewn project, not a no-sew pumpkin.
1. Choose your Halloween colors and gather supplies
The source sample uses YarnArt Jeans and a 3 mm hook, with a finished height of approximately 14 cm / 5½ inches. That measurement belongs to the original sample; a different yarn, hook, or tension will change your result. No measured gauge or yarn consumption is supplied.
Use the same yarn range, or closely matched thicknesses, for all the main pieces:
| Part | Our color option | Original palette |
|---|---|---|
| Head, body, and arms | Burnt orange | Orange |
| Collar and feet | Deep plum | Green |
| Stem cap and stem | Warm brown | Brown |
| Two vines | Moss green | Green |
| Face | Black, with small cream highlights | Black features and light details |
You also need fiberfill, a yarn needle, scissors, a stitch marker, and removable markers for placing the face and limbs. For an embroidered face, use embroidery yarn for the eyes and mouth. The source lists 8 mm safety eyes in its materials and 8–10 mm eyes in assembly; if you choose those instead, fit their backing washers before closing the head.
Plan this as a shelf decoration. Do not assume that a decorative doll with attached parts is suitable for a baby or small child.
Keep the structure consistent: a color substitution does not require changing the stitch counts. Switching to a much thicker plush yarn changes more than color, so do not expect the same 14 cm size or the same small-piece proportions. See our yarn and hooks for amigurumi guide for help choosing a manageable starting yarn.
2. Read the stitches and construction order
- ch: chain.
- sc: single crochet.
- sl st: slip stitch.
- dc: double crochet.
- tr: treble crochet.
- inc: 2 sc into the same stitch.
- dec: single crochet 2 stitches together.
- BLO / FLO: back loop only / front loop only.
- MR: magic ring.
The Spanish source uses pb for US sc, pa for US dc, and pad for US tr. Do not translate its “punto alto” as a US treble crochet.
In the ribbed panels, turn at the end of every row and keep the stated number of actual sc stitches. Turning chains are not additional sc. Work the narrow limbs and stem in continuous rounds, using a marker to identify the first stitch.
There are two ribbed panels, two arms, two feet, one collar, one stem cap, and one stem with two vines. Leave sewing tails when finishing separate pieces. Our crochet abbreviations guide explains repeat notation if you need a refresher.
3. Crochet and shape the ribbed body
With orange, chain 14.
- Starting in the second chain from the hook, work 13 sc along the foundation. Ch 1 and turn.
- Work 13 sc in BLO, ch 1, and turn.
- Continue the same back-loop row until you have 28 rows in total. Count rows, not just the raised ridges.
The source describes the first row and then 27 more repetitions. Each row stays at 13 sc. Check that the edges remain straight; accidentally counting the turning chain as a stitch makes a widening panel.
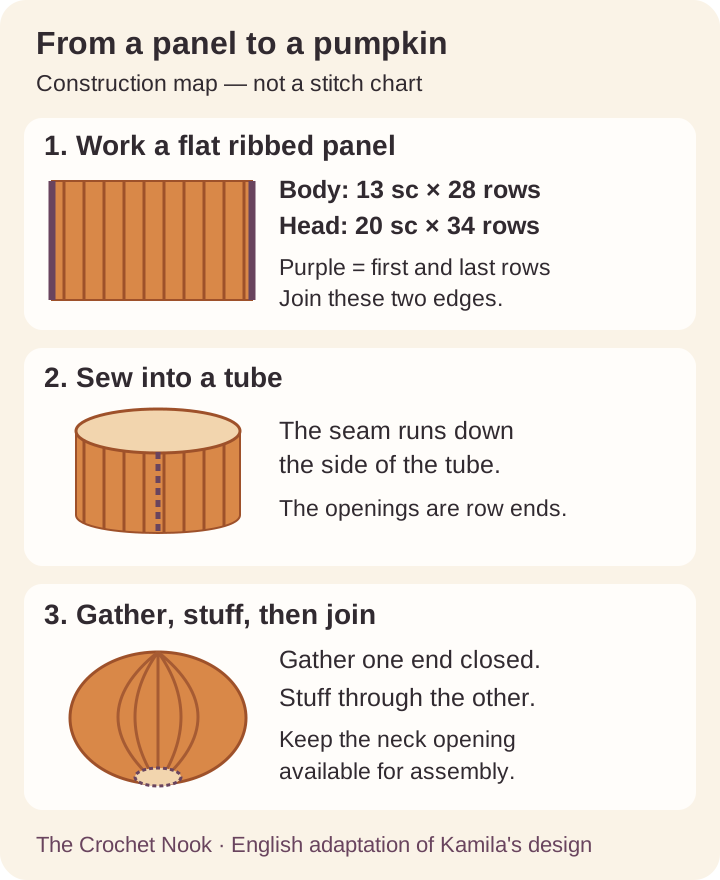
Bring the first and last rows together and sew them into a tube, following the source's back-loop seam. The tube's two openings are the row-end edges, not the edges you just sewed.
Thread the yarn needle through one row-end opening with a running stitch. Pull gently to gather it closed, then secure the yarn. This becomes the body base. Gather the opposite opening only partway, add small pieces of stuffing, and keep this opening available for joining to the head.
Aim for a rounded body with visible ribs. Stuffing should support the shape without stretching holes between the stitches.
4. Make the larger pumpkin head
With orange, chain 21. Starting in the second chain from the hook, work 20 sc across.
Continue with back-loop sc rows as for the body, keeping 20 sc in each row. The source's head instruction says to work the “20 sc, ch 2, turn” sequence 34 times; use 34 rows for this panel. Its ch-2 turn differs from the body's ch-1 turn. Retain it without counting either chain as an extra sc.
Join the first and last rows into a tube. Gather the top closed, and leave the lower opening partly open for stuffing and the neck join.
Before closing access to the inside, mark the face with removable markers. The source places the eyes about 3 cm above the collar and 3 cm apart on its 14 cm sample. Treat those measurements as placement guidance for that sample, not fixed measurements for a larger or smaller version.
For our face option, embroider two small black eyes with a short cream highlight in each. Add a shallow zigzag smile below them, with optional short eyebrows and blush stitches. Secure embroidery tails inside the head. If using safety eyes, insert the posts and secure their washers while you can still reach the back.
Stuff evenly and shape the head by hand. Join its lower opening to the body's remaining opening, taking small sewing stitches around both edges. Add a little more filling at the neck if needed before completing the seam. The head should sit securely above the body without a loose gap.
5. Crochet two arms and two feet
Arms: make two in orange
- Round 1: 6 sc into an MR. 6 sts.
- Rounds 2–6: Sc in each stitch around. 6 sts in each round.
Finish with a sewing tail. Keep the upper edge available for attaching beneath the collar; do not add extra increase or decrease rounds.
Feet and legs: make two in plum
The feet start with a small oval around a chain, then narrow into the legs.
| Round | Instructions | Stitches |
|---|---|---|
| 1 | Ch 4. Starting in the second ch, sc in the next 2 chains, 4 sc in the last chain, then work along the other side of the chain with sc in the next 2 positions. | 8 |
| 2 | Sc, inc, inc in each of the next 4 sts, sc, inc. | 14 |
| 3 | Sc in the next 4 sts, dec 4 times, sc in the last 2 sts. | 10 |
| 4 | Sc in the next 4 sts, dec twice, sc in the last 2 sts. | 8 |
| 5–9 | Sc in each stitch around. | 8 |
Foot checkpoint: round 2 has six increases altogether: one near the start, four together, and one at the end. Eight starting stitches therefore become 14. Round 3 consumes all 14 stitches and leaves 10; round 4 consumes 10 and leaves 8.
Finish both legs with sewing tails. Compare them before attaching: the toes should face the same direction when the doll sits, with the tops of the legs placed symmetrically.
6. Add the scalloped collar
With plum, chain 38.
- Skip 2 chains. In the next chain, work 2 dc, 1 tr, 2 dc, all into that same chain.
- Skip 2 chains, then sl st into the next chain.
- Repeat steps 1–2 four more times, making five scallops in total.
Foundation-chain note: the supplied pattern starts with 38 chains but its five written scallops use 30. Keep the remaining 8 chains as an unworked end rather than inventing another scallop. When fitting the collar, tuck that short chain end to the back and secure it beneath the collar during sewing. This finishing clarification preserves the source's chain count and five-scallop sequence.
Wrap the collar around the neck join to check the fit. Arrange the scallops outward without pulling the strip so tightly that it squeezes the head and body together. Set it aside for attachment after the arms are sewn on.
7. Make the stem cap, stem, and vines
Stem cap in brown
This small cap sits on top of the pumpkin head; it is not a pointed witch hat.
| Round | Instructions | Stitches |
|---|---|---|
| 1 | 8 sc into an MR. | 8 |
| 2 | Inc in every stitch. | 16 |
| 3 | Repeat (sc, inc) 8 times. | 24 |
| 4 | Work 24 sc in BLO. | 24 |
| 5 | Sc in each stitch. | 24 |
| 6 | In FLO, repeat (sc in next 2 sts, inc) 8 times. | 32 |
Finish with a tail for sewing the cap to the head.
Stem and two vines
With brown, work 6 sc into an MR for round 1. Work 6 sc in each of rounds 2–6. Close with a slip stitch.
Join green at the stem:
- First vine: ch 16. Starting in the second chain from the hook, work 15 sc back along the chain. Sl st to the stem.
- Second vine: from the joining point, ch 21. Starting in the second chain, work 20 sc back along the chain. Sl st to the stem and finish.
Gently arrange the two cords into loose curls. Do not increase along the chains to force a tight corkscrew: the source uses one sc per chain.
Sew the stem to the center of the cap. Check the position of the completed cap on the head, leaving the face unobstructed, and keep its sewing tail for final assembly.
8. Assemble and finish your Halloween doll
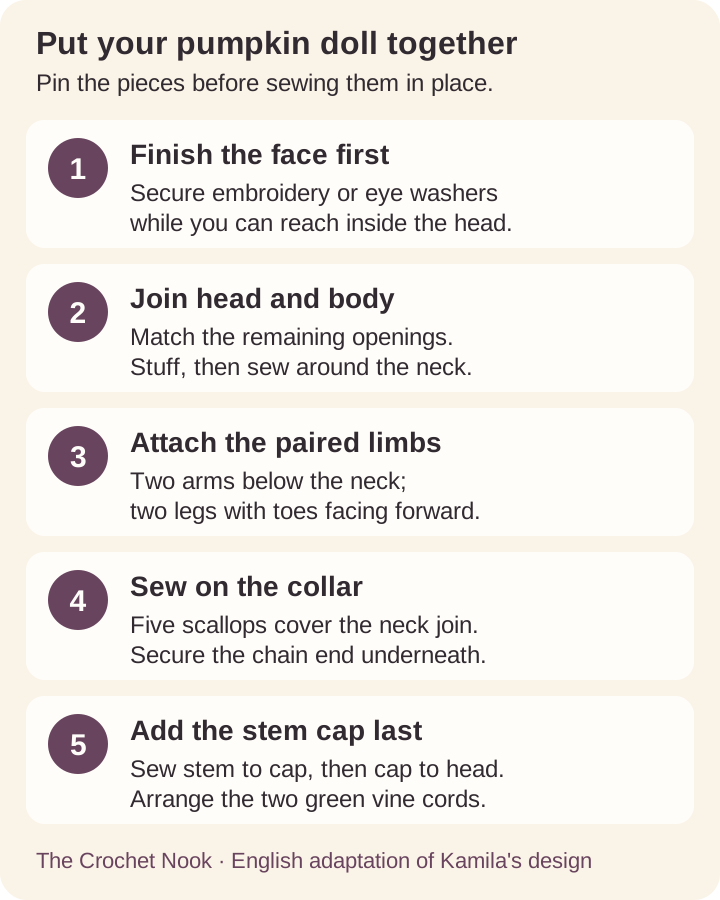
Set the joined head and body on a flat surface. Mark the arm and leg positions before committing to a seam.
- Sew the arms to opposite sides of the upper body, just beneath the collar position.
- Attach the legs evenly at the lower body, with the feet pointing forward.
- Sew on the collar, concealing the neck seam and its unused chain end.
- Attach the stem-and-cap unit to the head and arrange the vines.
- Check the face, weave in loose ends, and reshape the stuffing gently by hand.
Check every attachment with a gentle pull. Display the finished doll on a stable shelf or beside an unlit decorative lantern, away from an open flame.
Tips & troubleshooting
My stuffing shows through. Check the fabric before adding more filling. Overstuffing spreads stitches apart; loose tension can also leave gaps. For a new piece, try a slightly smaller hook and compare the fabric. Do not fix gaps by pulling sewing yarn so hard that it cuts into the crochet.
My head looks like a cylinder. Confirm that the first and last rows were joined, and that you gathered the two row-end openings. Spread the filling through the sides of the pumpkin rather than packing one hard lump down its center.
My feet do not match. Count after rounds 1–4: 8, 14, 10, 8. Place the round marker consistently and check that the four consecutive increases in round 2 were worked into four separate stitches.
The collar has leftover chains. That is the 38-chain/five-scallop difference explained in step 6. Keep five scallops and secure the remaining chain end underneath at the back.
The head wobbles. Check that the neck openings are joined all the way around and the filling supports the join. Reinforce a loose seam with small stitches into both pieces, rather than simply pulling the collar tighter.
Frequently Asked Questions
Is this pumpkin doll pattern suitable for beginners?
It suits a confident beginner who can work single crochet, identify back loops, follow increases and decreases, and sew separate pieces together. The collar also uses double and treble crochet. If these are new to you, practice the stitches first or start with our simpler ribbed pumpkin decoration.
Is this a no-sew Halloween crochet pattern?
No. You sew the ribbed panels into tubes, join the head and body, and attach the arms, legs, collar, and stem cap. Planning a separate assembly session makes the small pieces easier to position neatly.
Can I change the colors without changing the pumpkin shape?
Yes, using different colors of the same yarn keeps the construction the same. The plum-and-orange option changes the palette while retaining the source stitch counts. Changing yarn thickness, hook size, or stitch tension can change the dimensions and proportions.
What yarn and hook should I use for a 14 cm pumpkin doll?
The original sample uses YarnArt Jeans and a 3 mm hook and is approximately 14 cm tall. Those materials are a starting point, not a size guarantee, because the PDF does not give a measured gauge. Use a firm fabric and measure your own finished doll.
Can I use chenille or blanket yarn?
You can experiment, but this version has not been sized for those yarns. Thicker yarn will make larger pieces, and the narrow six-stitch arms and stem may be harder to work neatly. Choose a suitable hook and check every attachment and facial placement on your own version.
Can I embroider the eyes instead of using safety eyes?
Yes. Embroider small black eyes with optional cream highlights. Add and secure the embroidery while you can reach the inside of the head. Embroidery avoids plastic eye hardware, but it does not by itself make the whole doll suitable for a baby.
More Halloween crochet projects to make next
Build a small autumn display around your pumpkin doll, or choose a different construction for your next project:
- More pumpkins: our crochet pumpkin pattern for fall decor explains a ribbed decoration in three size options.
- A smaller hanging project: make a crochet ghost keychain.
- Something to hold treats: try the pumpkin and cat Halloween candy baskets.
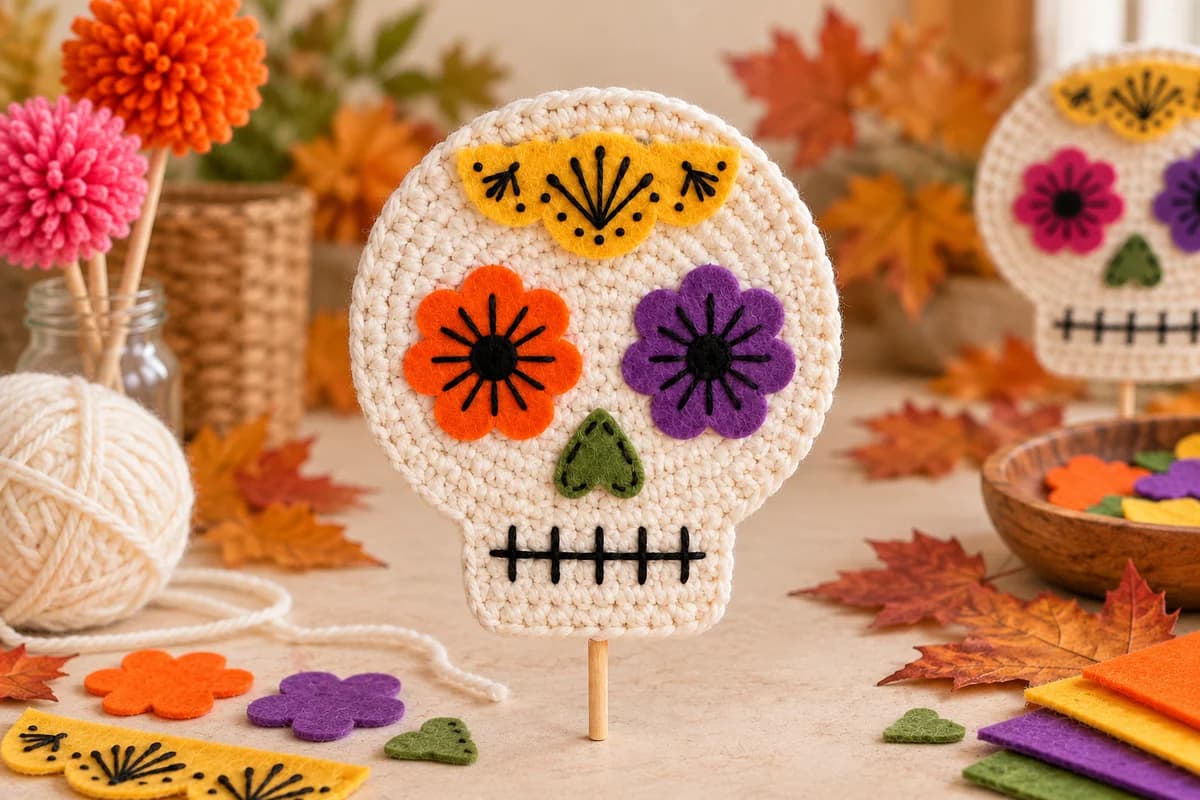
- A flat Halloween decoration: follow the crochet skull pattern.
- More characters to browse: explore our Halloween amigurumi collection.
Make a Pumpkin Bear companion
For a different pumpkin character with rounded ears and a bear face, visit our free Pumpkin Bear PDF signup section. Sign up and confirm your email to receive the printable guide and occasional crochet emails. It is a separate project, not a download of this pumpkin doll adaptation.
Essential crochet guides
Maker notes
Questions or finished-project notes?
Share what helped, ask about a step, or leave a thoughtful note for the next maker.
Loading maker notes...