Crochet Pumpkin Hat Pattern: Jack-o'-Lantern Beanie
Crochet a ridged pumpkin hat with a black stem, curly vines, and sewn felt face. Follow clear round counts, post-stitch help, and fit checks.

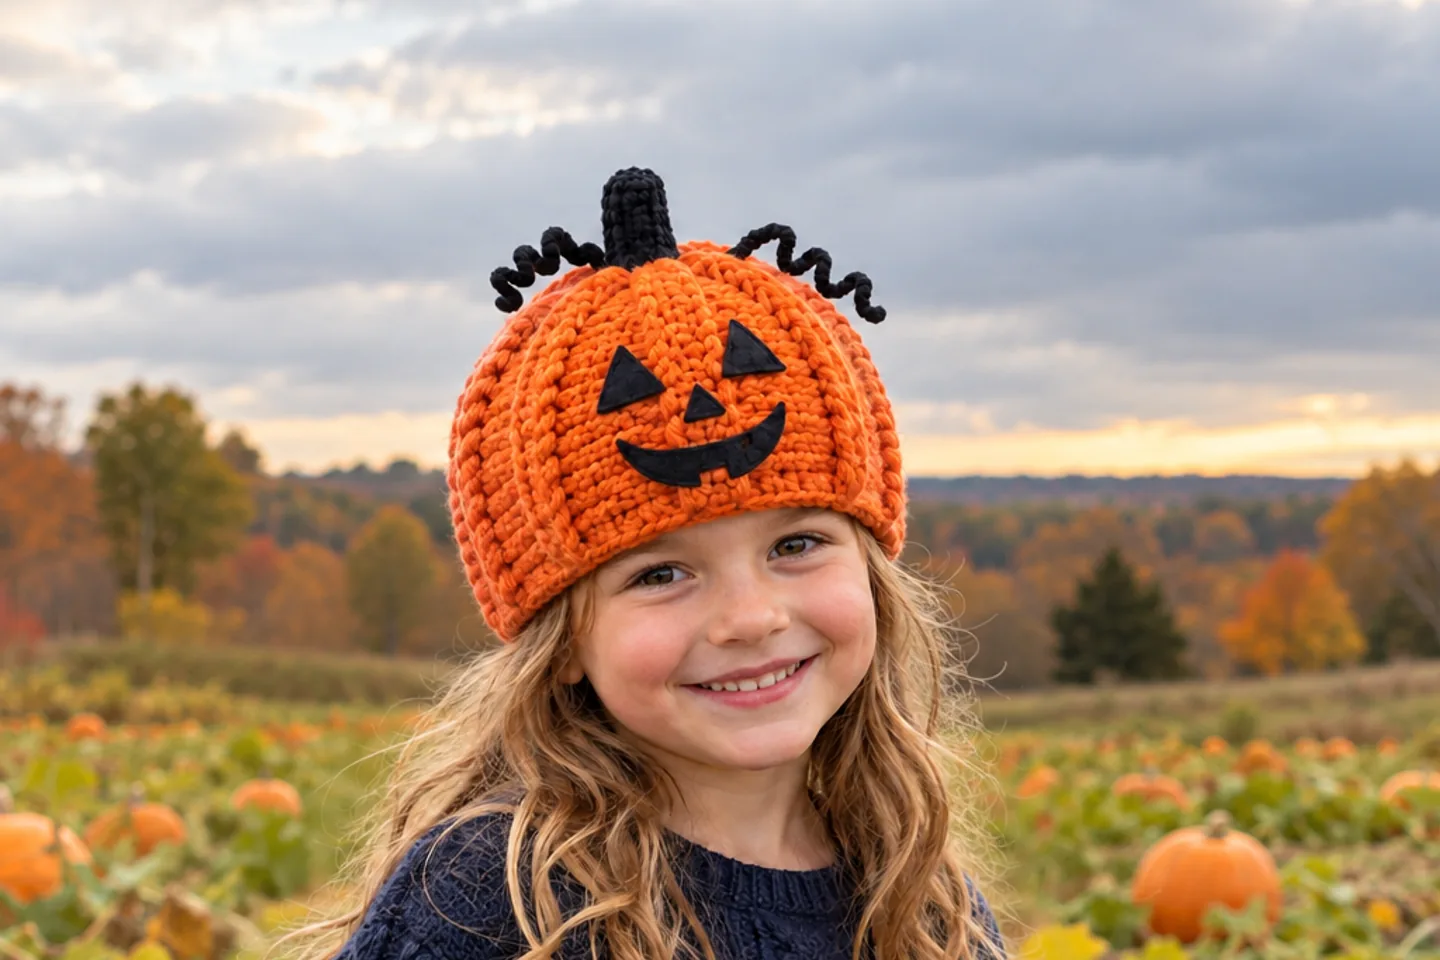
This crochet pumpkin hat pattern turns a black stem into an orange, eight-ridge jack-o'-lantern beanie. You work downward in joined rounds, then add two curling vines and stitch on a felt face. The post stitches take a little practice, but the count checkpoints below make the Halloween costume project easier to follow.
This tutorial explains Jessie Rayot's Jack-o'-Lantern Hat for Red Heart, published by Yarnspirations. The design and underlying pattern are theirs. Keep the original free Red Heart pattern available alongside these teaching notes. The stitch totals, gauge, materials, and finished-size estimate below come from the supplied Red Heart PDF, RHC0316-018943M, last updated August 1, 2019. The photograph on this page illustrates the intended details; use the written instructions and your own gauge to judge the actual fit.
Before you start: size, skill, and yarn
The publisher describes this as an easy pattern and gives one size, about 20 in / 51 cm around. There is no child-age grading in the PDF. The person who wears it should be measured around the head where the lower edge will sit. A comfortable try-on matters more than the model's apparent age in a photograph. At the stated gauge, 56 stitches at 11 stitches per 4 in / 10 cm calculate to about 20.4 in / 51 cm before any stretch or finishing. That calculation supports the publisher's estimate; it is not a measured Crochet Nook sample.
You should be comfortable with double crochet, joined rounds, and counting stitches. The new technique is crocheting around a stitch post, rather than only into its top loops. If those basics are new, use our crochet stitch guide and pattern-reading guide first.
The source specifies one 3.5 oz / 100 g ball each of Red Heart Reflective in Black (8012) and Neon Orange (8251). Each source ball contains 88 yd / 80 m. Yarnspirations lists the Reflective shades as discontinued, so if you substitute another bulky/weight-5 yarn, check the yardage on its label and make a gauge swatch. A substitute will not have the original yarn's flash-reflective effect unless its own label says so. Do not assume that two yarns marked weight 5 will make the same-sized hat.
Materials checklist
- Orange bulky/weight-5 yarn for the pumpkin and black bulky/weight-5 yarn for the stem and two vines; the quantities above are the publisher's, not measured substitutes.
- 6 mm / US J-10 crochet hook as the starting size; adjust to match gauge.
- Black craft felt, black sewing thread, and a sewing needle for the face.
- Yarn needle, scissors, tape measure, and removable stitch markers.
Gauge and fit check
The source gauge is 11 stitches and 7 rows over 4 in / 10 cm in the double-crochet/front-post-double-crochet texture. Make a swatch larger than 4 in / 10 cm using the chosen orange yarn, then measure across its center without stretching it. If you get more stitches in 4 in, try a larger hook; if fewer, try a smaller hook. Check the height too. The hat has a fixed 12 orange rounds, so row height affects how far its lower edge reaches.
If the finished hat is for a particular child, measure their head before starting and try the hat on before sewing the face. This one-size design does not supply a verified method for grading it to every head size. Do not add or remove increases at random: doing so changes the eight-ridge repeat and the counts below.
US abbreviations and post stitches
This pattern uses US terms throughout.
| Term | Meaning |
|---|---|
| ch, sl st | Chain, slip stitch |
| hdc, dc | Half double crochet, double crochet |
| FPdc | Front-post double crochet: work around the vertical post of the indicated stitch |
| FPhdc | Front-post half double crochet: same hook path, finished as an hdc |
| A, B | Black stem/vine yarn, orange pumpkin yarn |
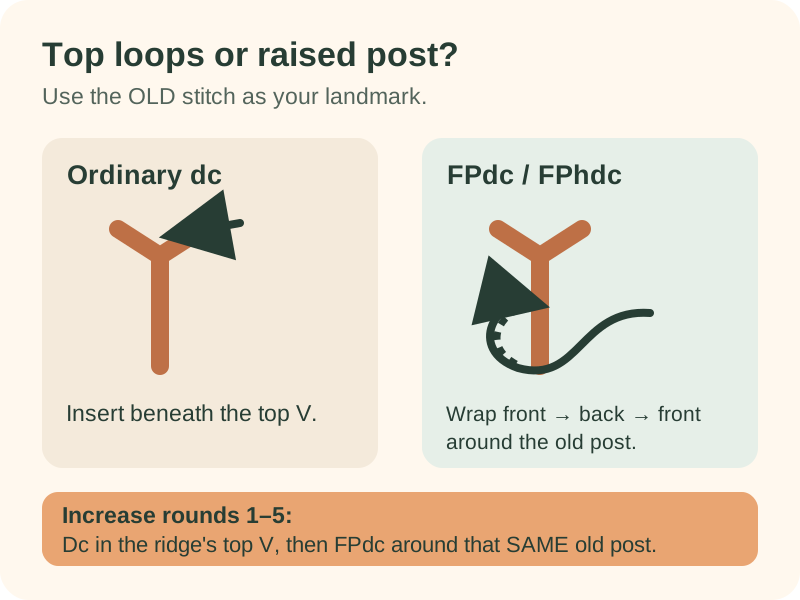
For an FPdc, yarn over and pass the hook from the front to the back, then back to the front around the vertical body of the indicated old stitch. Pull up a loop; yarn over and draw through two loops twice. For an FPhdc, use the same front-to-back-to-front path, pull up a loop, then yarn over and draw through all three loops. These stitches wrap the existing post and lift it into a ridge; they do not go under the two top loops.
In orange increase rounds 1-5, you sometimes make a dc in the top of an old FPdc and then another FPdc around that same old post. Those are two new stitches made from one old ridge location. Do not work the second stitch around the new dc you just made.
How the joined rounds work
Start at the black stem and work toward the orange lower edge. Do not turn after a round. Join with a slip stitch into the top of that round's beginning chain. In stem rounds 1-6, ch 2 counts as the first hdc. In stem round 7 and orange rounds 1-10, ch 3 counts as the first dc. Orange rounds 11-12 return to ch 2 counting as the first hdc. A joining slip stitch never adds a stitch. Mark the first raised post at the join and move that marker upward as you work.
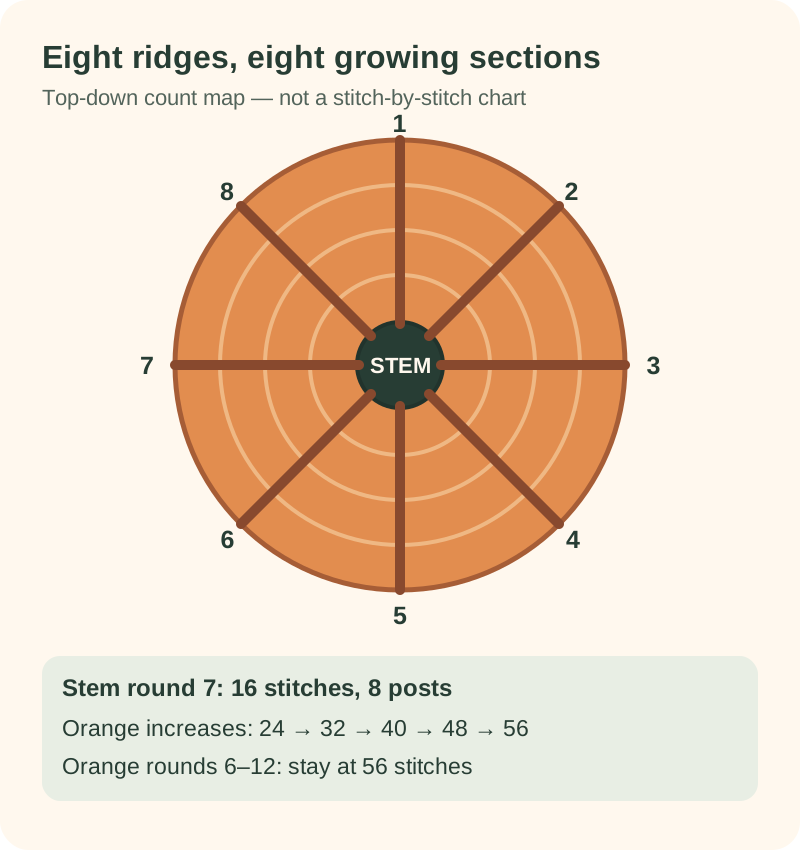
The eight raised posts divide the pumpkin into eight sections. Orange rounds 1-5 add one stitch in each section, moving the body from 16 to 56 stitches. Rounds 6-12 keep 56. The source places an extra ordinary dc in the same old stitch under the joining slip stitch at the end of orange increase rounds 1-5; this is intentional and helps complete the section that straddles the join. Do not mistake the slip stitch itself for that old stitch.
Crochet the black stem
Use black yarn A. Leave a 10 in / 25.5 cm starting tail, chain 4, and slip stitch into the first chain to make a ring.
- Stem round 1: Ch 2 (counts as one hdc). Into the center ring work one hdc, five dc, and one hdc. Join into the top of the starting ch 2. 8 stitches.
- Stem rounds 2-6: For each round, ch 2 (first hdc), FPhdc around the next stitch, FPdc around each of the next five stitches, and FPhdc around the last stitch. Join into the top of the starting ch 2. 8 stitches every round. The post stitches give the short stem its raised texture.
- Stem round 7: Ch 3 (first dc). Work one FPdc around the beginning ch 2 from stem round 6. Seven times, work a dc in the next stitch and an FPdc around that same old stitch's post. Join into the top of the starting ch 3. 16 stitches: the initial dc/post pair plus seven more pairs.
Fasten off black. Leave its long starting tail for curving the stem during finishing. Each of the eight FPdc in stem round 7 is a ridge anchor for the orange hat.
Crochet the orange pumpkin body
Attach orange yarn B in the first stitch of stem round 7, the stitch under its join. Leave a long tail to weave in later. The pattern now grows outward by eight stitches per round for five rounds.
For each orange increase round 1-5, begin with ch 3 (the first dc), work FPdc around the first old ridge post, follow the seven-section repeat in the table, then work the listed ordinary dc stitches after the repeat. Join into the top of the starting ch 3. Here, “top + post” means dc into the top of the old FPdc, then FPdc around that same old FPdc.
| Orange round | Repeat this section 7 times after the first ridge | Finish before joining | Total |
|---|---|---|---|
| 1 | Dc in next 1 dc; top + post of next ridge | Dc again in the old starting stitch beneath the join | 24 |
| 2 | Dc in next 2 dc; top + post of next ridge | Dc in next 1 dc; dc in old starting stitch | 32 |
| 3 | Dc in next 3 dc; top + post of next ridge | Dc in next 2 dc; dc in old starting stitch | 40 |
| 4 | Dc in next 4 dc; top + post of next ridge | Dc in next 3 dc; dc in old starting stitch | 48 |
| 5 | Dc in next 5 dc; top + post of next ridge | Dc in next 4 dc; dc in old starting stitch | 56 |
Why the last stitch goes back to the start: the first ridge sits immediately after the beginning chain, so its eighth section crosses the join. That final dc is into the original first stitch, not into the joining slip stitch or the new chain. There should still be eight raised posts after every round. If your count is off by one, check this location first.
For orange rounds 6-10, no more increases are needed. On each round: ch 3, FPdc around the first ridge; seven times work dc in the next six dc, then FPdc around the next ridge; dc in the last five dc and join to the top of ch 3. Each round remains 56 stitches. Count the eight posts as stitches; do not add a dc into the top of each post in these even rounds.
For orange round 11, ch 2 (counts as an hdc), then FPhdc around the first old FPdc. Seven times, work hdc in the next dc, dc in the next four dc, hdc in the next dc, FPdc around the next old FPdc. Finish with hdc in the next dc and dc in the last four dc; join to the top of ch 2. 56 stitches. This round softens the fabric toward the lower edge without changing the count.
For orange round 12, ch 2 (first hdc), then FPhdc around the first old FPhdc. Seven times, work hdc in the next hdc, dc in the next four dc, hdc in the next hdc, FPhdc around the next old FPhdc. Finish with hdc in the next hdc and dc in the last four dc; join to the top of ch 2. 56 stitches. Fasten off orange.
Round-count checklist
| Stage | Stitch total | Ridge posts to locate |
|---|---|---|
| Stem rounds 1-6 | 8 | Textured stem, not yet eight orange sections |
| Stem round 7 | 16 | 8 FPdc anchors |
| Orange rounds 1-5 | 24, 32, 40, 48, 56 | 8 per round |
| Orange rounds 6-10 | 56 each | 8 per round |
| Orange round 11 | 56 | First ridge is FPhdc; next 7 are FPdc |
| Orange round 12 | 56 | All 8 ridge positions are FPhdc |
If you accidentally make both a top dc and a post stitch in an even round, you will grow beyond 56. If you omit a post stitch in an increase round, one ridge will vanish. Correct the affected round before continuing.
Make two black curly vines
The vines are separate pieces, sewn at the base of the stem after the orange body is complete. Use black yarn A. A chain-2 at the start of each vine's working row counts as one hdc; those two skipped chains are not two separate stitches.
- First vine: Ch 12. Work three hdc in the third chain from the hook. Then work four hdc in each of the nine remaining chains. The skipped ch-2 counts as one hdc, so the total is 1 + 3 + (9 × 4) = 40 hdc. Fasten off with a long sewing tail.
- Second vine: Ch 15. Again work three hdc in the third chain from the hook, then four hdc in each of the 12 remaining chains. Total: 1 + 3 + (12 × 4) = 52 hdc. Fasten off with a long sewing tail.
The dense increases naturally coil the chains. Let them curl; do not pull them straight while checking their shape. Count the first skipped ch-2 once, not as two stitches.
Sew the face and finish the hat
- Thread the starting black stem tail through a yarn needle. Sew it down through the beginning chains, draw it only slightly to curve the stem, then secure and weave the tail inside the hat.
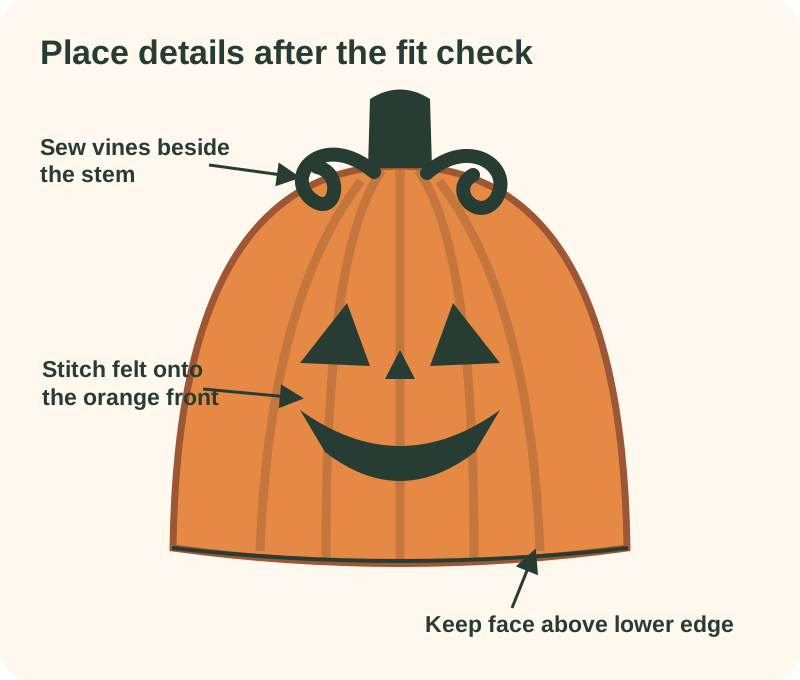
- Sew each vine at the base of the stem with its long tail. Keep both vines near the crown, away from the face and lower edge. Weave in the yarn ends on the inside.
- Cut a jack-o'-lantern face of your choice from the black felt. Try paper shapes first if you want to adjust the expression. Place the pieces on the front orange panel, pin them, and try the hat on to check that the face is visible and the lower edge stays clear of the eyes.
- Hand stitch the felt securely with black thread. Check the edges for loose corners before a child wears it. The source specifies stitching, not relying on adhesive alone. Weave in the remaining orange tail.
Customizing without losing the pattern count
Changing the felt expression or orange shade does not change the crochet. You can also omit the face for a plain fall pumpkin hat, while keeping the eight ridges, black stem, and vines. A different yarn weight will change gauge and size; swatch and measure rather than assuming this 56-stitch body will still be 20 in / 51 cm around. The discontinued reflective yarn's flash effect is a property of that yarn, not of the stitch pattern.
If you need a substantially smaller or larger hat, choose a pattern actually written and checked for that size instead of cutting out arbitrary eight-stitch increase rounds from this one-size design. Our bucket-hat fit guide shows a separate made-to-measure construction, but it is a different hat.
Tips & troubleshooting
A ridge disappears or doubles
Recount the eight posts at the end of the previous round. In orange rounds 1-5, the “top + post” pair both refer to one old ridge. In rounds 6-10, work only a post stitch around each old ridge, with no extra top dc there.
My total is one stitch too many or too few
Check the start of the joined round. The beginning ch 3 or ch 2 already counts as one stitch; the joining slip stitch never counts. In orange rounds 1-5, the final dc returns to the first old stitch beneath the join, not the slip stitch.
The hat does not fit as expected
Compare your orange post-stitch gauge with the publisher's 11 stitches and 7 rows per 4 in / 10 cm. Measure the actual lower circumference and depth. This is a one-size source pattern, and a child's age is not enough to guarantee fit.
The vines seem to have the wrong count
The skipped two starting chains count as one hdc. Work three hdc in the third chain and four in each remaining chain. That makes 40 or 52, depending on which vine you chose.
Frequently Asked Questions
Is this a beginner crochet pumpkin hat?
It is suitable for a confident beginner who knows basic stitches and can practice FPdc and FPhdc. The post-stitch placement is more demanding than a plain double-crochet beanie, so make a short swatch first if it is new to you.
Do I join or work in a spiral?
Join every round to the top of its beginning chain; do not turn. The beginning chain counts as the first stitch of that round. Mark the first raised post to keep the eight ribs aligned.
Can I glue the felt face?
The source instructs you to hand stitch the felt. Secure the edges with thread so corners do not lift during wear; a glued face alone does not follow this pattern's finishing method.
Will another orange yarn reflect camera flash?
Only if that yarn itself has a reflective strand. The original Red Heart Reflective shades are discontinued according to the publisher. A regular bulky orange yarn can make the hat, but should not be described as reflective.
More Halloween crochet projects
For a different costume hat shape, try our crochet witch hat pattern. Match the jack-o'-lantern theme with a pumpkin candy basket, or crochet ribbed pumpkin decorations for a seasonal display. For smaller projects, browse the Halloween amigurumi ideas.
Essential crochet guides
Maker notes
Questions or finished-project notes?
Share what helped, ask about a step, or leave a thoughtful note for the next maker.
Loading maker notes...