Halloween Crochet Candy Baskets: Pumpkin and Black Cat
Crochet a pumpkin or black-cat Halloween candy basket with clear inner and outer basket steps, stitch counts, handles, ears, and finishing tips.

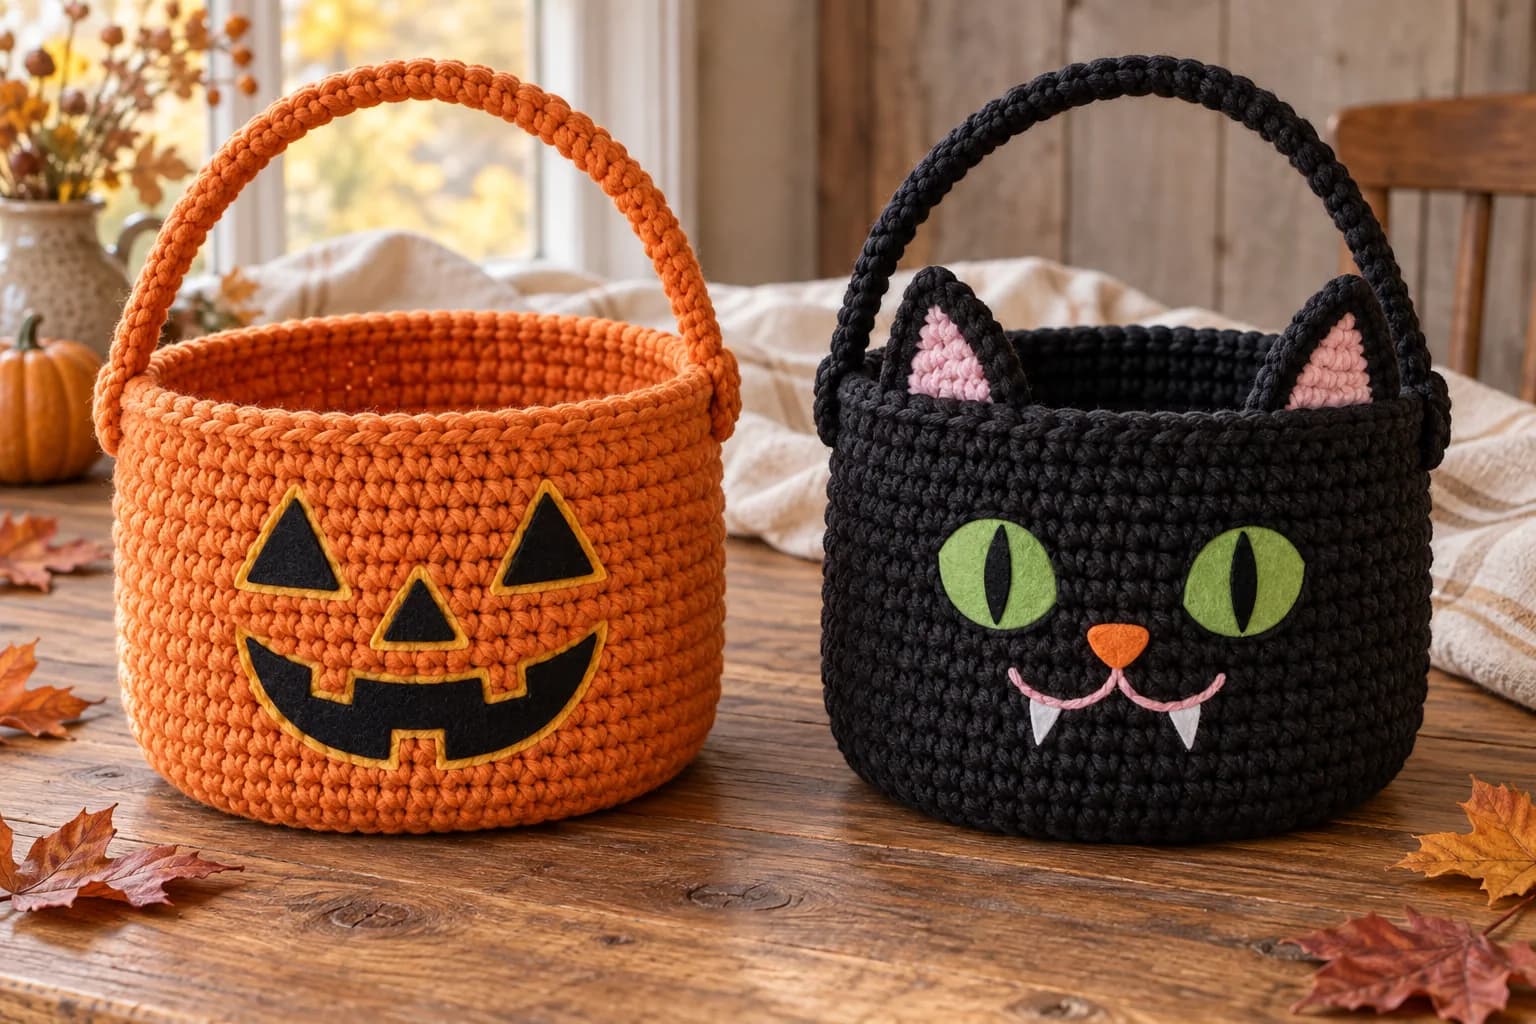
A crochet Halloween candy basket can be more than a plain tote. Bernat's Happy Hauntings Crochet Candy Baskets design makes the same round basket in two costumes: an orange jack-o'-lantern or a black cat with pointed ears. Both have a carrying handle and a double-layer body that hides a little stuffing between the inner and outer walls.
This is an annotated guide to Bernat's design, published by Yarnspirations, with no claim that The Crochet Nook designed or physically made these baskets. The project measurements, yarn amounts, and core counts below come from its June 29, 2026 PDF, BRC0503-39842M. Keep the original Yarnspirations candy-basket pattern open for its stitch charts and printable felt-face templates. Our construction diagram, count checkpoints, and assembly notes explain the places where that compact PDF asks you to infer the next step.
Choose your basket: make the pumpkin in orange or the black cat in black. The body and handle instructions are shared; only the cat adds crocheted ears. You need one floral ring and the listed yarn quantity for each basket. If you want both, plan for two rings and both yarn colors.
Project facts and supplies
| Item | Pumpkin | Black cat |
|---|---|---|
| Bernat Softee Chunky, weight 6 | Pumpkin (28630) | Black (28040) |
| Publisher's yarn quantity | 3 balls, about 260 yd / 238 m | 3 balls, about 260 yd / 238 m |
| Finished size, excluding handle and ears | About 9½ in / 24 cm across and 7 in / 18 cm tall | Same |
| Additional shaping | Felt jack-o'-lantern face | Two crochet ears and felt cat face |
Each specified ball is 100 g and contains about 108 yd / 99 m. The three-ball figure is a publisher estimate for one basket, not a measured Crochet Nook sample. Leave extra yarn for a gauge swatch and any handle adjustment.
For either version, gather an 8 mm / US L-11 hook, a blunt yarn needle, an 18 cm / 7 in diameter metal floral ring for the rim, a little fiberfill, scissors, a tape measure, and removable stitch markers. The pumpkin uses black and yellow felt. The cat uses lime-green, black, pink, orange, and white felt. The source attaches the felt with hot glue; you may also need matching sewing thread if you choose to secure details with stitches. Check that the ring is smooth and undamaged before crocheting around it.
The publisher gives a gauge of 8 single crochet stitches and 9 rows over 4 in / 10 cm. Check a reasonably large single-crochet swatch before starting. At this gauge, the 42-stitch rim has an approximate 21 in / 53 cm fabric circumference, close to the circumference of a 7 in ring; the 60-stitch outer wall widens to about 30 in / 76 cm, or roughly 9½ in across. Those are calculations from the stated gauge, not measured finished samples. If your swatch is much denser or looser, adjust the hook before expecting the same proportions.
Read the two-layer construction first
The first round of 42 sc is worked around the metal ring. On the next pass, work into the back loops of those 42 stitches to start the inner wall. After closing the inner bottom, return to the unused front loops of that original 42-stitch round to grow the wider outer wall. The two walls remain joined at the rim. They are not two separately crocheted bags that you sew together at the top.
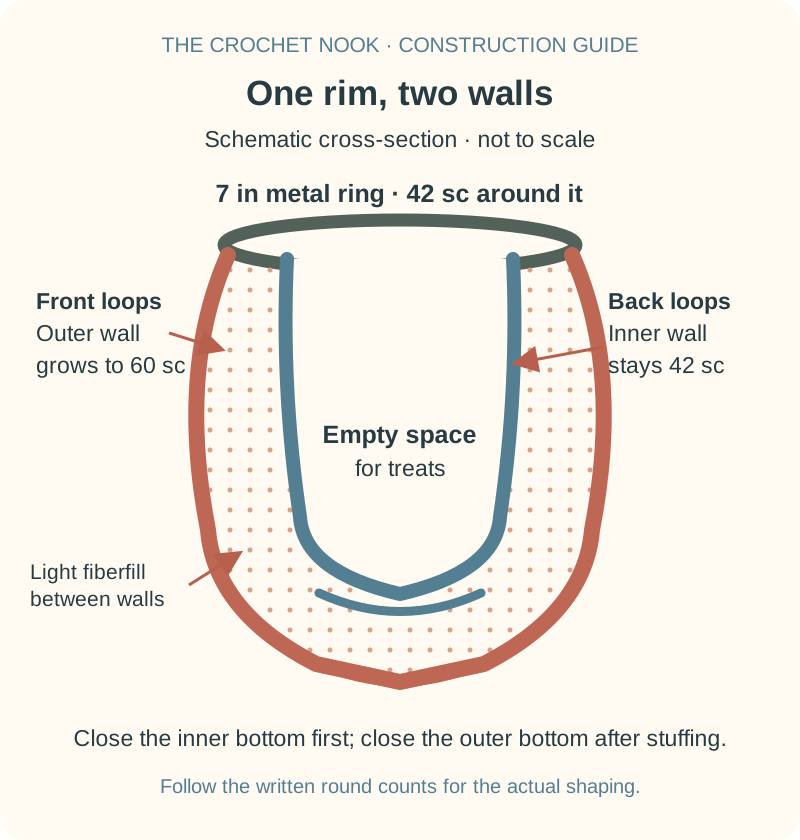
The diagram shows which loops belong to each wall, not a measured cross-section or every stitch in a round. Read the counts below while you work. The inner wall stays at 42 stitches; the outer wall expands to 60 before both bottoms are decreased separately.
These instructions use US terms. ch means chain, sc means single crochet, sl st means slip stitch, and sc2tog means single-crochet two stitches together, consuming two stitches and producing one. For sc3tog, draw up a loop in each of three successive stitches, yarn over, then draw through all four loops on the hook. A beginning ch 1 never counts as a stitch here. Join each completed round with a slip stitch to its first single crochet, then ch 1 to start the next round. Mark that first sc so a join cannot be mistaken for an extra stitch. If joining or repeats are new to you, our pattern-reading guide explains the notation.
Shared basket body: make once for each color
Work every step in this section in orange for the pumpkin or in black for the cat. If making both baskets, repeat the whole section with a second ring. The stitch-count table is part of the instructions: check each count before moving on.
1. Crochet the rim and inner wall
Attach your yarn to the floral ring with a slip stitch. Chain 1, then crochet 42 sc evenly around the ring and join to the first sc. Spread those stitches around the metal before continuing; bunching them into one area makes the opening uneven.
For the first inner-wall round, ch 1 and work one sc in the back loop of each of the 42 rim stitches. Join. The unused front loops must remain accessible on the outside of the rim. For every following inner-wall round, ch 1, work one sc in each stitch through both loops, and join. Continue until the inner wall measures about 7 in / 18 cm from the beginning at the ring, following the publisher's length checkpoint. Measure vertically without stretching the work. Do not guess a fixed number of wall rounds; row height varies with gauge.
2. Close the inner bottom
The first decrease round uses the back loops only, creating a turn at the bottom edge. In each decrease group, work the stated number of ordinary sc, then work sc2tog across the next two stitches. Join after every round and ch 1 before the next. The table gives one complete repeat and the expected total:
| Inner bottom round | Repeat around | Groups | End count |
|---|---|---|---|
| 1 | 5 sc, sc2tog, using back loops | 6 | 36 |
| 2 | 4 sc, sc2tog | 6 | 30 |
| 3 | 3 sc, sc2tog | 6 | 24 |
| 4 | 2 sc, sc2tog | 6 | 18 |
| 5 | 1 sc, sc2tog | 6 | 12 |
Cut the yarn with a long tail. Thread it through the remaining 12 stitch tops, pull them together, and secure the end. The inner basket is now closed at the bottom, but do not stuff its candy-holding space. Fiberfill goes later between the walls.
3. Expand the outer wall
Find the unused front loops of the original 42 rim stitches, not the loops at the bottom you just closed. Join the same color yarn to the front loop of the first rim stitch. Chain 1 and follow these opening rounds:
| Outer wall round | Repeat or action | End count |
|---|---|---|
| 1 | In front loops only, repeat 6 sc, then 2 sc in next loop, six times | 48 |
| 2 | Repeat 7 sc, then 2 sc in next stitch, six times | 54 |
| 3 | One sc in every stitch | 54 |
| 4 | Repeat 8 sc, then 2 sc in next stitch, six times | 60 |
For Round 1, the six increases use the seventh loop of each group. Working 6 sc and then an increase into that seventh loop consumes all 42 original loops and produces 48 stitches. From Round 2 onward, use both top loops unless a round says otherwise.
Continue with 60 sc per round, joining as before, until the outer wall measures about 7½ in / 19 cm from the ring. It is intentionally a little longer than the inner wall so it can curve around the outside and meet at the bottom. Smooth both walls down before measuring; do not pull one layer taut while leaving the other bunched.
4. Close the outer bottom and add stuffing
Start the outer-bottom decreases from 60 stitches. Each repeat is worked six times around. Stop after Round 5 to add fiberfill lightly into the space between the walls, distributing it around the sides and base. Keep the inner basket hollow for treats and avoid packing the gap so firmly that it distorts the rim.
| Outer bottom round | Repeat around | End count |
|---|---|---|
| 1 | 8 sc, sc2tog | 54 |
| 2 | 7 sc, sc2tog | 48 |
| 3 | 6 sc, sc2tog | 42 |
| 4 | 5 sc, sc2tog | 36 |
| 5 | 4 sc, sc2tog; pause to stuff between walls | 30 |
| 6 | 3 sc, sc2tog | 24 |
| 7 | 2 sc, sc2tog | 18 |
| 8 | 1 sc, sc2tog | 12 |
Leave a long tail, pass it through the remaining 12 stitches, pull closed, and secure it. The inner and outer bottoms close independently. If a row ends with the wrong count, correct that row before narrowing the opening further; stuffing will make the mistake harder to reach.
5. Make and attach one handle
With the body color, ch 31. Work one sc in the second chain from the hook and in every remaining chain: 30 sc. Turn. For Rows 2 and 3, ch 1, sc across all 30 stitches, and turn. Fasten off, leaving tails for sewing. This makes one short, three-row-wide strip per basket.
Choose two points opposite each other on the rim. Mark them before sewing so the handle will sit over the center of the opening rather than pull the basket to one side. Lay each handle end against the outside wall just below the ring and sew firmly through several stitches of both the handle and basket fabric. Sew the second end at its opposite marker without twisting the strip. The publisher says to sew the handle as shown in its photo but does not specify an exact attachment stitch count, so these placement steps are practical guidance, not measured load-testing. Lift the empty basket by the handle, inspect both seams, and rework loose stitches before carrying anything in it.
Pumpkin candy basket
For the pumpkin, work the shared body and handle in Pumpkin orange. Use the jack-o'-lantern templates on page 5 of Yarnspirations' PDF for two eyes, a nose, and a mouth. The source layers smaller black felt shapes over larger yellow ones so a narrow yellow outline remains visible. Check placement with the handle upright: keep the eyes level and the mouth clear of the base curve. Then secure the felt as directed in the original pattern and inspect every edge before use.
No cat ears are needed on this version. If you prefer a simpler face, a pair of triangles and one wide smile still reads as a pumpkin, but that is a styling choice rather than an extra source template.
Black-cat candy basket
For the cat, repeat the entire shared body and handle in Black, using its own metal ring. Then crochet two matching ears:
| Ear row | Work | End count |
|---|---|---|
| 1 | Ch 6; sc in second chain from hook and across; turn | 5 |
| 2 | Ch 1; sc2tog, 1 sc, sc2tog; turn | 3 |
| 3 | Ch 1; sc across; turn | 3 |
| 4 | Ch 1; sc3tog across the three remaining stitches | 1 |
Fasten off with a tail for each ear. Place the two narrow tips along the cat's top edge, one at either side of the face and clear of the handle attachments. Sew through the ear bases and the basket fabric so the ears do not flop forward. The source's page 6 templates show green eyes, black pupils, a pink mouth and inner ears, a small orange nose, and white teeth. Dry-position every piece first. The sample image here illustrates both colorways; follow the source templates for exact felt shapes rather than measuring them from a screen.
Tips & troubleshooting
| If you notice... | Check this before continuing |
|---|---|
| Inner or outer wall twists at the top | Confirm that the inner wall began in the rim's back loops and the outer wall began in its unused front loops. |
| An increase round is one stitch too large | Count the starting ch 1 and joining sl st separately; neither counts as an sc. |
| Bottom decreases stop matching the table | Each decrease round has six groups, and each sc2tog removes one stitch per group. |
| The basket leans when picked up | Check that handle ends are opposite and sewn at the same height. |
| The outer wall looks overfilled | Remove some fiberfill from between the layers before closing the last rounds. |
| A felt detail lifts at an edge | Reattach it before use. Felt and glue need inspection, particularly on a carried children's accessory. |
The rim is rigid metal and the decorations are small attached pieces. Keep sharp or damaged rings out of the project; let an adult handle any hot glue, and check handle seams and facial pieces each time the basket is used. Do not treat either a glue bond or a paper-reviewed handle as a guarantee of durability under a heavy candy load. For a different bag construction with an oval base and open mesh, see our crochet market tote pattern.
Frequently Asked Questions
Do the pumpkin and cat need different body patterns?
No. Each uses the same 42-stitch rim, 42-stitch inner wall, 60-stitch outer wall, and 30-stitch handle rows. Change the yarn color, then add the face for that character. The cat alone gets two crocheted ears.
Is this a good first crochet project?
It is rated easy by the publisher, but it asks you to recognize front and back loops, make joined rounds, follow six decrease groups per round, and attach a handle. A confident beginner can follow it with markers and the count tables. If you are still learning single crochet, start with our beginner crochet tutorial first.
Where does the stuffing go?
Only between the inner and outer basket walls, after the outer bottom has decreased to 30 stitches. Keep the inner cavity empty so it can hold treats. The diagram above shows this relationship, not a suggested amount of fiberfill.
Can I skip the metal ring or use thinner yarn?
Those changes alter the opening, gauge, and shape. This guide's counts and the publisher's measurements assume the specified 7 in / 18 cm ring and a comparable super-bulky yarn. A ring-free or finer-yarn basket needs a separately checked design; do not expect the same dimensions from a direct swap.
Where can I get the felt shapes and stitch charts?
Use the original Bernat/Yarnspirations Happy Hauntings pattern. Its PDF has the pumpkin felt templates on page 5 and the cat templates on page 6, plus stitch charts for both layers. The written instructions here add count and assembly guidance while crediting the original design.
More Halloween crochet projects
Pair a basket with our crochet witch hat guide, or make a small crochet pumpkin decoration for a table display. The Halloween amigurumi collection links to eight separate character projects if you would rather crochet a decoration than a carrying bag.
Essential crochet guides
Maker notes
Questions or finished-project notes?
Share what helped, ask about a step, or leave a thoughtful note for the next maker.
Loading maker notes...