Crochet Witch Hat Pattern for Halloween: Rows, Brim & Fit
Make a crochet witch hat for Halloween with a pointed crown and ruffled brim. Follow clear row instructions, stitch counts, seaming tips, and fit checks.

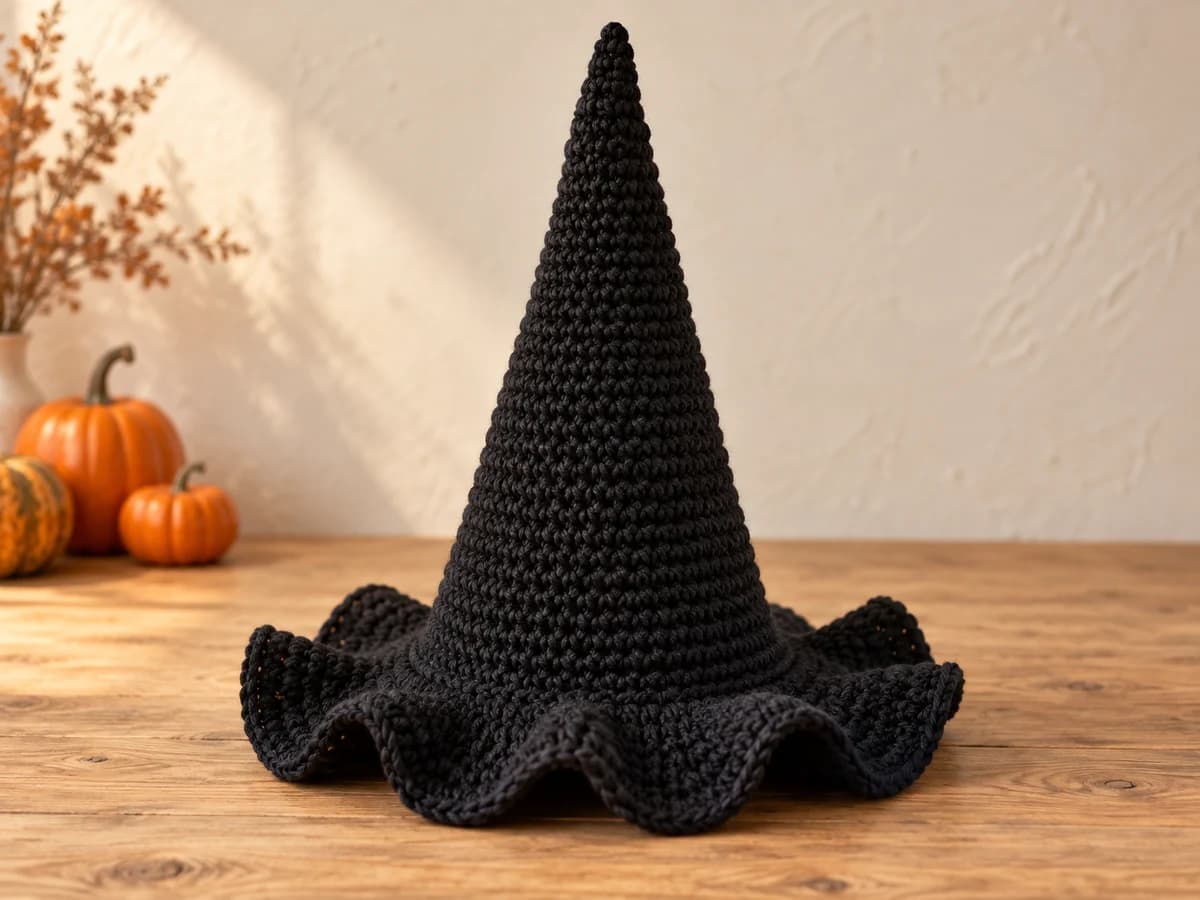
A tall point and a rippling brim give this crochet witch hat its Halloween character. The construction may surprise you: the hat is crocheted in back-and-forth rows, then sewn along the back. You do not need to work a continuous spiral or join every row into a round.
This article explains Red Heart's Crochet Witchy Hat, published by Yarnspirations, using rewritten directions and additional counting, fitting, and finishing help. The original design is theirs. Keep the original Witchy Hat pattern and stitch charts available alongside this guide; the publisher currently provides the PDF free. The instructions below follow the supplied November 4, 2024 version, RHC0816-37484M.
Before choosing a size: the larger sizes' stated head measurements and stitch counts need a careful fit check. We explain the discrepancy below and retain the source counts rather than inventing a new grading system. Read that section before buying yarn or starting a costume for someone else.
What you need to know before starting
The cone uses single crochet, with an increase row separated from the next increase row by three ordinary rows. The brim switches to double crochet and expands much faster, producing soft ruffles. A final single crochet row finishes the edge, and one back seam closes both the cone and brim.
This is a manageable project if you can count stitches, turn rows, and sew a seam. Black yarn makes counting harder, so use a bright task light and mark the first and last stitch of each row. If these are your first crochet stitches, practice with light-colored yarn using our crochet beginner tutorial.
Materials and yarn quantities
The source specifies Red Heart Super Saver in Black (0312), a medium weight 4 acrylic yarn. Its listed ball contains 364 yards / 333 meters in 198 g. One ball covers each of the source's stated yarn quantities:
| Source size | Listed yarn use | Metric yarn use |
|---|---|---|
| S | 114 yards | 104 meters |
| M | 129 yards | 118 meters |
| L | 143 yards | 131 meters |
| XL | 157 yards | 144 meters |
These are the publisher's quantities, not measurements from a Crochet Nook sample. Allow extra for a swatch or changes to the design. If you substitute yarn, compare yardage and fabric firmness as well as the weight label; a very soft yarn can produce a cone that bends rather than stands upright.
You also need:
- A 5.5 mm / US I-9 hook as the starting size, adjusted to match gauge.
- A blunt yarn needle and scissors.
- Removable stitch markers, including markers for row ends.
- A tape measure and a row counter or notebook.
- Spare contrasting yarn for temporarily joining the back edges during the fit check.
The basic hat has no wire, buckle, or separate band. Keep the first version simple so extra decoration does not hide a fit or construction problem.
Gauge, sizing, and the important fit check
The published gauge is 12 single crochet stitches and 15 rows over 4 inches / 10 cm. Make a swatch larger than that measurement, measure in its center without stretching, and check both stitch and row gauge. More stitches in the same width means tighter fabric; fewer means looser fabric. Try a different hook and measure again rather than forcing your hands to maintain an uncomfortable tension.
The PDF labels its sizes by intended head circumference. However, the final cone counts imply the following approximate widths at its stated stitch gauge:
| Source size | Publisher's intended head circumference | Cone stitches before brim | Calculated flat width before seaming |
|---|---|---|---|
| S | 16 in / 40.5 cm | 48 | About 16 in |
| M | 18 in / 45.5 cm | 60 | About 20 in |
| L | 20 in / 51 cm | 72 | About 24 in |
| XL | 22 in / 56 cm | 78 | About 26 in |
The calculation is stitch count ÷ 12 × 4 inches. It estimates the unseamed fabric width, not a measured finished circumference. The seam, stretch, and actual gauge affect fit, but the larger-size differences are substantial enough that a size label alone is not a reliable fit guarantee.
Measure around the wearer's head where the hat will sit. Before adding the brim, temporarily join the cone's side edges with loose basting stitches, aligning matching rows. Try on the cone or measure its opening without stretching it. Check that it stays in place comfortably and does not slip down over the eyes. Remove the basting before continuing to crochet.
If the opening is much too large or small, stop here. Recheck gauge and confirm the size-specific rows you followed. Do not skip a few increases at random: the brim repeats depend on the cone's final count. For a fit that does not match the published size guidance, ask Yarnspirations for sizing clarification through the original pattern page before completing that size. We have checked the written stitch arithmetic; we have not established corrected finished measurements for these sizes.
Abbreviations and turning-chain rules
These instructions use US terms.
| Term | Meaning |
|---|---|
| ch | Chain |
| sc | Single crochet |
| dc | Double crochet |
| inc | Work 2 sc in the same stitch |
| BLO | Back loop only: use the loop farther from you when the stitch top faces you |
| RS | Right side, the intended outside of the hat |
For a repeat such as (sc in 3 stitches, inc) six times, work one sc into each of three consecutive stitches, then two sc into the next stitch. Repeat that whole group six times. Our pattern abbreviation guide explains how to follow repeats and size brackets.
Cone rows: the beginning ch 1 does not count as a stitch. Work into the first real stitch and do not crochet into the previous row's turning chain.
Double crochet brim rows: the beginning ch 3 does count as the first dc. Mark its top so you can work into it at the far end of the next row. This change in chain counting is essential to keeping the brim totals correct.
Crochet the pointed cone in rows
Start with ch 2. For Row 1, work 6 sc into the second chain from the hook, mark this as the RS, then turn. Although those stitches share one starting chain, do not join them into a round.
For every subsequent cone row, ch 1 before working and turn after completing the row. An ordinary row means one sc in every stitch, with no increases. Use both top loops unless instructed otherwise.
Rows shared by all sizes
| Row or rows | Work across the row | Stitches at end |
|---|---|---|
| 2–3 | Ordinary rows | 6 |
| 4 | Increase in every stitch | 12 |
| 5–7 | Ordinary rows | 12 |
| 8 | Repeat (sc in 1 stitch, inc) six times |
18 |
| 9–11 | Ordinary rows | 18 |
| 12 | Repeat (inc, sc in each of 2 stitches) six times |
24 |
| 13–15 | Ordinary rows | 24 |
| 16 | Repeat (sc in each of 3 stitches, inc) six times |
30 |
| 17–19 | Ordinary rows | 30 |
| 20 | Repeat (inc, sc in each of 4 stitches) six times |
36 |
| 21–23 | Ordinary rows | 36 |
| 24 | Repeat (sc in each of 5 stitches, inc) six times |
42 |
| 25–27 | Ordinary rows | 42 |
| 28 | Repeat (inc, sc in each of 6 stitches) six times |
48 |
| 29–31 | Ordinary rows | 48 |
Size S: after Row 31, work one more ordinary row of 48 sc. Your cone has 32 rows. Complete the fit check, then go to the brim. Do not work the larger-size increase rows below.
Extra cone rows for M, L, and XL
| Row or rows | Work across the row | Stitches at end |
|---|---|---|
| 32 | Repeat (sc in each of 7 stitches, inc) six times |
54 |
| 33–35 | Ordinary rows | 54 |
| 36 | Repeat (inc, sc in each of 8 stitches) six times |
60 |
| 37–39 | Ordinary rows | 60 |
Size M: after Row 39, work two more ordinary rows of 60 sc. Your cone has 41 rows. Complete the fit check, then go to the brim. These are not the L/XL increase instructions for Row 40.
Extra cone rows for L and XL
| Row or rows | Work across the row | Stitches at end |
|---|---|---|
| 40 | Repeat (sc in each of 9 stitches, inc) six times |
66 |
| 41–43 | Ordinary rows | 66 |
| 44 | Repeat (inc, sc in each of 10 stitches) six times |
72 |
| 45–47 | Ordinary rows | 72 |
Size L: after Row 47, work two more ordinary rows of 72 sc. Your cone has 49 rows. Complete the fit check, then go to the brim. Do not work the XL increase at Row 48.
Extra cone rows for XL only
At Row 48, repeat (sc in each of 11 stitches, inc) six times to reach 78 sc. Work Rows 49–51 as ordinary rows of 78 sc. Complete the fit check after Row 51, then begin the brim without adding another cone row.
Before moving on, write down your size and final count: 48 / 60 / 72 / 78 sc for S / M / L / XL. Every later brim count must come from that same size column.
Add the ruffled brim
Restart row numbering at 1 for the brim. You are still working flat; the back edges remain open. All four sizes follow the same method, with different totals.
Brim Row 1: create the flare
Chain 3, counting it as the first dc. Work 1 dc into the back loop of the first sc, so that the chain and this dc together form the first pair. Work 2 dc into the back loop of every remaining sc. Turn.
You now have twice the cone count: 96 / 120 / 144 / 156 dc. Do not add two dc to the first stitch as well as the chain 3; that would give you one extra stitch.
Brim Row 2: increase once per six stitches
Chain 3 to stand for the first dc; leave the stitch directly beneath that chain unworked. Put 1 dc in each of the next 4 stitches, then 2 dc in the next stitch. For the rest of the row, repeat one dc in each of 5 stitches, then 2 dc in the following stitch. Work through both loops. Turn.
Each group uses six stitches from the previous row and produces seven. Your new count is 112 / 140 / 168 / 182 dc, including the starting chain 3. Remember that the last stitch of the previous row is the top of its starting chain.
Brim Row 3: increase once per fourteen stitches
Chain 3 to stand for the first dc and leave its base stitch unworked. Work 1 dc in each of the next 12 stitches, then 2 dc in the next stitch. Continue with groups of one dc in each of 13 stitches, then 2 dc in the following stitch, using both loops. Turn.
Each group consumes fourteen stitches and produces fifteen. The totals are 120 / 150 / 180 / 195 dc, including the starting chain 3.
Brim Row 4: finish the edge
Chain 1 without counting it as a stitch. Work 1 sc into every dc, including the top of the previous row's chain 3. Finish with 120 / 150 / 180 / 195 sc. Fasten off, leaving a generous tail for the back seam.
| Checkpoint | S | M | L | XL |
|---|---|---|---|---|
| Cone before brim | 48 | 60 | 72 | 78 |
| Brim Row 1, dc | 96 | 120 | 144 | 156 |
| Brim Row 2, dc | 112 | 140 | 168 | 182 |
| Brim Row 3, dc | 120 | 150 | 180 | 195 |
| Brim Row 4, sc | 120 | 150 | 180 | 195 |
The wavy edge is part of this design. Do not automatically remove increases to make the brim lie flat: doing so changes both the appearance and the written count sequence.
Sew the back seam and finish
Bring the two side edges together with the RS facing inward. Align the point, the cone-to-brim transition, and the outer brim edge. Use removable markers to hold matching row ends together; this keeps one side from drifting ahead of the other.
Using the long tail, sew from the outer brim edge toward the point, joining corresponding row ends with small, even whipstitches. Use enough stitches along the taller dc row ends to close gaps, but avoid pulling the seam into a hard ridge. Add a fresh length of yarn if necessary and secure its ends in the fabric.
Turn the hat right side out. Check the seam from the outside, weave in the starting and finishing tails, and gently arrange the brim's waves. Check the opening again after seaming. A seam pulled too tightly can alter the fit even if the temporary fitting was comfortable.
Follow your yarn label for washing and shaping. Avoid pressing acrylic directly with an iron. The finished silhouette depends on the firmness of your fabric; the image shows the intended pointed, ruffled style rather than providing a stitch-count chart or size measurement.
Tips & troubleshooting
| What you notice | What to check | What to do next |
|---|---|---|
| Cone count changes on an ordinary row | A missed edge stitch or an extra stitch in the turning chain | Mark both row ends, find the first incorrect row, and rework from there |
| Brim Row 1 is one stitch too large | Chain 3 plus two dc were worked into the first sc | Use the chain plus only one dc in that first back loop |
| Brim rows gradually lose stitches | The top of the previous chain 3 was missed | Mark that chain top and include it as the final stitch |
| Brim forms soft waves | Counts agree with the table | Keep the ruffles; they are intentional |
| One brim section is much fuller than the rest | Increases are clustered or a repeat was worked twice | Count each repeat before attempting to reshape the fabric |
| Cone folds over | Loose gauge, soft yarn, or the weight of a tall cone | Check your swatch and yarn choice; shaping cannot reliably stiffen loose fabric |
| Hat slips down over the face | Opening is too large, even though the size label sounded right | Return to the fit check; confirm source sizing before completing an unsuitable size |
| Seam twists the hat | Unequal row ends were joined or seam tension is uneven | Unpick the seam and match the cone-to-brim transitions first |
For help recognizing where a stitch was added or dropped, use our common crochet mistakes guide.
Frequently Asked Questions
Is this crochet witch hat made in the round?
No. This Red Heart design is worked in rows from the point to the brim and closed with a back seam. Do not combine these instructions with a spiral witch-hat tutorial; the turning chains, edges, and finishing method differ.
Is it suitable for beginners?
A confident beginner who can work sc and dc, follow repeats, and sew a seam can follow the construction. Practice the stitches first and choose a light workspace for black yarn. The sizing concern deserves attention at every skill level.
Is the pattern free?
Yarnspirations currently offers the original Red Heart Witchy Hat PDF as a free download. This page adds rewritten instructions and practical explanations. Yarn and tools are separate purchases.
Can I substitute chunky or plush yarn?
It would change the gauge, size, and structure substantially. Use a comparable medium weight yarn for the supplied counts and swatch first. Plush yarn also makes the increase positions harder to see; it is not a direct substitution for this version.
Can I make the brim flat instead?
The first brim row doubles the stitch count, and the later increases build a ruffled edge. A flat brim requires different shaping. Follow a pattern designed for that silhouette instead of deleting an arbitrary number of increases here.
Which size should I choose for a child or adult?
Measure the actual head rather than assigning an age to S, M, L, or XL. Compare the source labels with the gauge calculations above, then check the cone's opening before adding the brim. The larger-size discrepancy needs publisher clarification if the measured fit does not match the intended wearer.
More Halloween crochet ideas
For a lighter costume accessory, our lace crochet Halloween mask guide explains Lisa Gentry’s free masquerade design, with a nose-seam diagram and fit checks before stiffening.
For another wearable costume, make the crochet pumpkin hat with a felt jack-o'-lantern face. For a small decoration to display beside your costume, try our rectangle-based crochet pumpkin. To carry treats, see the pumpkin and black-cat crochet candy baskets. For little characters and decorative projects, browse the Halloween amigurumi ideas. Our seasonal crochet and handmade gift planner helps you choose what to make next without starting several oversized projects at once.
Essential crochet guides
Maker notes
Questions or finished-project notes?
Share what helped, ask about a step, or leave a thoughtful note for the next maker.
Loading maker notes...