Crochet Halloween Mask: Lace Masquerade Guide
Make a lace crochet Halloween mask with a free masquerade pattern, clear seam diagrams, thread and hook advice, fit checks, and stiffening tips.

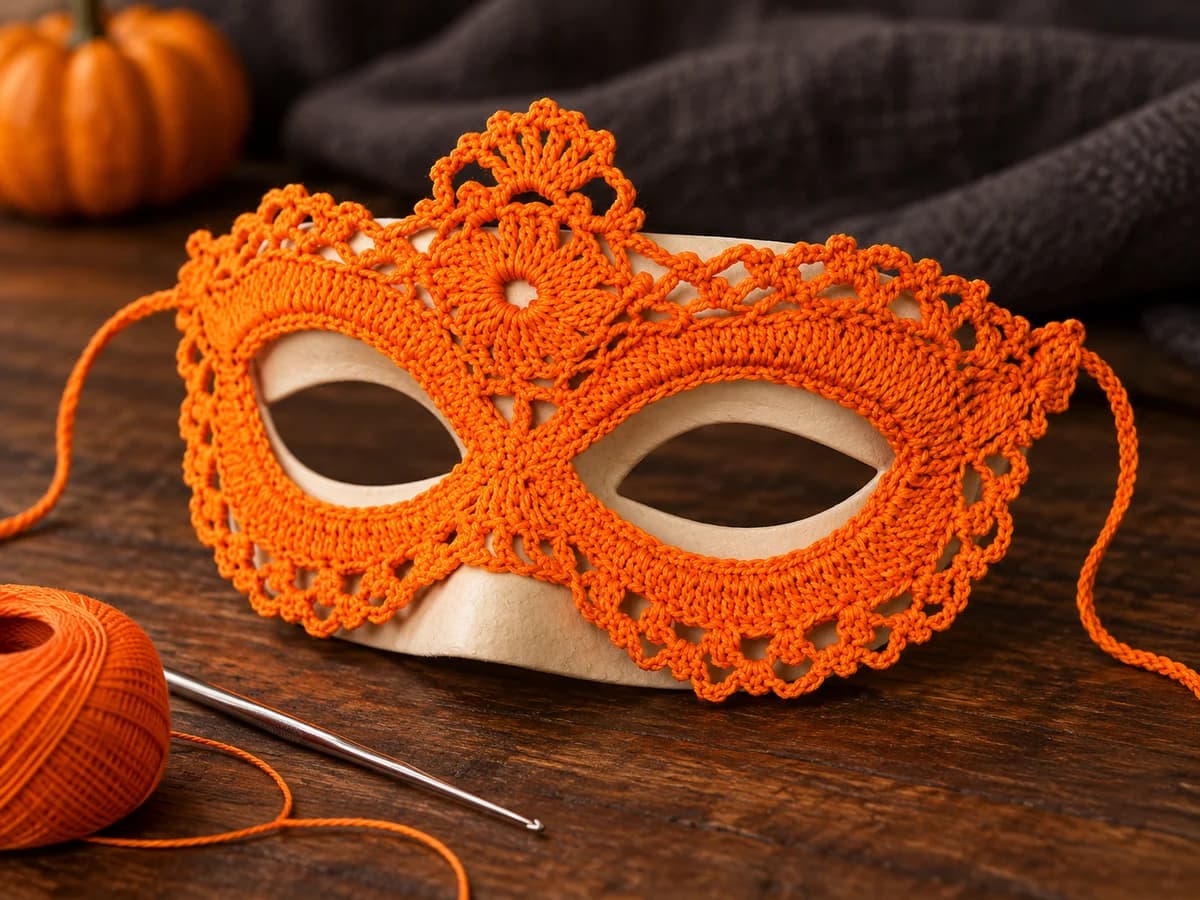
A crochet Halloween mask adds handmade lace to a costume without making an entire outfit. This orange masquerade design has two shaped eye openings, a medallion above the nose and a picot border.
This is an illustrated companion to Go Incognito Masks by Lisa Gentry for Aunt Lydia’s/Yarnspirations. The supplied two-page PDF, ALC0136-025033M, provides the complete pattern; this guide explains its construction, count checks and finishing. Get the original free pattern. The styled project image is illustrative, not a stitch chart or evidence of a tested sample.
Check fit before stiffening: the pattern has one size. Ties secure the mask but cannot correct misplaced eye openings.
Materials, size, and gauge
Start with size 10 cotton crochet thread and a 1.50 mm steel hook, adjusting the hook for gauge. The PDF’s Pumpkin 431, Black 12 and Hot Pink 332 are alternative colors for separate masks.
Gather a tapestry needle, scissors, four removable markers and a tape measure. Optional shaping supplies are fabric stiffener, a foam head form, a 1 in / 2½ cm brush and rustproof pins.
| Check | PDF specification |
|---|---|
| Thread | One ball per pictured color; used yardage per mask is not given |
| Solid-color ball | 250 yd; ball capacity, not mask consumption |
| Gauge | 23 sc across 4 in / 10 cm; no row gauge supplied |
| Mask size | About 8 in / 20¼ cm wide × 3¾ in / 9½ cm high, excluding ties |
| Tie | One 48 in / 122 cm strand |
Measure the middle 4 in / 10 cm of a single-crochet swatch. More than 23 sc means trying a larger hook; fewer means trying a smaller one. Recheck afterward. Compare hook sizes in millimeters, since numbering systems vary. Thicker yarn changes the openings and overall size; it is not a direct substitute.
Read the construction before crocheting
Make one center circle and two eye circles. Sew the eye circles at the nose, then join the medallion while working the edging. Add the tie and check fit before shaping.
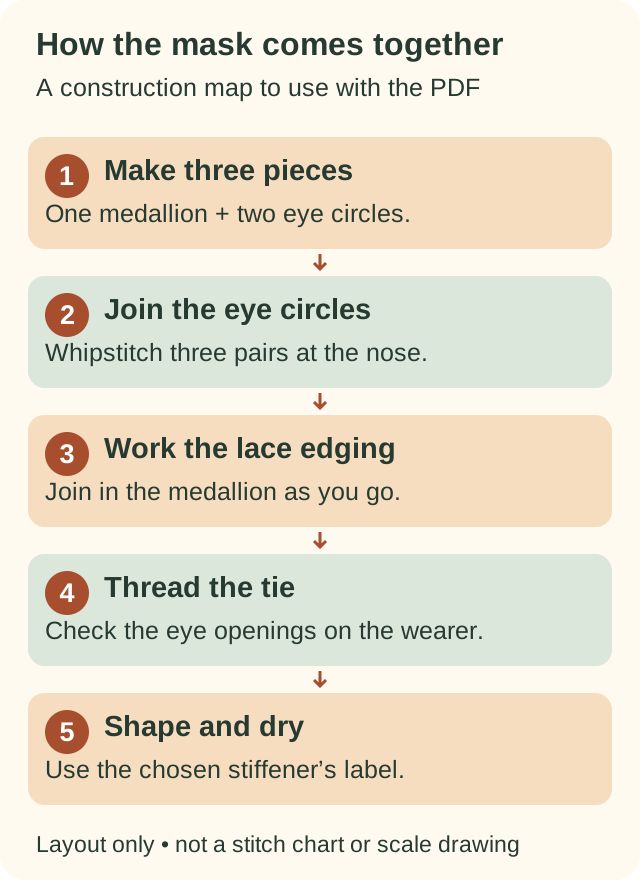
Use US terms: ch = chain, sl st = slip stitch, sc = single crochet, hdc = half double, dc = double, tr = treble and dtr = double treble. Work into an arch’s opening when the PDF specifies a chain space. See our crochet stitch guide and pattern-reading tutorial if needed.
Practice these two details:
- Picot: ch 3, then slip stitch into the first chain to form a small point.
- Dtr5tog: work five unfinished double trebles across five successive stitches, each starting with three yarn overs. Leave each final loop on the hook; yarn over and draw through the resulting six loops. Five base stitches become one cluster top.
Work through the mask with these checkpoints
Open the original pattern PDF alongside this guide. Page 1 contains the starting pieces, seam and beginning of the edging. Page 2 starts midway through Edging Round 2; the page break does not end that round.
1. Make the center circle
Work: follow the PDF’s small chain-ring medallion and fasten off.
Count: eight groups of three treble-height stitches and eight ch-2 spaces. The beginning ch 4 counts as the first treble.
Check: all eight spaces must be present. Four connect the medallion to the eye section; four remain above for the edging.
2. Make both eye circles and mark the inner edges
Work: each eye begins with a 45-chain ring and 45 sc in Round 1. Keep the chain untwisted and flexible. Round 2 varies stitch height around a 12-sc section.
Mark: number only those 12 sc, starting at the section’s first sc.
| Eye | Mark after sc | Enclosed seam stitches |
|---|---|---|
| Right | 5 and 8 | 6, 7, 8 |
| Left | 4 and 7 | 5, 6, 7 |
Fasten off the right circle; leave the left working thread attached for the edging.
Source warning: Round 2 starts with ch 4 but says to join to beginning ch 5. Joining to the actual ch 4 is the consistent reading, not a publisher-confirmed correction. The shaping consumes 45 base stitches and makes 78 stitch positions when the initial ch 4 counts as one treble. Do not add a stitch to accommodate the printed “ch 5.”
3. Sew the three-stitch nose seam
Work: arrange the eye contours as a mirrored pair. Bring their marked three-stitch sections together and whipstitch the opposing pairs without gathering.
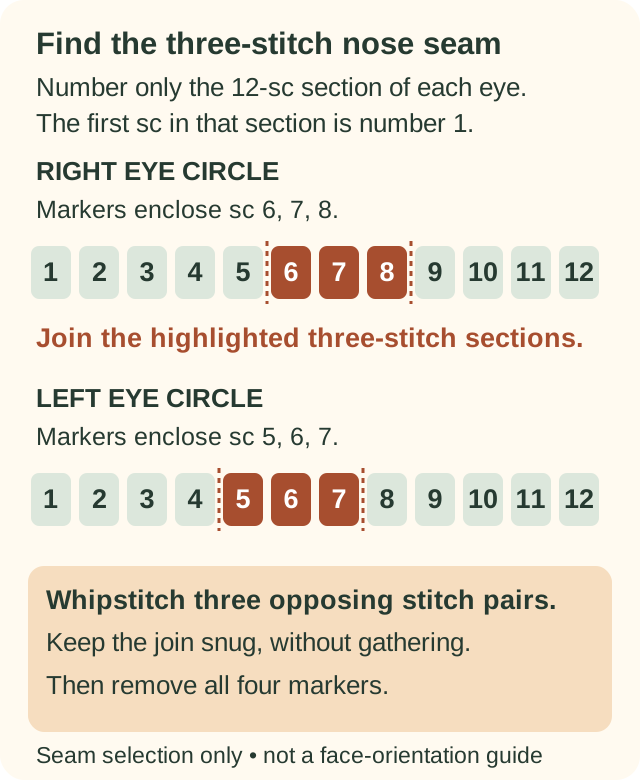
Check: remove the markers and hold the openings against the wearer before adding lace. They should sit level without sideways pulling. Correct a twist, count error or gathered seam now.
4. Work the lace edging and join the medallion
Work: continue from the left circle using the PDF’s edging section. Round 1 establishes arches and attaches the medallion. Mark its first attachment space to avoid using it twice.
Source warning: the join refers to a dc on a center circle made with trebles. This appears to mean an existing treble-height post. Compare the publisher’s photograph and request Yarnspirations clarification if the join will not lie evenly; do not invent another round.
Check: finish Round 2 across the page break. Row 3 is a partial finishing row, not a complete circuit. Follow each bracketed repeat fully, then compare corresponding arches before fastening off.
5. Add the tie and check the fit
Work: measure one 48 in / 122 cm tie. The PDF gives no cord stitch or chain count. With the mask’s right side facing you, pass through the two outer ch-6 spaces in the directions below. The middle span supports the mask behind the head. Bring each end around its side’s 6-tr-and-ch-4 group from front to back.
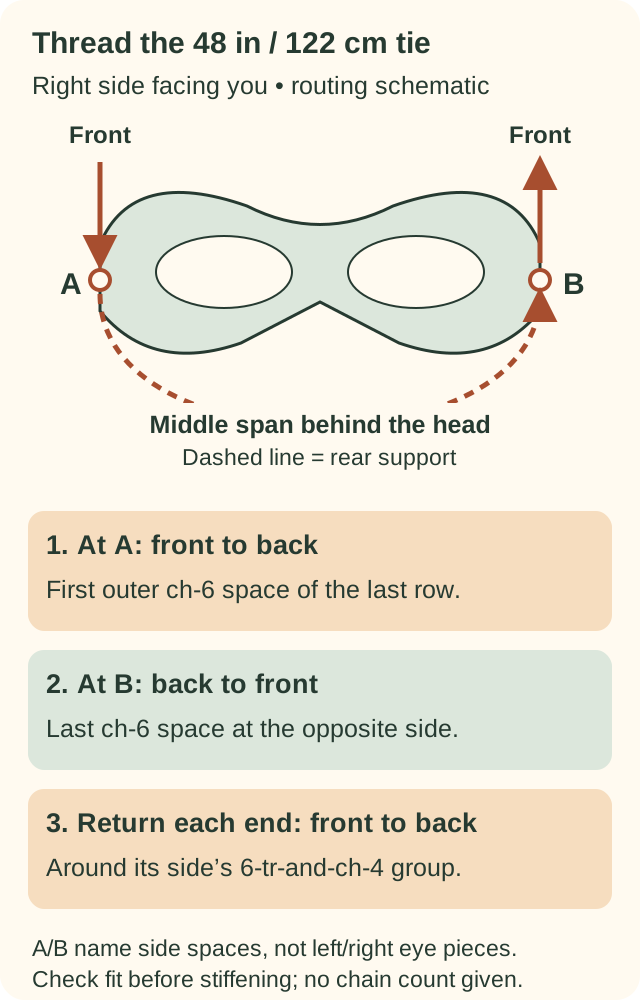
Check: the tie should hold the mask level without folding the lace. Look ahead and sideways; both eyes and eyelashes need clearance. Stop if the openings do not align comfortably.
Shape and stiffen the lace
Test stiffener on a swatch and follow its label. The PDF applies it to the wrong side, shapes the mask on a head form with rustproof pins, then applies it to the right side.
Keep both openings clear and evenly shaped. Apply stiffener on the form, away from the wearer, and let it dry completely before removing pins or trying on the mask. Never tighten the tie to force an uncomfortable hardened shape to fit.
Stiffener is optional; untreated lace may droop. Follow the more restrictive care instructions for the thread and finish. Washing may require reshaping.
Tips & troubleshooting
The eye opening is too small
Recount the 45-chain start and 45-sc first round, then check gauge. Restart an overly tight chain; do not cut stitches or yank the finished lace.
The bridge pulls the eyes out of line
Check the different marker positions in the seam diagram. If the whipstitch gathers the fabric, loosen and resew it.
The medallion twists or the arches differ
Count eight medallion spaces and check the attachment order. For uneven arches, revisit the last bracketed repeat and its specified chain space. Undo the first error instead of adding compensating chains.
Black thread is difficult to count
Use a pale cloth beneath your work, strong side lighting and transition markers. Practice the cluster in light thread. See common crochet mistakes and how to fix them for tension help.
Frequently Asked Questions
Where can I get a free crochet masquerade mask pattern PDF?
Download Lisa Gentry’s Go Incognito Masks from Yarnspirations’ original pattern page. Its complete edging instructions accompany this guide. This mask PDF is separate from our Pumpkin Bear newsletter bonus.
What thread do I use for a crochet lace mask?
Use size 10 cotton crochet thread and a starting 1.50 mm hook, adjusted to 23 sc per 4 in / 10 cm. Match thread size and gauge, not color alone.
Can I use embroidery floss instead of crochet thread?
It is not an equivalent substitute. Strand count, twist and thickness vary. Comparable size 10 cotton thread is the clearest starting point; substitutions require a swatch and eye-section fit check.
How do I make a crochet mask hold its shape?
The source uses optional fabric stiffener on a head form. Test a swatch, shape evenly and follow the drying directions. Blocking can neaten stitches without providing lasting firmness.
Is this an easy crochet Halloween costume for a beginner?
The publisher rates it easy, but fine thread, clusters and seam placement need practice. A confident beginner familiar with stitch heights and chain spaces is better prepared. Start with our absolute-beginner tutorial if needed.
Can I make the mask smaller for a child?
The PDF supplies one size. Changing hooks changes the openings without creating reliable child sizing. Choose a suitably sized pattern if the eyes do not align; check clear vision and comfortable ties before wearing.
More Halloween crochet to make next
Pair it with a ruffled-brim crochet witch hat. For smaller projects, explore pumpkin and black-cat candy baskets or a crochet ghost keychain. Our seasonal crochet project planner has more ideas.
Essential crochet guides
Maker notes
Questions or finished-project notes?
Share what helped, ask about a step, or leave a thoughtful note for the next maker.

Loading maker notes...