Crochet Market Tote Bag Pattern (Free)
Make a free crochet market bag with a sturdy oval base, flexible mesh body, reinforced handles, and practical sizing tips for a reusable shopping tote.

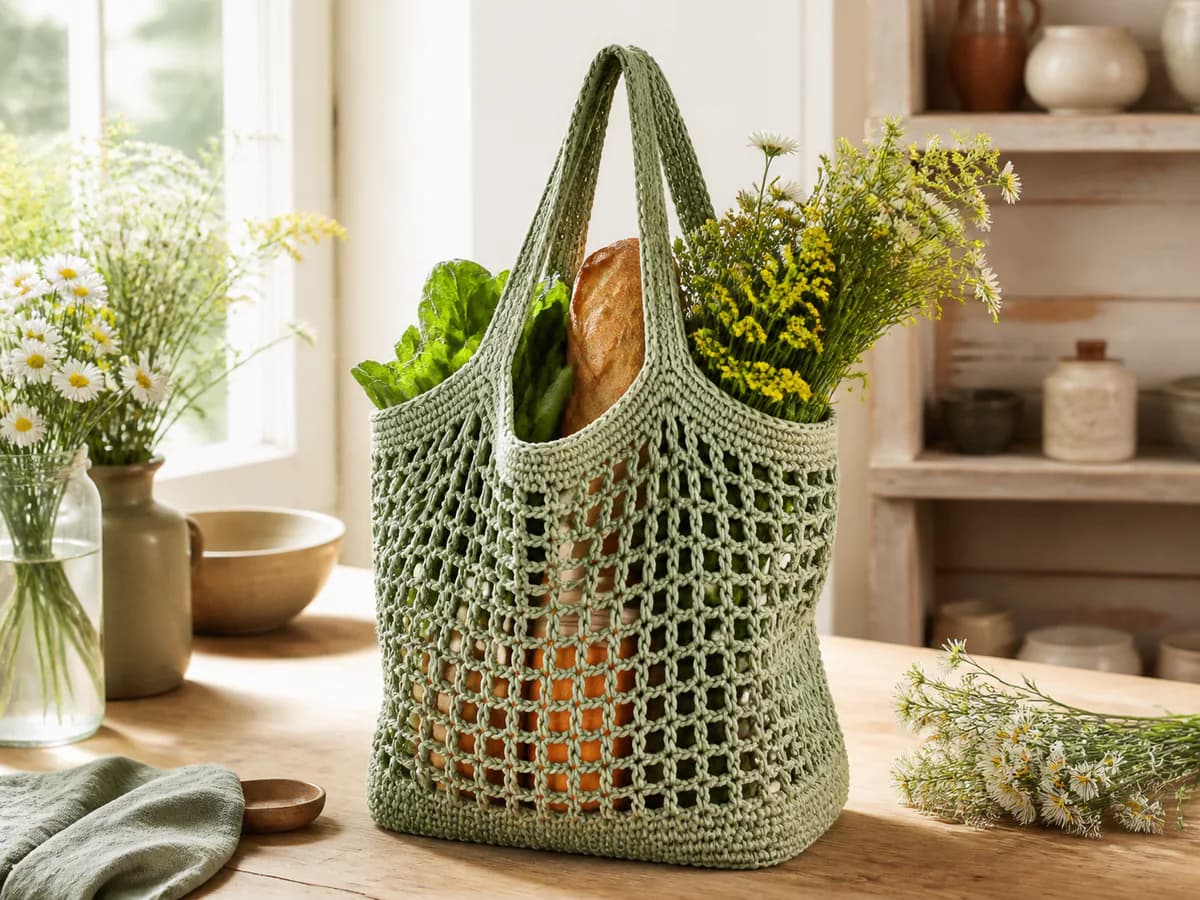
This free crochet market bag starts with an oval base, continues into open mesh and finishes with two integrated handles. The instructions below count every section, including the stitches skipped beneath each handle. Practice joined rounds and double crochet before starting.
Before you start
This version has a long, narrow oval base, a mesh body worked in joined rounds, and handles formed directly from the rim. There are no side seams or separately sewn straps. The body height can be adjusted, but the written base and handle layout use a fixed stitch count. The finished bag will be flexible rather than a rigid, box-shaped tote.
The base and handle diagrams below explain counts and placement, not measured proportions. Use the following checkpoints to catch errors before adding more fabric.
| Stop after | What to count | What to inspect |
|---|---|---|
| Base round 1 | 90 sc | 42 stitches on each straight side; 3 at each end |
| Base round 3 | 102 sc | A narrow oval without an accidental twist |
| Base round 6 | 102 sc | Lower walls beginning to cup upward |
| Each mesh round | 51 dc and 51 spaces | One starting-chain dc; no extra stitch at the join |
| Rim round 2 | 102 sc | Two face sections of 51 stitches |
| Handle foundation | 52 sc and two chain-45 arches | Equal openings and untwisted chains |
| Handle covering | 152 sc | 50 sc around each arch, distributed evenly |
Materials and gauge
- Worsted-weight cotton or a cotton blend suitable for bags; check the yarn's care label
- A 4.5 mm hook as a starting point; adjust to make firm but workable single crochet
- Six removable stitch markers, a blunt yarn needle and a tape measure
- Optional fabric lining for keeping small items inside
Make and wash a small single-crochet swatch first. Cotton can stretch under weight too: fiber alone does not establish a bag's carrying capacity. This pattern has no physically verified finished dimensions, yardage or load rating. Measure the actual base and body as you work. A lining contains small objects but does not automatically reinforce the handles.
Record the washed swatch's stitches and rows over a measured area, but do not treat that as a target gauge supplied by this pattern. There is no sample-backed gauge to match. After base round 3, lay the oval down without stretching and measure its length and width; decide whether that narrow footprint suits what you intend to carry before working the walls. Measure again after several mesh rounds, because open mesh and solid single crochet do not have the same gauge.
For yarn planning, reserve enough matching yarn for the dense rim and handles before extending the mesh. A weighed mesh swatch can estimate the body requirement from its area; budget separately for the solid base and handles. Record your final yarn use for a repeat bag.
Abbreviations and round joins
US terms: ch chain, sl st slip stitch, sc single crochet, dc double crochet, inc 2 sc in one stitch, sp space. Work joined rounds without turning. In solid rounds, ch 1 does not count; join to the first actual sc and begin the next round in that same stitch. Do not work into the joining slip stitch. Mesh starting chains count differently, as specified below.
Free crochet market bag and shopping tote pattern
Oval base
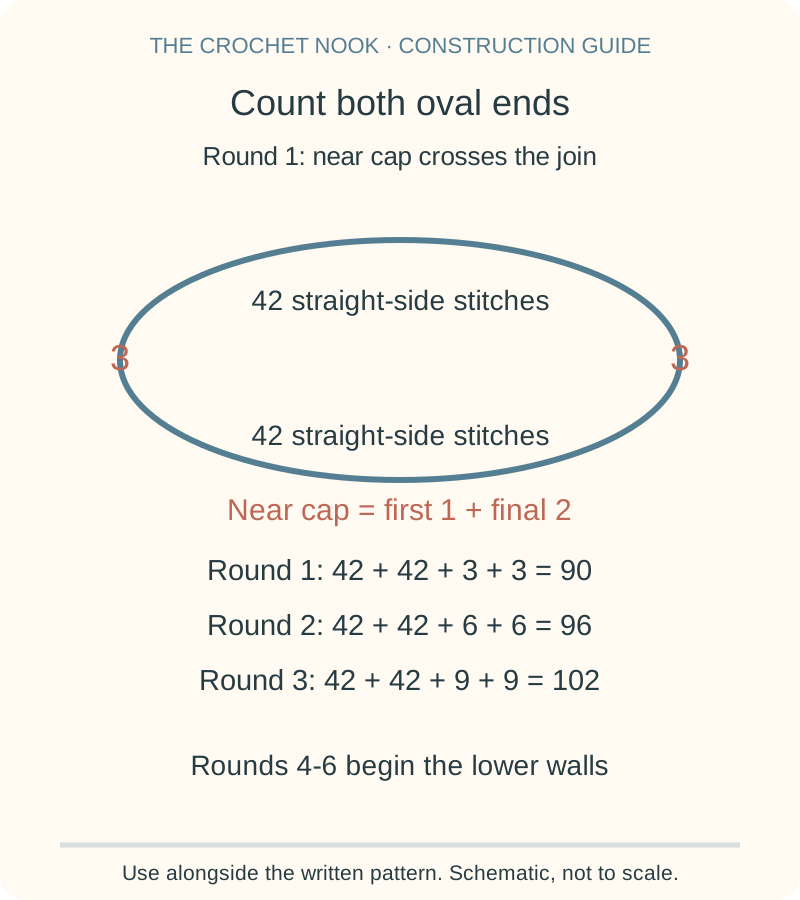
- Round 1: Chain 45. Sc in the second chain from the hook and in the next 42 chains. Work 3 sc in the final chain. Rotate the chain and sc in the next 42 unused underside loops. Work 2 sc in the same chain as the first sc. Join to the first sc. (90)
- Round 2: Ch 1; inc in the first stitch, sc in the next 42, inc in each of the next 3, sc in the next 42, inc in each of the final 2. Join. (96)
- Round 3: Ch 1; (sc, inc) once, sc in the next 42, (sc, inc) 3 times, sc in the next 42, (sc, inc) twice. Join. (102)
- Round 4: Ch 1; sc in the back loop of every stitch. Join. (102)
- Rounds 5-6: Ch 1; sc in both loops of every stitch. Join each round. (102)
Before the first stitch, lay the chain flat and identify its two ends. After working along the first side, turn the foundation in your hands to reach the unused underside loops; do not flip the work over and begin a turned row. Keep the loose starting tail out of the stitches.
In round 1, each straight side has 42 stitches. The far cap has 3 stitches; the near cap straddles the join, with the first stitch plus the last 2. Those caps become 6 stitches each in round 2 and 9 each in round 3. Mark them before increasing.
Rounds 4-6 intentionally stop increasing and begin the lower walls. Cupping here is expected; do not add an uncounted increase round to flatten them. If the oval twists before round 4, check both underside stitch placement and cap counts first.
Mesh body
- First mesh round: Ch 4 (counts as the first dc and ch-1 space in the first stitch), skip the next stitch. Repeat (dc in the next stitch, ch 1, skip the next stitch) 50 times. Join to the third chain of the starting ch 4. You have 51 dc and 51 ch-1 spaces.
- Following mesh round: Sl st into the first ch-1 space. Ch 4, counting as the first dc and space. Work (dc in the next ch-1 space, ch 1) in each of the 50 remaining spaces. Join to the third starting chain. Keep 51 dc and 51 spaces.
- Repeat the following mesh round to your preferred body height. Measure relaxed from the base edge and allow for stretch when filled; 29-31 cm is an optional target, not a verified sample measurement.
Where to put the hook: after the first mesh round, work each dc around the next ch-1 space, not into the top of the dc below. This moves the posts over the previous round's spaces. At the start, the slip stitch only moves you into position; it does not count as a dc or a mesh space. The starting ch 4 supplies one dc and the first space, so the other 50 spaces receive the remaining repeats.
Do not add another dc in the first space: the starting chain already occupies it. Count spaces before the rim so a missed mesh repeat does not alter the handles.
Reinforced rim and handles
Rim round 1: Ch 1; sc into the top of the starting dc (the third starting chain), then sc in its following space. Repeat (sc in the next dc, sc in the next space) 50 times. Join. (102) Rim round 2: Ch 1, sc in every stitch and join. (102)
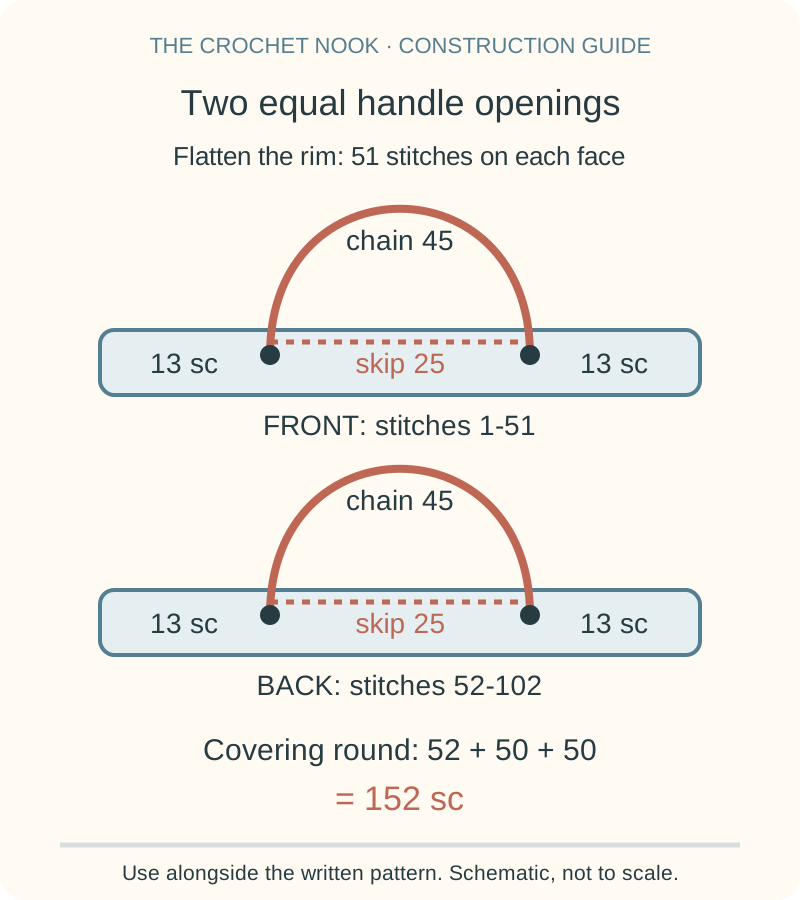
Flatten the bag with its long oval sides forming the front and back. Identify the two side folds, 51 stitches apart. Fasten off and rejoin at one fold so the next round starts there, rather than assuming the old round join is centered. Treat the folds as boundaries between stitches: the new first stitch starts the front face, stitches 1-51 belong to the front, and stitches 52-102 belong to the back. With an odd number on each face, the fold can lie between stitches rather than through the middle of a stitch. Number the rim stitches 1-102 from this new starting point. Temporarily mark stitches 13, 39, 64, and 90 to show the four edges beside the handle openings.
| Face | First attachment section | Skip under handle | Last attachment section |
|---|---|---|---|
| Front | Sc in 1-13 | Chain 45; skip 14-38 | Sc in 39-51 |
| Back | Sc in 52-64 | Chain 45; skip 65-89 | Sc in 90-102 |
Handle foundation round: Ch 1; follow the two table rows, then join to the first sc. Each face uses 13 sc, a chain-45 bridge over 25 skipped stitches, and 13 sc. The new edge has 52 sc plus 90 chains = 142 positions. The four attachment ends sit beside the skipped sections. After the first chain 45, the next sc goes into stitch 39; after the second, it goes into stitch 90. Do not work back into the 25 skipped stitches beneath either arch.
Before covering the chains, lay both arches upward without twisting them. Check that the two chains have similar relaxed lengths and can be lifted comfortably; their eventual drop depends on your chain tension and stretch. Keep this check gentle: the uncovered chains are not finished handles. The written counts below assume chain 45 for each arch; changing that length also requires reassessing the covering density.
Handle covering round: Ch 1; sc in the first 13 sc, work 50 sc around the entire first chain arch (not into individual chains), sc in the next 26 sc, work 50 sc around the second arch, then sc in the last 13 sc. Join. 152 sc: 52 along the rim plus 100 around the handles. To work around an arch, insert the hook under the whole chain bridge and draw up a loop around it; do not search for 50 individual chains in a chain of 45. The extra five sc per arch are intentional. Use a marker halfway along each arch to distribute 25 sc on each half without bunching.
Finishing round: Ch 1; sc in all 152 stitches and join. For wider handles, repeat this entire round once or twice, keeping 152. Fasten off and weave ends securely through dense fabric in more than one direction.
After covering the arches, check their shape before adding more rounds. Fifty stitches must fit evenly around each chain without being packed into a small section. Slide the covering stitches gently along the chain to distribute them. If an arch still ruffles or pulls tight, stop and check chain tension and covering tension; the arithmetic alone cannot establish a comfortable handle. Do not add extra finishing stitches to hide a mismatch.
Tips & troubleshooting
The handles sit unevenly
Before covering the arches, lay the bag flat and check the front and back each contain 51 original rim stitches. Each skipped opening must contain exactly 25. Move the round start to the actual side fold if necessary; do not compensate with different chain lengths.
The base looks much narrower than the picture suggests
Only the first three rounds increase, so this is a shallow oval base rather than a deep rectangular bottom. The lower walls begin in round 4. Do not keep adding oval increases while following the unchanged 102-stitch mesh and handles: a wider base needs a recalculated body and handle layout. Check the footprint before continuing, and use a different construction if you need a broad, flat bottom.
The mesh gains an extra hole near the join
Count 51 dc, including the starting chain as one, and 51 spaces. The join goes into chain 3 of the starting ch 4; chain 4 forms the space. An extra dc in the starting space, a stitch worked into the slip stitch, or a second chain space at the end can change the count. Undo the affected round before beginning the solid rim.
The filled tote stretches too far
Use a shorter mesh section on the next bag and consider a sewn lining with its own reinforced attachment. Test the completed bag gradually with light, non-breakable contents over a padded surface. Stop if stitches pull apart or handle joins distort. This is not a weight-certified shopping bag.
The rim has more than 102 stitches
Return to the final mesh round and count 51 spaces. The first rim round uses one sc per dc and one per space. Working into a join or adding a stitch to the starting chain can create extras.
Frequently Asked Questions
Can I make the tote with acrylic yarn?
You can, but test the fabric's stretch and recovery with your chosen yarn. Cotton and acrylic blends vary; no fiber choice alone guarantees a sturdy handle. A shorter body and wider handles may be more comfortable.
How can I make a smaller produce bag?
The simplest change is fewer mesh rounds while keeping this 102-stitch circumference and the counted handles. A shorter starting chain also changes every base and handle count, so do not substitute chain 21 into these instructions. For a narrower bag, use a separately counted smaller pattern.
Is this market bag strong enough for groceries?
Its capacity depends on yarn, tension, stitching and wear. Start with light contents, inspect all four handle ends and retire or repair the bag if the fabric or attachments weaken. No maximum load has been established by physical testing.
A different tote construction to compare
Yarnspirations' free Fresh Mesh Crochet Tote Bag is an alternative if you prefer a flat-panel bag with side seams and separately sewn straps. Its published gauge, yarn quantity, and dimensions belong to that design; they cannot be transferred to this oval-base tote. Follow one complete pattern rather than combining its panel counts with our joined-round mesh or integrated handles.
Related guides
Add structure with the bag lining and hardware guide, compare boho bag constructions, or make a smaller crossbody pouch.
Essential crochet guides
Maker notes
Questions or finished-project notes?
Share what helped, ask about a step, or leave a thoughtful note for the next maker.
Loading maker notes...