Crochet Bucket Hat Pattern for Beginners
A beginner bucket hat built from a measured flat crown, straight sides, and an evenly increased brim rather than an unreliable age label.

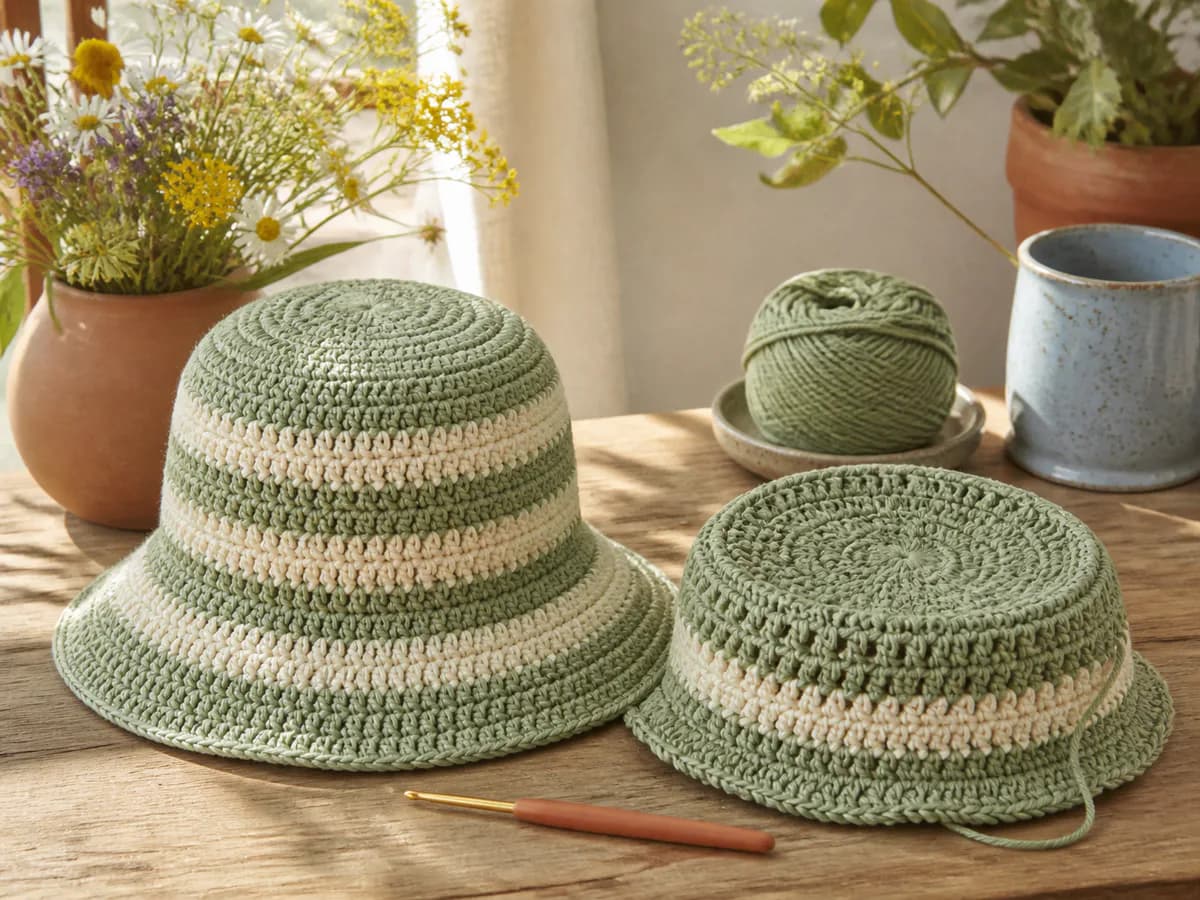
A beginner bucket hat built from a measured flat crown, straight sides, and an evenly increased brim rather than an unreliable age label.
Materials and supplies
- Firm worsted cotton or cotton blend; use a second color of the same yarn if you want the pictured stripes
- 4-5 mm hook, adjusted if needed for a firm but comfortable fabric
- Locking stitch markers
- Yarn needle and sharp scissors
- Flexible tape measure for head circumference, crown diameter, and side depth
Crochet terms used
The instructions use US terms: sc (single crochet), sl st (slip stitch), and inc (two sc in one stitch). BLO means work through the back loop only. Counts in parentheses show the stitches expected after each round. A magic ring starts the crown; the optional stripe instructions below explain color changes.
Gauge and fit
Make a 12 cm square in single crochet and wash it as the finished hat will be washed. Measure stitches and rows across the center, away from the edges. Measure the wearer's head where the hat band will sit. For a fabric that stretches comfortably, a finished circumference 1-2 cm smaller can be a starting target; use less reduction for a firm cotton fabric that has little stretch. If you cannot measure the wearer, the Craft Yarn Council head-circumference chart gives a starting range, but a real head measurement is more useful for fit.
The crown-disc target is the chosen finished circumference divided by 3.14. For example, a 56 cm head and a chosen 55 cm finished circumference suggest a crown about 17.5 cm across. This is a calculation example, not a verified finished size for a particular yarn.
Check against stitch gauge too. At an example gauge of 16 sc per 10 cm, 55 cm corresponds to 88 stitches. This six-increase construction reaches multiples of six, so compare the nearby 84- and 90-stitch rounds with the actual diameter and fit instead of forcing an exact calculated count. A crown circle is an approximation; try the hat on after a few side rounds before continuing.
Work in continuous sc spirals, with a marker in the first stitch. Do not join, turn, or chain between rounds. The marker identifies the round boundary, not an extra stitch. Work through both loops except for the specified back-loop turning round.
Crown
- Round 1: Work 6 sc in a magic ring. (6)
- Round 2: Inc in every stitch. (12)
- Round 3: Repeat (sc, inc) around. (18)
- Round 4: Repeat (2 sc, inc) around. (24)
- Round 5: Repeat (3 sc, inc) six times. (30)
- Round 6: Repeat (4 sc, inc) six times. (36)
- Round 7: Repeat (5 sc, inc) six times. (42)
- For each following round, add one plain sc before the increase in each of the six repeats. Round 8 is (6 sc, inc) six times (48); round 9 is (7 sc, inc) six times (54). Each completed crown round adds exactly six stitches, so round 14 has 84 stitches and round 15 has 90. Measure the relaxed disc across its center in two directions after a complete round. Stop when its diameter is close to your target, then check fit after a few side rounds.
Before changing the increase rhythm to correct waves or cupping, recount the previous round and confirm the six increase positions. Correct extra or missing stitches first. If the count is right but the disc still will not lie reasonably flat, check yarn and hook tension with a fresh swatch rather than improvising an undefined extra increase round.
Sides and band
Work one sc in the back loop of every stitch for one round, keeping the crown's final count. This defines the crown-to-side fold. Continue in both loops without increases. Count periodically to check that the sides are not widening or narrowing accidentally.
Measure from the crown center down to the intended band position, following the curve of the hat with the tape rather than measuring straight through the air. Use a well-fitting hat or try-on to choose the depth. Stop when the lower edge reaches the position where you want the brim to begin.
For a slightly firmer band, you may work the final two side rounds with a hook 0.5 mm smaller, keeping the stitch count unchanged. Try on after the first such round. If it constricts the opening, undo it and continue with the main hook.
Optional sage-and-cream stripes
The solid-color instructions above make the same hat shape. For stripes like the pictured hat, keep the crown sage. During the side rounds, work a few rounds in sage, two rounds in cream, two or more in sage, then two rounds in cream before returning to sage. Fit matters more than a fixed stripe schedule: shorten a sage section if needed so the brim still begins at your measured depth. Keep the stitch count unchanged in every stripe round and use the same yarn weight for both colors.
At each color change, work the final sc of the old-color round until two loops remain on the hook; draw the new color through those two loops. Put the marker in the first stitch of the new round and continue in the same spiral. The start of each stripe will step up slightly in continuous rounds; this does not change the stitch count or fit. Cut and weave in the old color securely if you will not use it again soon. For a close-up of the last-yarn-over technique, see Crochet.com's color-change tutorial.
Brim
- Change back to the main hook. Divide the stitch count into six equal sections and place a marker at each division.
- Work one increase at every marker, moving each marker into the first stitch of its increase. (6 stitches added)
- Work one round even. Repeat these two rounds until the brim projects 5-7 cm.
- Try the hat on between increase rounds. Add an extra even round when the brim ripples; add an extra increase round when it pulls upward.
- Finish with one relaxed slip-stitch round: insert the hook through both loops of each stitch, draw the yarn through the stitch and the loop on the hook, and repeat. Keep the edge flexible; if it draws the brim inward, undo the finishing round and use a larger hook for that round. Fasten off and weave the tail through the reverse of several stitches.
For a 90-stitch example, place markers at stitches 1, 16, 31, 46, 61, and 76. The first increase round makes 96 stitches, the even round stays at 96, and the next increase round makes 102. If the brim needs another increase round without an intervening even round, still work only one increase at each of the six markers. Measure brim depth outward from the band, not from the crown center.
The three checkpoints are independent: crown diameter controls circumference, side depth controls where the band sits, and the increase spacing controls brim shape. Adjust the relevant section instead of resizing the entire hat.
Tips & troubleshooting
The crown is curling before the sides
First recount the six increase groups and check for missed increases. If the counts are correct, compare your washed swatch and tension; do not repeat an old shaping instruction over a different stitch total.
The crown has waves
Check for accidental extra increases or a counted joining stitch. Correct count errors before blocking; if the six-increase sequence still does not lie flat with your yarn and tension, swatch with a different hook before continuing.
The band feels tight
Try on before adding the brim. Unpick the optional smaller-hook band rounds and work them with the main hook if they reduce the opening too much.
Frequently Asked Questions
Do I join or turn after each round?
Use continuous single-crochet spirals for this version, with a marker in the first stitch. Do not join, turn, or add a starting chain between rounds.
Can I use the same round count for every head size?
No. Use the measured head circumference, washed gauge and crown diameter together. Stop increasing at the appropriate size for the wearer, then measure the side depth separately.
May I sell the finished item?
Small-scale sales of finished items from this pattern are allowed with credit to Crochet Bucket Hat Pattern for Beginners. Do not copy, sell, or republish the written instructions or site images.
Keep exploring
To build on Crochet Bucket Hat Pattern for Beginners, continue with 20 Boho Crochet Bag Ideas, Best Free Crochet Bag and Accessory Patterns, Crochet Crossbody Bag & Phone Pouch Patterns. For a broader route through the site, use the Ultimate Free Crochet Pattern Library.
Essential crochet guides
Maker notes
Questions or finished-project notes?
Share what helped, ask about a step, or leave a thoughtful note for the next maker.
Loading maker notes...