Easy Crochet Ghost Keychain Pattern
Make a mini crochet ghost keychain with counted rounds, a five-point hem, embroidered face, and securely sewn hanging loop. A clear Halloween project.

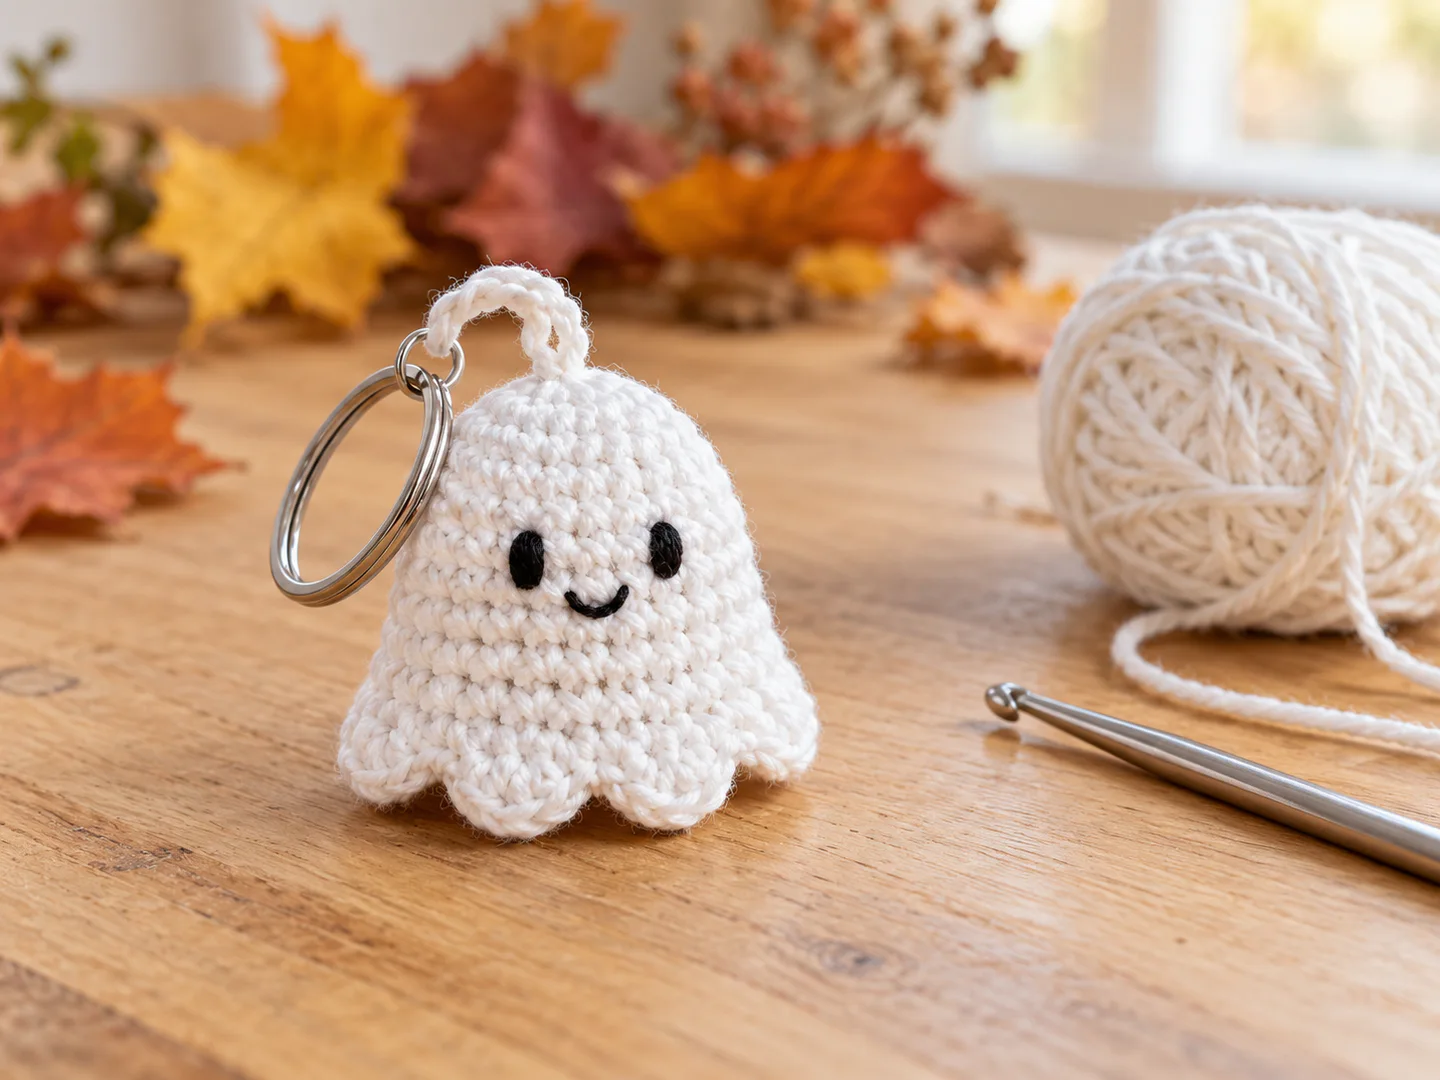
This crochet ghost keychain pattern makes a small, soft Halloween charm with a rounded head, five gentle points along its hem, and a face sewn with black thread. The body is crocheted in one spiral. A separately crocheted hanging loop is sewn across the crown before you add a split ring. The face uses embroidery instead of plastic eyes, so there is no hard piece to pull loose from the front.
Read through the round-count table before starting. The most important turn is round 12: work into its back loops to shape the base, then return to its unused front loops for the pointed hem. If you are new to spirals, our beginner amigurumi guide explains magic rings, markers, and invisible decreases.
The lead image illustrates the shape and finish described below. Your exact stitch texture, size, and hem drape will depend on your materials and tension.
Materials
- Smooth white DK cotton yarn for the body and hanging loop; use a small leftover ball, and keep more available until your first charm is complete.
- A 3 mm crochet hook as a starting point. If stuffing shows through your stitches, try a smaller hook that still lets you work comfortably.
- A small amount of polyester stuffing.
- Black embroidery floss or thin black yarn for the eyes and mouth, plus an embroidery needle.
- A split keyring, a blunt yarn needle, scissors, and a removable stitch marker.
No exact yarn quantity or finished measurement is claimed here because neither has been measured from a finished sample. Use the same yarn and hook for the loop as for the ghost; bulky or fuzzy yarn makes the small rounds and facial placement harder to see. A split ring can be added without opening a jump ring with pliers.
US stitch terms and how to read the rounds
This pattern uses US terms: ch = chain, sc = single crochet, sl st = slip stitch, hdc = half double crochet, dc = double crochet, inc = two sc in one stitch, and dec = single-crochet decrease across the next two stitches. BLO means back loop only; FLO means front loop only. For a neater closed base, make each decrease as an invisible decrease through the front loops of the two stitches it consumes.
Work the body in a continuous spiral without joining or turning. Move the marker into the first stitch of every round. A number in parentheses is the total after that round; the marker and any joining slip stitches never count as body stitches. If you need a stitch refresher, see the basic stitch guide.
Crochet the ghost body
Leave a normal tail for closing the starting ring, then make a magic ring in white. An alternative is to ch 2 and work round 1 into the second chain from the hook; tighten that opening carefully.
Round 1: 6 sc into the ring. Pull it closed. (6)
Round 2: Inc in each stitch. (12)
Round 3: (1 sc, inc) six times. (18)
Round 4: (2 sc, inc) six times. (24)
Round 5: (3 sc, inc) six times. (30)
Rounds 6–11: Sc in each stitch around for six complete rounds. (30 per round)
Stop after round 11 to embroider the face while you can still reach the inside of the piece. Choose a front directly opposite your marker if that makes placement easier. Place the two eyes on either side of the front center, roughly on rounds 8–9, with about five intervening stitches. Make each eye with two or three short vertical black stitches, then add a small curved mouth one round below. Hide and secure the embroidery tails inside the body. Use a pin or short contrasting yarn markers to preview the face before sewing; exact spacing can be adjusted for your tension.
Round 12: BLO sc in every stitch. (30) The unused front loops form a complete circle around the outside; do not work into them yet.
Round 13: (3 sc, dec) six times. Each repeat consumes five stitches and makes four. (24)
Round 14: (2 sc, dec) six times. (18)
Begin adding small amounts of stuffing. Keep the lower edge soft so the five points can hang instead of flaring stiffly.
Round 15: (1 sc, dec) six times. (12)
Round 16: Dec six times. (6) Fasten off, leaving a sewing tail. Thread the tail through the front loop of each of these six final stitches in order, pull gently to close the opening, and bury the tail inside. The base closes underneath the hem; it should not show from the front.
Round-count checklist
| Rounds | What changes | Stitch count |
|---|---|---|
| 1–5 | Increase the crown by six stitches each round | 6 → 12 → 18 → 24 → 30 |
| 6–11 | Keep the upper body even | 30 each round |
| 12 | Work 30 sc through back loops, reserving 30 front loops | 30 |
| 13–16 | Close the underside with six decreases per round | 24 → 18 → 12 → 6 |
Add the five-point ghost hem
Find the unused front loops of round 12. They sit outside and above the closed underside. With the ghost upright, join white yarn with a sl st in any one of those loops. That joining sl st is the first stitch of the first six-stitch group, not an extra stitch.
To finish the first group, work sc in the next unused loop, hdc in the next, dc in the next, hdc in the next, sc in the next. Then work (sl st, sc, hdc, dc, hdc, sc) across the next six unused loops four more times. Each group uses six different front loops and peaks at its dc. Five groups use all 30 reserved loops. Fasten off and weave the tails into the underside. Do not add a sixth point or work back into the stitches of the closing rounds.
If the edge twists, check that each stitch of the repeat went into the next free front loop rather than all six into one loop. Gently shape the points with your fingers; the hem can be uneven if your tension differs between the tall and short stitches.
Make and attach the hanging loop
Leave a long starting tail of white yarn for sewing, then ch 12. Turn and work one sl st in the second chain from the hook and each chain back to the beginning: 11 sl sts. Fasten off with a long ending tail. You now have one sewing tail at each end of the narrow strap.
Place the strap ends on opposite sides of the crown around rounds 1–2 so the ring sits above the face, not over an eye. Sew the first end down through at least two neighboring crown stitches, then make a second pass through the strap and the same area of firm fabric. Slide the split ring onto the free end of the strap; sew that second end down on the opposite side with the same two passes. Bury both tails through several body stitches. Do not sew only into the magic-ring opening or pull on one single stitch. Tug the ring gently to inspect both attachment points and repair any looseness before using the charm on keys or a bag.
The loop and ring are small detachable components. This is a decorative keychain, not a toy for a baby or toddler; keep it away from children who may mouth or pull off small parts. For more detail on faces and attachment choices, see our amigurumi face and safety guide.
Tips & troubleshooting
| Problem | What to check |
|---|---|
| The body widens or narrows unexpectedly | Count the stitches at the marker at the end of each round; do not count the marker itself or accidentally crochet into a join. |
| Stuffing shows through | Use less stuffing near the front, or try a smaller hook for tighter fabric on the next ghost. |
| The face looks crooked | Mark the center and both eye positions first; embroider before closing the base so you can secure the tails inside. |
| You cannot find the hem loops | Round 12 must use back loops only. Its unused front loops sit in a ring just above the base decreases. |
| The hem has four or six points | Count 30 free loops and use exactly five groups of six; the joining sl st is the first stitch of group one. |
| The ghost hangs sideways | Move the strap ends until the ring is centered above the face, then sew them to neighboring crown stitches on both sides. |
Frequently Asked Questions
Can I use worsted or plush yarn?
Yes, but the charm will change size and the small hem points may look different. A smooth DK yarn is easier for checking the 30 reserved loops and embroidering the face. Start with a hook that produces a firm fabric, then make one sample before preparing a batch.
Do I need safety eyes?
No. The written pattern uses embroidered features and has no safety-eye step. Embroidery also lets you choose the expression before closing the underside.
Why is round 12 worked in the back loops?
Its back loops carry the body toward the closed underside. Its 30 unused front loops stay available for the separate five-point hem. Working through both loops would remove that clean place to attach the edge.
Could I make it without the keyring?
Yes. Skip the strap and ring to make a small Halloween decoration. You can also thread a hanging cord through the crown, provided its attachment is appropriate for where you plan to display it.
Explore another small Halloween project
For a different construction, Joey Diehl's ghost keychain at Virkadia uses an inner insert, open facial features, and linked jump rings. Club Crochet's beginner ghost has a video and a bobble-arm shape. Follow the designers' own pages for those patterns; their instructions and photos belong to them. This crochet ghost uses its own rounded body, five six-stitch groups for the hem, embroidered face, and sewn strap attachment.
You may also like our Halloween amigurumi ideas, free crochet keychain collection, or crochet pumpkin pattern. Each takes a different route from a small ghost charm.
Essential crochet guides
Maker notes
Questions or finished-project notes?
Share what helped, ask about a step, or leave a thoughtful note for the next maker.
Loading maker notes...