Free Crochet Skull Pattern: 7 Steps for Halloween Decor
Make a flat crochet skull in seven clear steps, with counted rounds, jaw and border diagrams, felt finishing tips, and a link to the free pattern PDF.

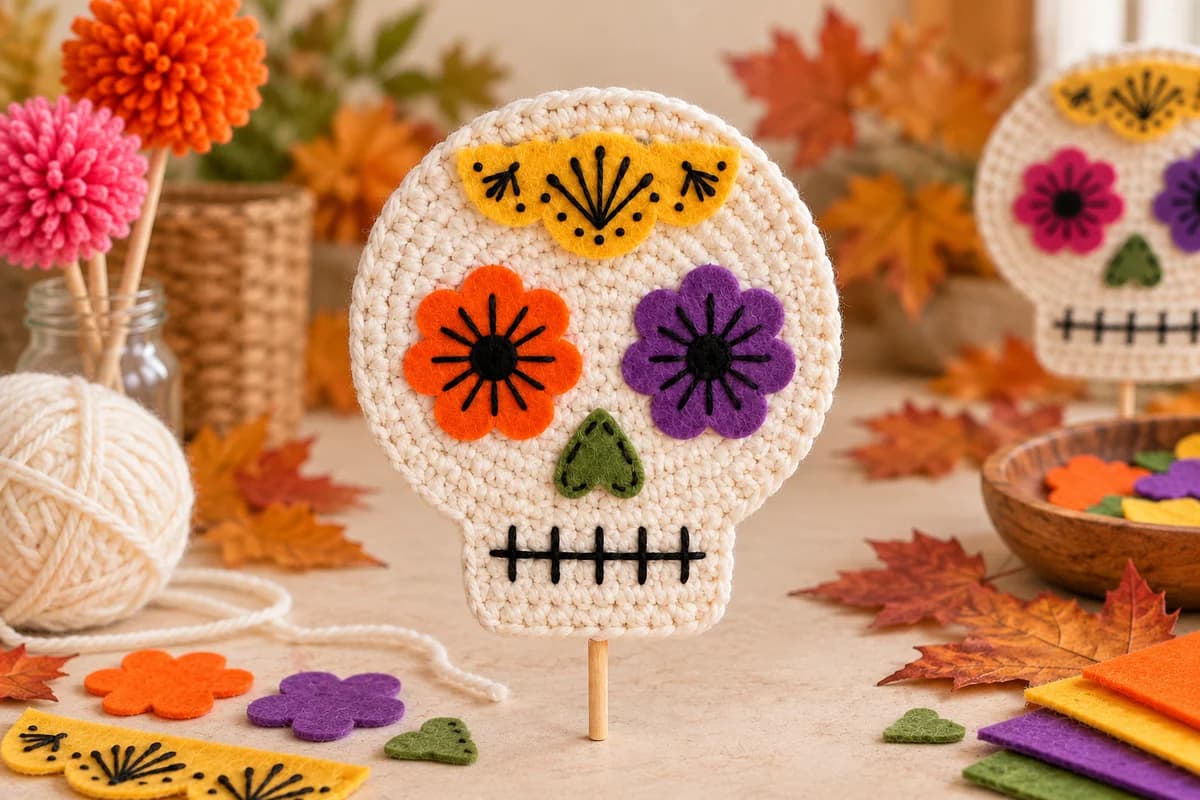
This free crochet skull pattern makes a flat decoration with a rounded forehead, a narrow jaw, and colorful felt features. Work the white base first, embroider its face, then mount it on a wooden stick for a Halloween display. There is no stuffing: the shape comes from joined rounds followed by five short rows.
The seven steps below explain one complete skull project, with checkpoints where the construction changes. The pattern is Skull Party Sticks & Pompoms, designed by Jessie Rayot and adapted by Rebecca Venton for Red Heart. This reading guide follows the supplied pattern, adding count explanations and original diagrams. Get the original free pattern and felt templates from Yarnspirations. Our instructions have been reviewed against that PDF; we have not crocheted a finished sample. The lead illustration shows the intended decorative style.
At a glance: US terms · 5.5 mm hook · worsted-weight yarn · approximately 4 × 5¼ inches before adding the stick.
1. Gather yarn, felt, and finishing supplies
For the crochet base, use white medium-weight yarn and a 5.5 mm (US I-9) hook. The original specifies Red Heart Super Saver in White, with Black for embroidery and Pumpkin, Bright Yellow, and Pretty’n Pink for colorful pompoms. It lists one skein of each color for the project collection, but gives no measured yarn consumption per skull. Do not interpret that as one whole skein per decoration.
You will also need:
- A stitch marker, scissors, and a sharp-pointed yarn needle for sewing through felt.
- Small felt pieces in contrasting colors for two eyes, a nose, and a forehead ornament.
- White adhesive-backed foam; the source supply list specifies three 6 × 9-inch sheets for the collection.
- A 12-inch wooden dowel, approximately 3/16 inch (4.76 mm) in diameter, for each party stick.
- A hot glue gun, operated by an adult as directed in the original pattern.
- Optional: a 2½-inch pompom maker or a piece of heavy cardboard that width.
Keep the felt and backing uncut until the skull is finished. Your own crochet piece is the best guide for the backing outline, especially if your tension differs slightly from the stated gauge.
2. Check gauge and learn the two shaping stitches
The source gauge is 12 stitches and 15 rows of single crochet per 4 inches (10 cm). Make a swatch larger than the measuring area, then measure its center without stretching. If there are too many stitches across 4 inches, try a larger hook; if there are too few, try a smaller hook.
Gauge matters most if you want the stated size and a similar fit for the printed felt pieces. This is a decoration, so a small size difference is workable, but check the finished silhouette before assembly.
Abbreviations: ch = chain; sc = single crochet; sl st = slip stitch; st/sts = stitch/stitches. An increase means 2 sc in the same stitch. For sc2tog, insert the hook into the next stitch and pull up a loop, repeat in the following stitch, then yarn over and pull through all three loops. Two base stitches become one stitch.
Starting ch 1 and joining slip stitches do not count in the totals below. Place a marker in the first actual sc, rather than the chain. Our crochet abbreviation guide explains how to follow repeats if this notation is new to you.
3. Crochet the round top of the skull
With white yarn, chain 4 and slip stitch into the first chain to make a ring. Work round 1 into the ring opening. Keep the right side facing you throughout these six rounds; do not turn between them. Start each round with ch 1 and finish by slip stitching into its first sc.
- Round 1: Work 6 sc into the ring. 6 stitches.
- Round 2: Increase in every stitch. 12 stitches.
- Round 3: Repeat “increase, sc in the next stitch” six times. 18 stitches.
- Round 4: Sc in the first stitch; repeat “increase, sc in the next 2 stitches” five times; increase in the next stitch, then sc in the last stitch. 24 stitches.
- Round 5: Repeat “increase, sc in the next 3 stitches” six times. 30 stitches.
- Round 6: Sc in the first 2 stitches; repeat “increase, sc in the next 4 stitches” five times; increase in the next stitch, then sc in the last 2 stitches. 36 stitches.
Each round after the first adds six stitches. Count before continuing, particularly around the join, where accidentally working into a slip stitch can add an unwanted stitch. Keep the yarn attached after round 6.
4. Shape the jaw with five short rows
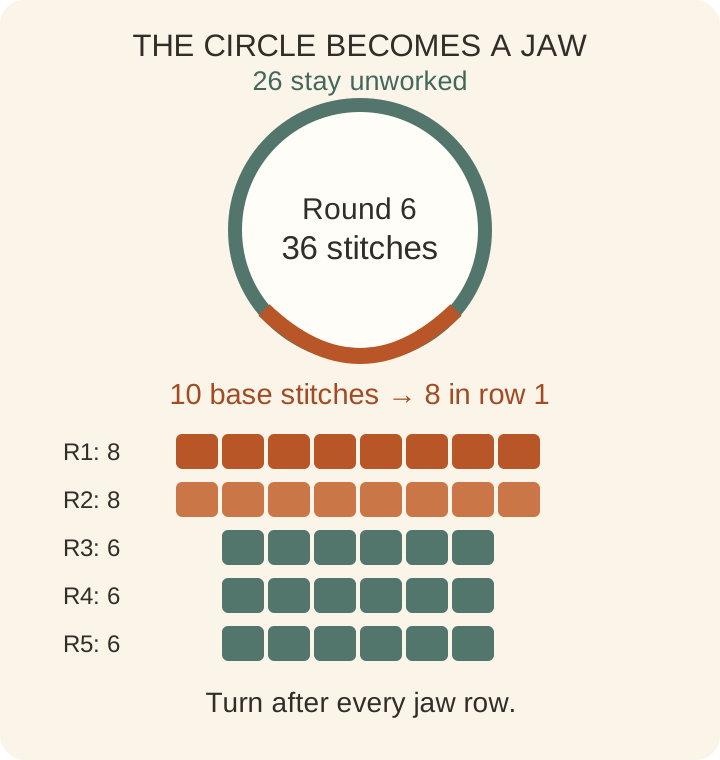
The jaw uses only the first 10 stitches of round 6. Leave the other 26 untouched for the border. Unlike the circular top, this section is worked back and forth, turning after each row.
- Row 1, right side: Ch 1, sc2tog, sc in the next 6 stitches, sc2tog. Turn. 8 stitches.
- Row 2: Ch 1, sc across all 8 stitches. Turn. 8 stitches.
- Row 3: Ch 1, sc2tog, sc in the next 4 stitches, sc2tog. Turn. 6 stitches.
- Row 4: Ch 1, sc across all 6 stitches. Turn. 6 stitches.
- Row 5: Repeat row 4. 6 stitches. Keep the yarn attached.
The first jaw row consumes 2 + 6 + 2 = 10 base stitches but produces only eight. This is why you must stop before working all the way around the circle.
5. Work the border without losing the corners
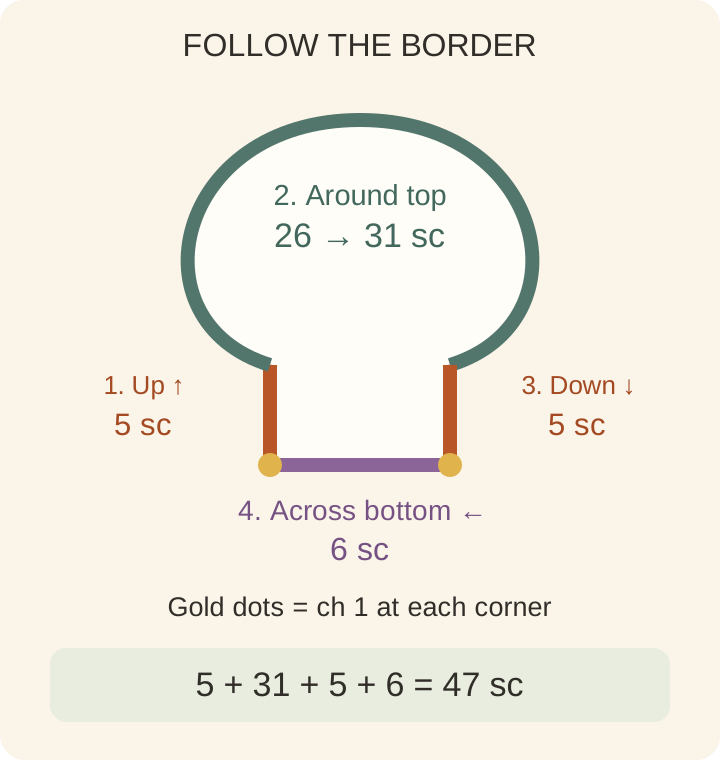
After turning at the end of row 5, chain 1 and travel around the entire outside edge. Work through these four sections in order:
- First jaw side: Make one sc into each of its five row ends: 5 sc.
- Rounded top: Across the 26 unused stitches of round 6, sc in the next stitch; repeat “increase, sc in the next 5 stitches” four times; increase in the final stitch: 31 sc.
- Second jaw side: Make one sc into each of its five row ends: 5 sc.
- Bottom edge: Chain 1 for the corner, sc across the six stitches of jaw row 5, then chain 1 for the other corner: 6 sc and two corner chains.
Slip stitch into the first border sc and fasten off. The check is 5 + 31 + 5 + 6 = 47 sc, plus the two ch-1 corners. Neither corner chain belongs in the 47-stitch total.
6. Add felt eyes, a nose, and embroidered teeth
Use page 2 of the original PDF for the felt templates. Print at actual size, then compare the paper shapes with your finished skull before cutting felt. Cut two flower-shaped eyes, one nose, and one forehead ornament in your chosen colors.
Arrange all four pieces on the front first. Leave space below the nose for the teeth. Following the source method, use a small amount of glue at each felt piece’s center to hold its position, then sew it in place with black yarn and straight stitches. Add a horizontal mouth with short vertical stitches crossing it to suggest teeth. Keep the embroidery relaxed so it does not draw the jaw inward.
Weave in the yarn ends before covering the back. For help with tidy facial details, see our crochet face and embroidery guide.
7. Finish your skull party stick and optional pompoms
Trace the skull onto adhesive-backed foam and cut out the backing. Glue the dowel to the wrong side of the crochet, then attach the foam over the back, covering the dowel’s attachment area. Allow the glue to set according to its product instructions before handling.
For a matching pompom, wrap yarn around a 2½-inch maker or cardboard. Slide the bundle off carefully and tie a 12-inch strand tightly around its middle. Cut the loops, fluff, and trim; glue the pompom onto a separate dowel. More wraps produce a fuller pompom, so make one first before preparing a whole group.
Display the sticks in a stable container with your crochet pumpkins. For a different small Halloween project, try the crochet ghost keychain. These foam-backed sticks are decorations, not washable soft toys.
The original also suggests colorful skulls for Día de los Muertos. That celebration has its own traditions and meaning; Halloween styling and Día de los Muertos displays are distinct contexts for choosing your decorations.
Tips & troubleshooting
If the border looks uneven, count each section separately before pulling anything out. A missing row-end stitch affects the jaw edge; a missed increase affects the rounded top. Avoid tightening the final joining slip stitch enough to pinch the corner.
If your circular top cups or ripples, first check the six round totals and look for stitches accidentally added at the joins. If those counts are correct, compare your tension with the gauge swatch before adding the jaw. Do not rely on the foam backing to hide an incorrect count.
Frequently Asked Questions
Where can I get the free crochet skull pattern PDF?
Open the Red Heart Skull Party Sticks & Pompoms page on Yarnspirations and select its free pattern download. The two-page PDF includes the original instructions and the felt templates needed for this project.
Is this crochet skull pattern suitable for beginners?
The original is rated easy. It suits a beginner who can make single crochet, join a round, increase, decrease, and turn rows. The jaw and border need careful counting; use the two diagrams to check those transitions.
Is the skull flat or stuffed?
It is flat. A circular top and five short jaw rows form one piece, finished with a border. Felt and embroidery make the face; adhesive foam supports the back when it is mounted on a stick. No stuffing is required.
Why does my skull border have more than 47 stitches?
First check whether you counted the two corner chains as single crochets. The correct total is 47 sc plus those two chains. If there are still extra sc, check that each jaw side has five and that the rounded top has 31.
Can I make the skull with a different yarn or hook?
Yes, but the finished size and stiffness will change. Keep the same stitch counts, make a gauge swatch, and fit the felt pieces and foam to your actual skull. A finer yarn will usually make a smaller decoration; this is not a graded size variation.
Essential crochet guides
Maker notes
Questions or finished-project notes?
Share what helped, ask about a step, or leave a thoughtful note for the next maker.
Loading maker notes...