Colorful Crochet Christmas Tree Pattern: Step-by-Step Guide
Crochet a colorful Christmas tree with seven scalloped layers, a stuffed trunk, and a star. Follow step-by-step instructions and a clear stitch diagram.
Maya at The Crochet Nook · https://www.thecrochetnookblog.com/articles/colorful-crochet-christmas-tree-pattern

On this page
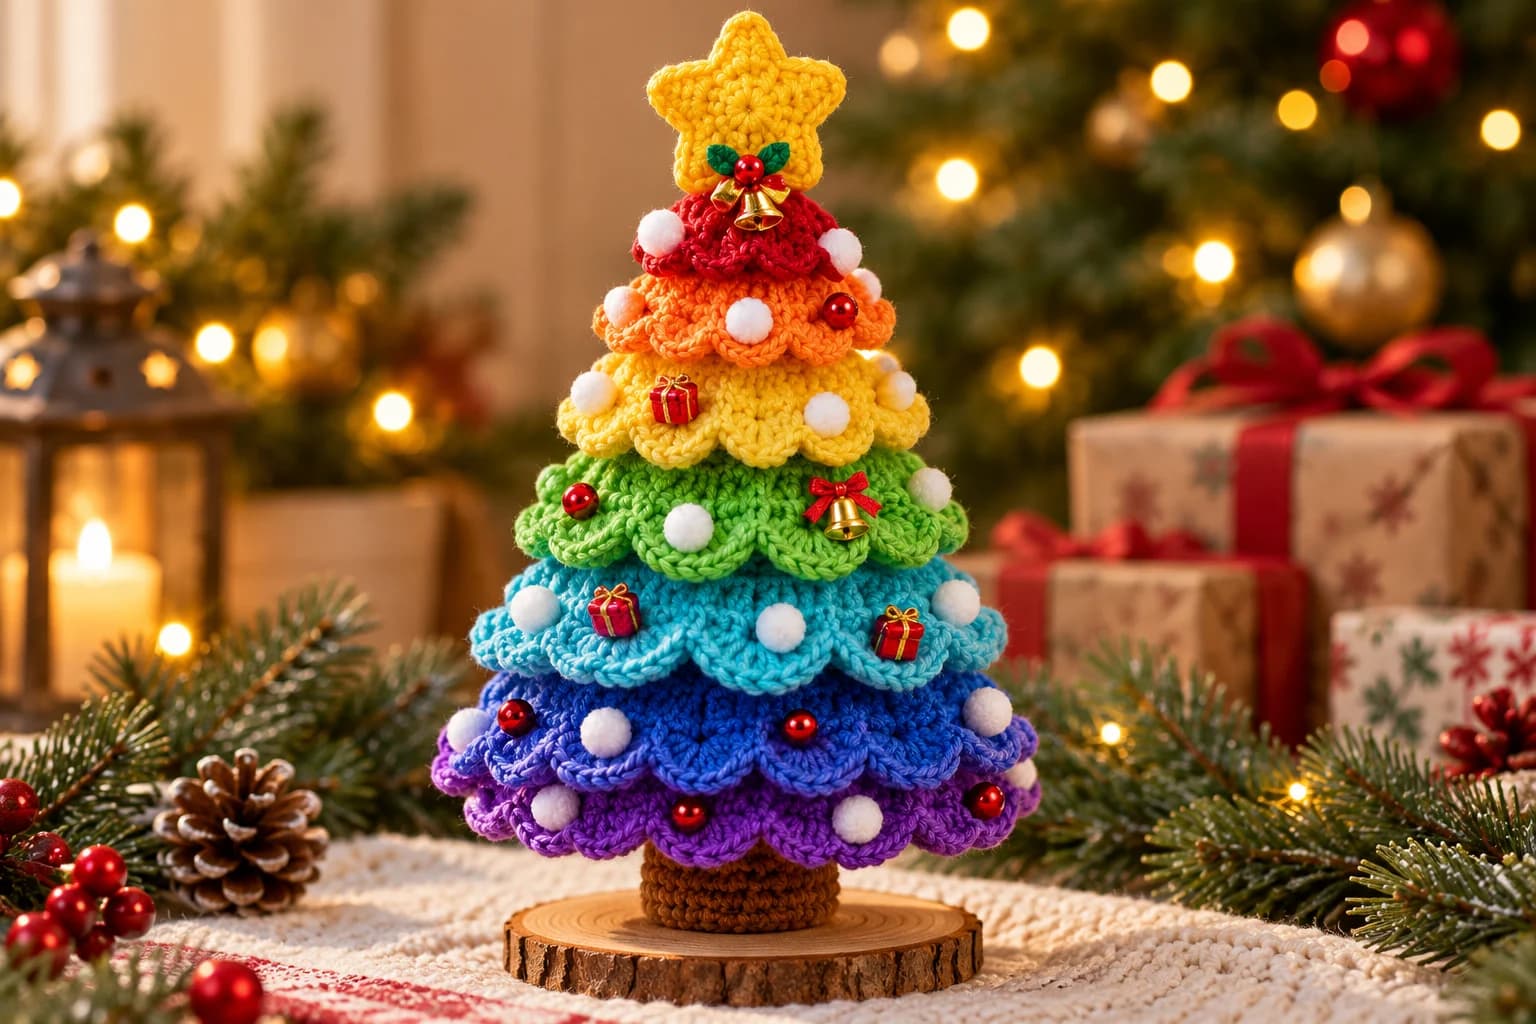
A handmade Christmas tree brings color and texture to a mantel, shelf, or festive table without taking up much space. This colorful crochet Christmas tree pattern builds that shape from seven separate scalloped layers, a stuffed trunk, and a cheerful star. You can arrange your yarn into a rainbow or choose shades that suit your holiday decorations.
If you enjoy Christmas crochet patterns that let you practice familiar stitches in a different way, this project offers a useful progression: increasing circles, shaping decorative edges, and assembling individual pieces. The instructions below explain the construction one stage at a time.
Pattern credit: adapted from the “Colorful Christmas Tree” PDF by CosFamily, supplied for this tutorial. The explanations and diagram clarify the source pattern's shorthand.
Before You Begin
This project suits confident beginners who can work a magic ring, join rounds, and recognize stitch tops. Practice those skills first if you are exploring easy Christmas crochet patterns for the first time.
Materials
- Four-ply milk cotton yarn in seven coordinating colors, plus brown and yellow.
- A 3.0 mm crochet hook.
- Stitch marker, scissors, and tapestry needle.
- Fiberfill for the trunk.
- A round display base and adhesive suitable for yarn and the base material.
- Optional small decorative trims or pom-poms.
“Four-ply” labels vary, so keep yarn thickness consistent across colors. The supplied pattern does not specify yardage, gauge, or finished dimensions; your yarn and tension will determine size. The larger layers require more yarn than the top layers. Our yarn and hook guide explains how to choose a firm fabric for the trunk.
US terms and abbreviations
Ch means chain; sl st, slip stitch; sc, single crochet; hdc, half double crochet; dc, double crochet; and BLO, back loop only. A dc increase means two double crochets in one stitch. Sc2tog means single crochet two stitches together. See our pattern-reading guide for help with notation.
Work in joined rounds without turning. Begin double-crochet rounds with ch 2 and single-crochet rounds with ch 1; these chains do not count as stitches. Join to the first actual stitch with a slip stitch.
Step 1: Crochet the Seven Circular Layers
Each layer begins with the same increasing circle. Stop at the round shown in the table, then add the scalloped edging in Step 2. Make one layer of each size.
- Round 1: Make a magic ring, ch 2, and work 6 dc into the ring. Tighten and join. 6 stitches.
- Round 2: Work 2 dc in every stitch. 12 stitches.
- Round 3: Repeat [dc in next stitch, dc increase in next stitch] six times. 18 stitches.
- Round 4: Repeat [dc in next 2 stitches, dc increase in next stitch] six times. 24 stitches.
- Round 5: Repeat [dc in next 3 stitches, dc increase in next stitch] six times. 30 stitches.
- Round 6: Repeat [dc in next 4 stitches, dc increase in next stitch] six times. 36 stitches.
- Round 7: Repeat [dc in next 5 stitches, dc increase in next stitch] six times. 42 stitches.
- Round 8: Repeat [dc in next 6 stitches, dc increase in next stitch] six times. 48 stitches.
| Layer, top to bottom | Last circle round | Stitches before edging | Scallops |
|---|---|---|---|
| 1: smallest | 2 | 12 | 6 |
| 2 | 3 | 18 | 9 |
| 3 | 4 | 24 | 12 |
| 4 | 5 | 30 | 15 |
| 5 | 6 | 36 | 18 |
| 6 | 7 | 42 | 21 |
| 7: largest | 8 | 48 | 24 |
Mark the first stitch of each round. Count before starting the edging; correcting a missed increase is much easier now.
Step 2: Add the Scalloped Branch Edges
The edging uses two stitches from the previous round per repeat. Work as follows:
- Ch 1, then sc in the first stitch.
- In the next stitch, work 2 dc, ch 2, 2 dc, placing all four double crochets into that same stitch.
- Repeat [sc in next stitch; (2 dc, ch 2, 2 dc) in following stitch] around. Work the starting ch 1 only once.
- Slip stitch into the first sc, fasten off, and weave in the ends.
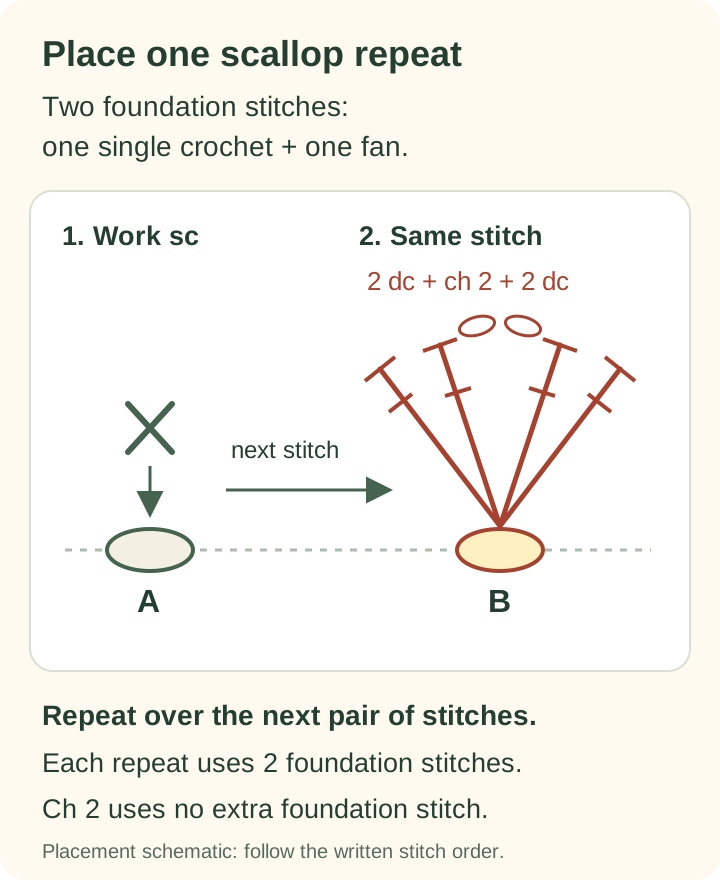
Keep the single crochets comfortable rather than tight so the edges can open. If a layer has too many scallops, check whether you accidentally worked a fan into both foundation stitches. Each repeat creates one single crochet, four double crochets, and one chain-2 space.
Set completed layers in size order to make assembly easier.
Step 3: Make and Stuff the Trunk
Using brown yarn, make a magic ring and follow the joining method above.
- Round 1: 6 dc into the ring. 6 stitches.
- Round 2: Dc increase in every stitch. 12 stitches.
- Round 3: Repeat [dc in next stitch, dc increase in next stitch] six times. 18 stitches.
- Rounds 4–10: Dc in every stitch. 18 stitches per round.
- Round 11: Sc in the back loop of every stitch. 18 stitches.
- Round 12: Repeat [sc in next stitch, sc2tog over next 2 stitches] six times. 12 stitches.
The back-loop round creates a fold line at the trunk's closing end. After joining Round 12, add fiberfill gradually until the trunk feels firm without stretching the fabric open. Fasten off with enough yarn for closure. Thread the tail through the front loops of the remaining stitches, draw the opening closed, and secure the end.
Step 4: Crochet the Star Topper
Make two matching yellow stars.
Round 1: Make a magic ring, ch 2, and work 10 dc into it. Tighten and join to the first dc.
Round 2: Ch 4. Starting in the second chain from the hook, work sc, hdc, and dc into the three successive chains. This makes one point. Skip the next dc on the center circle, then slip stitch into the following dc.
Repeat that point sequence five times in total. Each point uses two stitches around the center circle: one skipped stitch and one slip-stitch anchor. Fasten off and weave in the ends.
Align the two stars point for point and glue them together as directed in the supplied pattern. Keep the adhesive thin so it does not seep through the stitches. Let the joined star set before attaching it.
Step 5: Assemble and Decorate Your Tree
Dry-stack the layers before applying adhesive. Place the largest circle at the bottom, then add progressively smaller circles, keeping their centers aligned. Let each scalloped edge extend beyond the layer above it.
Once the arrangement looks balanced, separate the pieces and glue neighboring layers together around their centers. Keep adhesive away from the exposed scallops so the branch edges retain their movement.
Attach the trunk beneath the largest layer, then secure the trunk to the round base. Check alignment from the front and side while the adhesive is still adjustable. Finish by attaching the star at the top.
Add small pom-poms, bows, or festive trims sparingly so the crochet remains visible. Follow the adhesive manufacturer's setting instructions before moving the tree. Display this decorated piece out of reach of small children.
Tips & troubleshooting
Keep the layers in size order and check every count before edging. If a scallop looks narrow, confirm that all four double crochets share one stitch and the chain-2 arch remains loose. Use small amounts of adhesive near the centers; excess glue can flatten the branch edges.
Frequently Asked Questions
Is this an easy Christmas crochet pattern for beginners?
It suits confident beginners. The repeated circles provide practice, but magic rings, joined rounds, scallops, and star points require some stitch familiarity. Complete the smallest layer first to check that you understand the method.
Can I use different yarn for this crochet Christmas tree?
Yes, but the finished size and firmness will change. Use consistent yarn thickness across the layers and select a hook that produces tidy fabric, especially for the stuffed trunk. Make a trial layer before committing to all seven colors.
Can this tree hang with other crochet Christmas ornaments?
The supplied construction is intended for tabletop display: it includes a trunk and rigid base. A hanging version needs separate adjustments to weight, attachment, and balance. For ready-to-hang projects, explore these free Christmas crochet patterns.
Why does my assembled tree lean?
Check whether the layer centers line up, the trunk is evenly stuffed, and the base sits flat. Reposition pieces before the adhesive sets. Keep heavier decorations evenly distributed and avoid pulling one side downward while attaching the star.
Finish Your Festive Tabletop Tree
This colorful tree turns simple increasing circles into a layered Christmas decoration. Count each circle, place every scallop over two foundation stitches, and check the stack before gluing. Those small checkpoints make the construction easier to follow. Gather your favorite colors, begin with the smallest layer, and build a cheerful handmade accent for your holiday display.
Maker notes
Questions or finished-project notes?
Share what helped, ask about a step, or leave a thoughtful note for the next maker.

Loading maker notes...