Free SpongeBob Crochet Pattern: Step-by-Step Doll Guide
Follow this free SpongeBob crochet pattern with translated rows, checked stitch counts, a six-panel body diagram, and assembly and face-finishing tips.

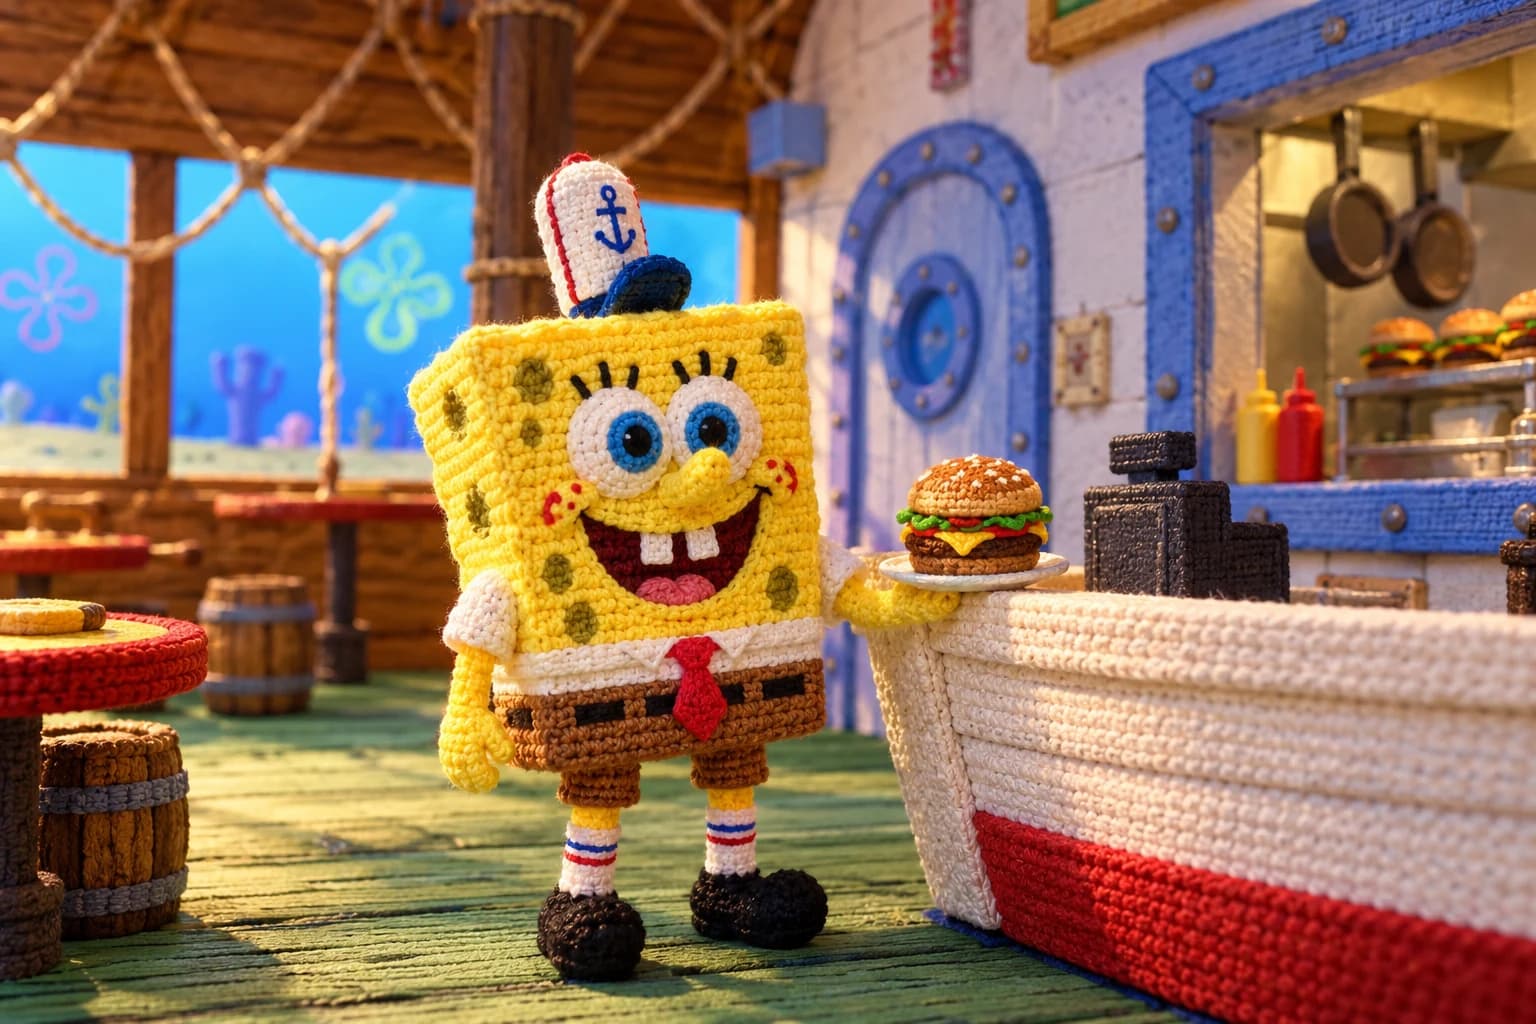
This free SpongeBob crochet pattern uses six flat panels for a rectangular body. Separate arms, socks, oversized shoes, and an expressive face complete the character.
The original pattern is by Yuliya Suyargulova. This English translation preserves her stitch counts; the joining, finger-placement interpretation, and facial finishing suggestions below are additional guidance from The Crochet Nook.
The restaurant scene, hat, and burger in the image are decorative inspiration; their instructions are not included in this pattern.
Before you start: supplies and terminology
Gather yellow, white, brown, and black yarn of matching thickness, blue and red scraps, stuffing, a tapestry needle, scissors, markers, and pins. Choose a hook that produces gap-free fabric. The source specifies no yarn, hook, gauge, yardage, or dimensions; swatch first. Our amigurumi yarn and hook guide explains how.
These are US terms: ch = chain; sc = single crochet; inc = two sc in one stitch; dec = two stitches worked together as one; BLO = back loop only; MR = magic ring; sl st = slip stitch. Parentheses followed by “×” indicate repeats; the final number is the stitch count.
For flat panels, ch 1 and turn between rows; that chain does not count. For small tubular pieces, work continuous rounds with a marker. Leave sewing tails. These working conventions clarify the abbreviated source. Review our pattern-reading guide when needed.
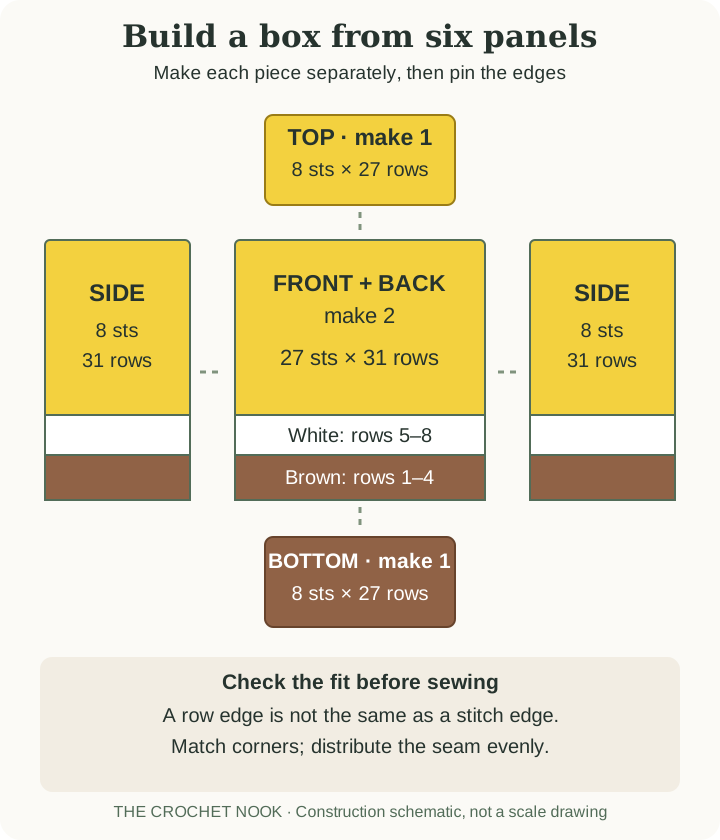
Step 1: Crochet the six body panels
Front and back: make two
Start in brown. Count every row.
| Row | Instruction | Count |
|---|---|---|
| 1 | Ch 28; starting in the second ch, sc across | 27 |
| 2–4 | Sc across in brown | 27 |
| 5 | Change to white; sc across BLO | 27 |
| 6–8 | Sc across in white | 27 |
| 9 | Change to yellow; sc across BLO | 27 |
| 10–31 | Sc across in yellow for 22 rows | 27 |
Use both loops unless specified. Each panel has four brown, four white, and 23 yellow rows, including row 9.
Side panels: make two
Ch 9 in brown; sc from the second chain for 8 sc. Follow the front/back color sequence through row 31, keeping eight stitches in every row. Rows 5 and 9 are BLO. Align the brown shorts and white shirt bands when joining.
Top and bottom: make one each
For the yellow top, ch 9 and sc from the second chain: eight stitches. Work rows 2–27 with eight sc per row. Repeat in brown for the bottom. Each strip measures eight stitches across and 27 rows long.
Step 2: Make the arms and hands
Make two, beginning in white.
| Round | Instruction | Count |
|---|---|---|
| 1 | 6 sc in MR | 6 |
| 2 | (Sc, inc) × 3 | 9 |
| 3 | Sc around | 9 |
| 4 | Yellow, BLO: (sc, dec) × 3 | 6 |
| 5–11 | Sc around for seven rounds | 6 |
| 12 | (Sc, inc) × 3 | 9 |
| 13 | (2 sc, inc) × 3 | 12 |
| 14 | Sc around | 12 |
Leave arms unstuffed or lightly stuff before closing. Without cutting yarn, ch 3; sc in the second chain and next chain for a thumb. Flatten the palm; work six sc through corresponding stitches of both layers.
The source then describes ch-4 fingers, with three sc worked back from the second chain, and says to make two more. It does not identify their attachment stitches. Suggested interpretation: slip stitch to a palm-edge stitch, ch 4, work three sc back, and anchor to that same edge stitch. Move along the closed edge and repeat twice for three long fingers. Mirror their placement on the second hand; avoid pulling the edge tight.
Step 3: Crochet the black shoes
Make two. Start at the rounded toe; the final small opening closes the heel, rather than forming an ankle hole.
| Round | Instruction | Count |
|---|---|---|
| 1 | 6 sc in MR | 6 |
| 2 | Inc × 6 | 12 |
| 3 | (Sc, inc) × 6 | 18 |
| 4 | Inc × 6, then 12 sc | 24 |
| 5–7 | Sc around | 24 |
| 8 | Dec × 6, then 12 sc | 18 |
| 9 | (Sc, dec) × 6 | 12 |
| 10 | Sc around | 12 |
| 11 | (3 sc, inc) × 3 | 15 |
| 12–14 | Sc around | 15 |
| 15 | (3 sc, dec) × 3 | 12 |
| 16 | Dec × 6 | 6 |
Stuff before the opening narrows. Thread the tail through the remaining stitches, draw closed, and secure. Avoid stretching the stitches with stuffing.
Step 4: Make the legs, eyes, and nose
Legs: make two
Begin in brown: round 1, six sc in MR; round 2, six increases (12); round 3, 12 sc. Change to yellow for round 4, working BLO (2 sc, dec) × 3 (9). Rounds 5–8: nine sc. Change to white; rounds 9–14: nine sc. Leave the white end open for sewing onto the shoe.
The brown cap attaches beneath the body; the white sock end attaches to the shoe near its heel. Stuff lightly enough to preserve the slim legs.
White eyes: make two
Round 1: six sc in MR. Round 2: six increases (12). Round 3: (sc, inc) × 6 (18). Round 4: (2 sc, inc) × 6 (24). Fasten off with a sewing tail and flatten each disc.
Yellow nose: make one
Round 1: eight sc in MR. Rounds 2–3: eight sc. Round 4: (2 sc, dec) × 2 (6). Round 5: six sc. Lightly stuff; leave open for attachment.
Step 5: Assemble and add the expression
These finishing suggestions supplement the photograph; the PDF gives no assembly sequence.
- Decorate the front while flat. Pin both eye discs above the white shirt stripe, leaving room for lashes. Sew around their edges; embroider blue irises and black pupils. Attach the nose centrally between their lower edges.
- Add the smile. Outline a curved mouth in black, with short upward corners. Embroider two white teeth beneath its center. Add three lashes above each eye and a small red embroidered tie on the white band. Optional blue and red stitched lines suggest sock stripes.
- Join the body. Sew the two side panels between front and back, matching color changes. Pin top and bottom into the remaining openings, matching corners and distributing row ends evenly along stitch edges. Different stitch and row gauges can make these edges unequal: check the fit before sewing, and rework a strip to the measured length if easing cannot keep it flat.
- Stuff and finish. Leave part of one seam open; add small tufts into corners, then fill the center without bowing the front. Close securely. Sew sleeves beside the shirt band, legs beneath the brown bottom, and sock ends onto the shoes. Pin both limbs first to check symmetry.
For more expression-placement help, see our amigurumi face tutorial. Embroidery keeps this version free of separate plastic eye pieces.
Tips & troubleshooting
Count both matching pieces before sewing. If a panel tapers, check for missed edge stitches. Keep color changes at the row ends, and pin every corner before distributing the seam stitches. Photograph the pinned face layout to preserve its spacing while attaching each detail.
Frequently Asked Questions
Is this a simple SpongeBob crochet pattern for beginners?
The stitches are basic, but small rounds, fingers, and six-panel assembly make this better suited to confident beginners with some sewing experience. Practice counting rounds and joining flat swatches first.
Is this a mini SpongeBob crochet pattern or keychain?
No mini size is specified. This is a multi-piece doll, and its dimensions depend on your materials. Finer yarn makes smaller pieces, but it also makes the hands and embroidery more demanding.
What yarn and hook should I use?
Choose smooth yarn in matching thicknesses and swatch with a compatible hook. The fabric should hold stuffing without large gaps. The designer provides no specific yarn, hook size, or measured gauge to reproduce.
Why does my rectangular body look rounded?
Excess stuffing pushes the panels outward. Remove some, redistribute small tufts into the corners, and check seam alignment. Avoid stretching the fabric to force mismatched edges together; fit the panels before closing.
Finish your SpongeBob crochet doll
Keep paired limbs identical and take time over the face. Careful pinning and stuffing preserve the recognizable box shape. Next, explore our amigurumi learning roadmap.
Essential crochet guides
Maker notes
Questions or finished-project notes?
Share what helped, ask about a step, or leave a thoughtful note for the next maker.
Loading maker notes...