Jesus Crochet Pattern: A Divine Mercy Doll in 8 Steps
Follow this free Jesus crochet pattern to make a 20 cm Divine Mercy doll, with clear rounds, arm-joining diagrams, brown hair, and red and blue rays.

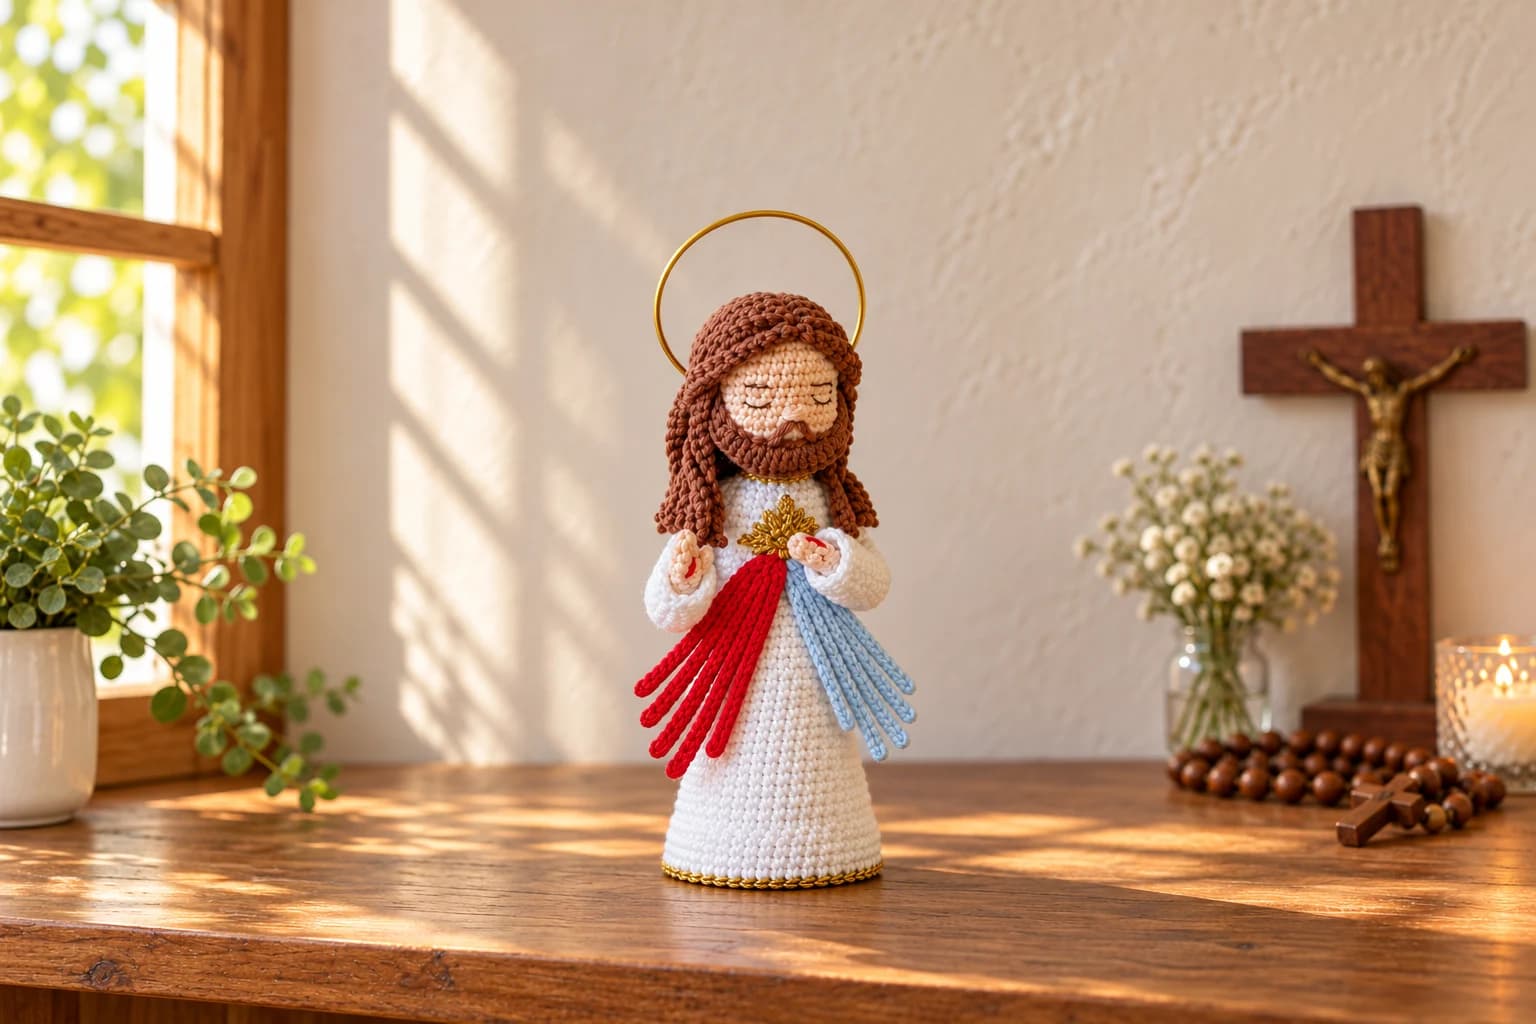
This Jesus crochet pattern makes a standing Divine Mercy amigurumi doll with a white gown, brown hair and beard, a gold chest detail, and red and pale-blue rays. The finished figure offers a handmade reminder of faith for a quiet prayer corner, a shelf beside a cross, or a thoughtful devotional gift.
The design is an intermediate/advanced project, approximately 20 cm tall without the halo when made with the specified materials and X-shaped single crochet. Allow about eight hours as a starting estimate; your pace, tension, yarn, and hook can change both the time and size.
Original design: Edna Alcantara, Encantarte Crochê. English article and reading notes by Maya at The Crochet Nook. The eight sections organize the components while keeping their original round numbering. Printed count differences are identified beside the relevant lines; no extra decreases or replacement rounds have been inserted.
1. Prepare the yarn, tools, and stitch key
Choose Círculo Amigurumi in Macadâmia 3148 for the skin, Branco 8001 for the gown and sleeves, Cacau 7567 for the hair and beard, Vermelho Círculo 3402 for one ray fan, and Azul Candy 2012 for the other. Use Encanto Slim Ouro Dourado 7577 for the gold details.
Have these tools and finishing materials ready:
- 1.8 mm hook: arms and sleeves.
- 2.0 mm hook: gown/body, head, hair, ray fans, waist detail, and hem.
- 2.5 mm hook: beard.
- 1.5 mm hook: gold flaming-heart motif.
- Soft fiberfill, tapestry needle, scissors, pins, and sewing thread.
- Black Cléa thread for facial details and red Cléa thread for the hand marks.
- No. 7 locking safety eyes if choosing that facial finish; embroidered eyes are also an option.
- A 5 cm acrylic base, silicone glue, pliers, and masking or electrical tape.
- No. 18 galvanized wire for the neck and arms; 1.5 mm gold wire is also listed for the design.
- Termolina fabric stiffener for the ray fans; stiffening the chest motif is optional.
The acrylic base fits the designer's tension. Check it against your crocheted base before gluing. Yarn quantities and a numerical gauge are not supplied; do not assume a specific amount per color. Keep wire-supported pieces and loose finishing materials for decorative display rather than children's play.
The written instructions below use US terms (US crochet terminology):
| Abbreviation | Meaning |
|---|---|
| MR | Magic ring |
| ch | Chain |
| sc | Single crochet |
| sl st | Slip stitch |
| hdc | Half double crochet |
| dc | Double crochet |
| inc | 2 sc in the same stitch |
| dec | Single-crochet decrease across 2 stitches |
| BLO / FLO | Back loop only / front loop only |
| st / sts | Stitch / stitches |
An hdc inc means 2 hdc in one stitch; a dc inc means 2 dc in one stitch. A repeat such as (3 sc, inc) ×6 repeats the entire group six times. Bracketed numbers are the printed counts. Use our crochet abbreviation guide if you need a notation refresher.
Make matching arms consecutively to help keep their tension consistent. Add soft stuffing gradually as the work progresses, rather than packing in one large amount at the end. The amigurumi beginner guide can help with basic shaping, but this figure is not a first amigurumi project.
2. Crochet two arms and their bell-shaped sleeves
Use the 1.8 mm hook and Macadâmia for each hand and arm. Arm numbering starts at round 1; the gown/body has its own sequence.
- Round 1: 5 sc in MR. [5]
- Round 2: Inc, 4 sc. [6]
- Round 3: Sc around. [6]
Change to white:
- Round 4: BLO, 6 sl st.
- Round 5: BLO, 2 sc, 2 inc, 2 sc. [8]
- Rounds 6–9: Sc around. [8 each round; 4 rounds]
- Round 10: BLO, sc around. [8]
- Rounds 11–20: Sc around. [8 each round; 10 rounds]
For the crocheted-in arm join used in step 3, fasten off and finish with an invisible join. Each arm has an 8-stitch opening. Keep four stitches available for joining in body round 43 and the other four for round 44.
Return to the unused loops at the arm's round-10 ridge and work the flared sleeve in white:
- Sleeve round 1:
(Sc, inc) ×4. [12] - Sleeve round 2: Sc around. [12]
- Sleeve round 3:
(5 sc, inc) ×2. [14] - Sleeve round 4:
(6 sc, inc) ×2. [16] - Sleeve rounds 5–6: Sc around. [16 each round; 2 rounds]
- Sleeve round 7: Sl st around. [14, as printed]
Count-reading note: the preceding sleeve round has 16 stitches, and the final line gives no decrease instruction. Its printed [14] is retained here; it is not an instruction to invent two decreases. Check the actual edge as you finish it.
Embroider the small red marks on the hands with red Cléa thread. Set both completed arms aside while you build the gown. This guide uses the crocheted-in attachment route rather than mixing it with the alternative sewn-arm route.
3. Shape the white gown and join the arms
Use the 2.0 mm hook and white Amigurumi. The gown, neck, and head form one continuous piece; numbering continues through round 67.
- Round 1: 9 sc in MR. [9]
- Round 2: 9 inc. [18]
- Round 3: Sc, inc,
(2 sc, inc) ×5, sc. [24] - Round 4:
(3 sc, inc) ×6. [30] - Round 5: 2 sc, inc,
(4 sc, inc) ×5, 2 sc. [36] - Round 6:
(5 sc, inc) ×6. [42] - Round 7: Raised/stem sc around. [42] Use the designer's raised-stitch demonstration for this specific technique.
- Rounds 8–10: Sc around. [42 each round; 3 rounds]
- Round 11: BLO, sc around. [42]
- Rounds 12–15: Sc around. [42 each round; 4 rounds]
Glue the acrylic base in place now and let the glue dry before continuing.
- Round 16: 6 sc, dec,
(12 sc, dec) ×2, 6 sc. [39] - Rounds 17–20: Sc around. [39 each round; 4 rounds]
- Round 21:
(11 sc, dec) ×3. [36] - Rounds 22–25: Sc around. [36 each round; 4 rounds]
- Round 26: 5 sc, dec,
(10 sc, dec) ×2, 5 sc. [33] - Rounds 27–30: Sc around. [33 each round; 4 rounds]
- Round 31:
(9 sc, dec) ×3. [30] - Rounds 32–35: Sc around. [30 each round; 4 rounds]
- Round 36: 4 sc, dec,
(8 sc, dec) ×2, 4 sc. [27] - Rounds 37–42: Sc around. [27 each round] The original lists this range and also prints “5 rounds”; the numbered range contains six rounds.
Keep adding stuffing gradually. For the arm join, read both of the next rounds before starting:
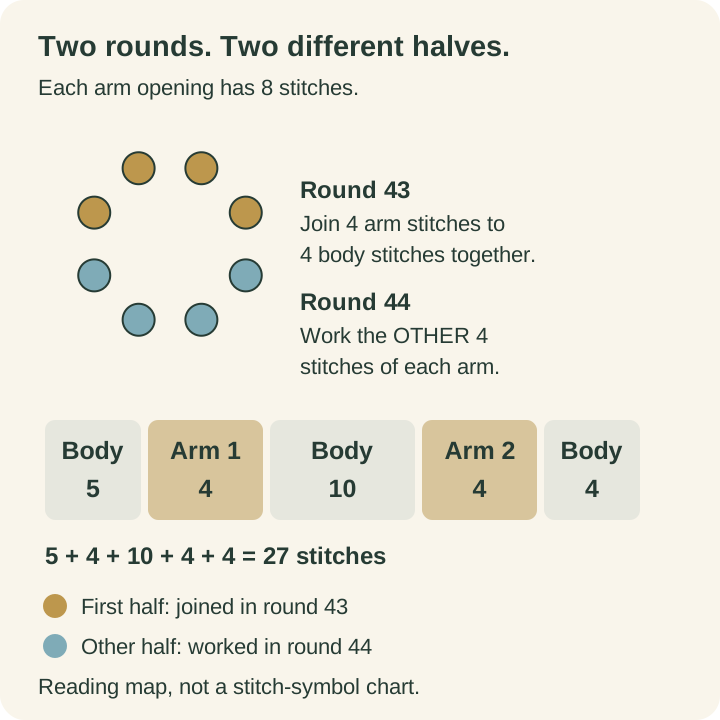
- Round 43: 5 sc; 4 sc joining the first arm to the body; 10 sc on the body; 4 sc joining the second arm to the body; 4 sc. [27] Each joining sc passes through an arm stitch and its corresponding body stitch together.
- Round 44: 5 sc; 4 sc in the first arm's previously unworked stitches; 10 sc on the body; 4 sc in the second arm's previously unworked stitches; 4 sc. [27]
The five groups are 5 + 4 + 10 + 4 + 4 = 27 in each round. The four arm stitches in round 44 are the other half of each arm opening, not the same four joined in round 43. The designer's arm-joining video provides another view of this construction.
- Round 45:
(Sc, dec) ×8. [18, as printed]
Count-reading note: this is the original line. With 27 starting stitches, eight repeats consume 24 stitches and produce 16, leaving three starting stitches unworked. The printed total is 18. Those two parts do not reconcile arithmetically; no unlisted stitches or substituted repeat have been added here. Resolve that transition against the original pattern before treating the following 18-stitch round as a confirmed count.
Change to Macadâmia:
- Round 46: BLO, sc around. [18]
- Round 47:
(Sc, dec) ×6. [12] - Round 48:
(2 sc, dec) ×3. [9]
Do not close the neck: continue directly into the head in step 4.
4. Crochet the head and finish the face
Continue with the 2.0 mm hook and Macadâmia. Read the face-placement and neck-support notes below before starting; install locking eyes and support while the head is still open.
- Round 49: Sc around. [9]
- Round 50: 9 inc. [18]
- Round 51:
(2 sc, inc) ×6. [24] - Round 52:
(3 sc, inc) ×6. [30] - Round 53:
(4 sc, inc) ×6. [36] - Rounds 54–55: Sc around. [36 each round; 2 rounds]
- Round 56: 15 sc, 2 dec, 4 sc, 2 dec, 9 sc. [32]
- Round 57: Sc around. [32]
- Round 58: 7 sc, inc, 8 sc, inc, 5 sc, inc, 8 sc, inc. [36]
- Rounds 59–62: Sc around. [36 each round; 4 rounds]
- Round 63:
(4 sc, dec) ×6. [30] - Round 64:
(3 sc, dec) ×6. [24] - Round 65:
(2 sc, dec) ×6. [18] - Round 66:
(Sc, dec) ×6. [12] - Round 67: 6 dec. [6] Close with a reverse magic-ring finish.
Round 56 shapes the cheeks. Center its paired decreases at the front; the original allows adjusting the number of sc before the decrease groups to position them correctly. Keep the shaping centered rather than assuming the start of the round is automatically the center of the face.
Fit the neck support and complete any locking-eye attachment before closing the head. Fold the ends of the No. 18 wire inward, then fold the wire back on itself to make a doubled support. Cover it with tape before inserting it into the neck. The arm-joining stage also allows adding arm wire for the final hand positions.
Choose one of the two facial finishes:
- Locking eyes: position between rounds 57 and 58, above the cheek shaping, with five stitches between the eyes. Secure them according to their fastening instructions. The pattern also describes white yarn below each eye and black Cléa above each eye for extra definition.
- Embroidered eyes: work between rounds 56 and 57, with four stitches of separation. This is the peaceful closed-eye appearance shown in the finished devotional figure.
For the nose, use skin-colored yarn one round below the eyes, spanning two stitches, and make three wraps. The eyebrow instruction places black sewing-thread embroidery two rounds above the eyes. Our amigurumi face guide explains general face-finishing terminology; use this pattern's own placements for this doll.
5. Add the gown hem and fine gold trim
Use the 2.0 mm hook. The gold collar is worked in slip stitches around the neck/gown transition. Work the gold waist detail between body rounds 31 and 32 in Encanto Slim, slip stitching around, then fasten off and hide the ends.
For the white hem, return to the unused front loops of body round 10. These are the loops left available when round 11 was worked BLO; do not add a second BLO round.
- Hem round 1: 42 sl st. Join with a sl st in the first stitch.
- Hem rounds 2–4: Sc around. [42 each round; 3 rounds]
- Hem round 5: Sl st around, joining one stitch of the hem to one stitch of the base each time. Fasten off.
The closing hem round can be worked with the gold Encanto Slim, as shown in the finished version. Keep the join even around the base so the gown's edge stays tidy. Let glued elements dry before handling the figure repeatedly.
6. Make the beard and sixteen hair strands
For the beard, use the 2.5 mm hook and Cacau. Ch 20 and begin in the second chain from the hook:
5 sc, 2 hdc inc, 2 dc inc, 3 dc in one chain, 2 dc inc, 2 hdc inc, 5 sc.
Fasten off, position the shaped beard on the face, and glue it in place. Embroider the moustache; the original describes passing the yarn twice. The beard sequence uses the 19 available foundation chains, with the taller stitches shaping its center.
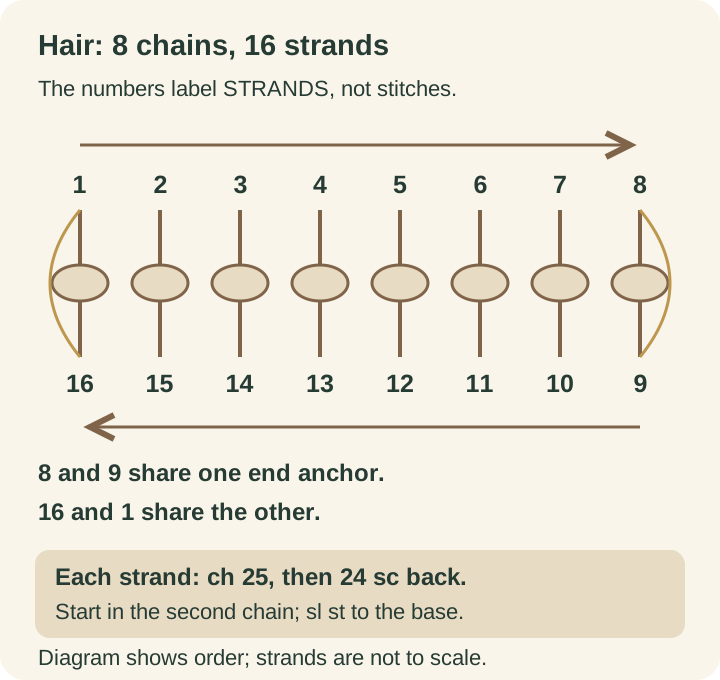
For the hair, change to the 2.0 mm hook, keeping Cacau. Ch 8 for the foundation. Work 16 strands around both sides of that foundation:
- Strand 1: Ch 25; from the second chain, work 24 sc, using the second chain loop for the slimmer strand described in the pattern. Sl st to the foundation.
- Strands 2–8: Ch 25, work 24 sc from the second chain, and sl st in the next foundation chain. Repeat seven times.
- Strand 9: Ch 25, work 24 sc, and sl st in the same foundation chain used for strand 8.
- Strands 10–15: Ch 25, work 24 sc, and sl st in the next foundation chain as you return along the other side. Repeat six times.
- Strand 16: Ch 25, work 24 sc, and sl st in the same foundation chain used for strand 1.
If the strands are too short for your figure, the pattern allows adding more chains. The listed version uses 25 chains and 24 sc per strand. Position the hair on the head, separate strands 1 and 2, and glue the remaining strands. Then turn strands 1 and 2 over and glue them with their reverse side showing to frame the face as in the finished example.
7. Crochet the red and pale-blue rays and gold chest motif
Each color makes one five-ray fan. Use the 2.0 mm hook, make one fan in red and the other in Azul Candy, and leave a long starting tail for attachment to the chest motif.
Ch 3 for the foundation. For each ray, work back from the second chain in slip stitches through the second chain loop, then anchor with a sl st in the third foundation chain. The designer's second-loop slip-stitch demonstration shows the referenced technique.
| Ray, in working order | Chains | Returning slip stitches |
|---|---|---|
| 1 | 16 | 15 |
| 2 | 18 | 17 |
| 3 | 20 | 19 |
| 4 | 22 | 21 |
| 5 | 20 | 19 |
Fasten off after ray 5. Keep the rays close together and stretched out while applying Termolina to their reverse side, then let them dry in that arrangement. This creates the firm, gathered fan rather than five loose strands hanging separately. The ray-finishing video is included among the designer's support resources.
For the gold flaming-heart motif, use the 1.5 mm hook and gold Encanto Slim. Keep the magic ring open until all eleven flame elements are complete. Each chain element is joined back into that same ring:
- Flame 1: From MR, ch 4; sc, 2 sl st, then sl st into MR.
- Flames 2–3: Ch 3; sc, sl st, then sl st into MR.
- Flame 4: Ch 4; sc, 2 sl st, then sl st into MR.
- Flame 5: Ch 3; sc, sl st, then sl st into MR.
- Flame 6: Ch 3; sc, sl st, then sc and sl st into MR. Keep the extra sc specified for this element.
- Flames 7–8: Ch 3; sc, sl st, then sl st into MR.
- Flame 9: Ch 4; sc, 2 sl st, then sl st into MR.
- Flames 10–11: Ch 3; sc, sl st, then sl st into MR.
Close the ring and fasten off. You may apply Termolina or the stiffening product named in the original to its reverse side. Let the motif dry before attachment.
8. Assemble the devotional details and choose its place
Position the gold motif on the chest and glue it in place. Pass each ray fan's starting tail through the center of the motif and secure it. A little glue may also be used to hold the rays against the gown. Arrange the red and pale-blue fans so both remain visible.
Pose the hands as in the completed figure: one raised, the other close to the chest. Check the embroidered red hand marks, hair framing, moustache, collar, waist line, and hem before setting the doll on its base.
The finished photographs include a circular gold-wire halo, and the materials list specifies 1.5 mm gold wire. No measured halo-forming or attachment sequence is provided, so no invented wire length or attachment method is included here. The stated 20 cm height excludes it.
Choose a dry, stable shelf or home prayer corner where the figure can stand undisturbed. A nearby cross, a prayer book, or a rosary can give the display a personal devotional setting without hiding the handmade details. Keep yarn and stiffened components away from candle flames and heat.
Tips & troubleshooting
- Keep component numbering separate. Arm round 10, sleeve round 1, body round 43, and flame 6 refer to different parts of the construction.
- Mark the front before the cheek shaping. The paired decreases in round 56 should sit beneath the facial features; the original allows repositioning the preceding sc to center them.
- Reserve the right arm stitches. Work the first four into body round 43 and the other four in round 44. Reusing the same half closes the opening incorrectly.
- Let glue and stiffener dry. The base is glued before round 16, the hair is positioned before final gluing, and the rays are stiffened while arranged together.
- Keep printed-count notes visible while working. The sleeve's last count and body round 45 contain the original differences described above. Do not add unlisted stitches solely to force a bracketed total.
- Plan for your own tension. Hook brand, hook size, yarn thickness, and the X-shaped sc can affect height and base fit. The 20 cm figure is a reference size, not a promise for every yarn substitution.
Frequently Asked Questions
Is this Jesus crochet pattern suitable for beginners?
It is an intermediate/advanced pattern. You need increases and decreases, loop-specific stitches, joining arms during body rounds, facial embroidery, chain-based hair, wire support, and decorative finishing. Learn basic shaping with the amigurumi guide before attempting this detailed figure.
How tall is the crochet Jesus doll, and how long does it take?
The specified materials and X-shaped single crochet produce a figure approximately 20 cm tall without its halo. The making-time estimate is about eight hours. Your tension and experience can change both measurements.
Which yarn and hooks are used for this Divine Mercy amigurumi?
The design uses Círculo Amigurumi for the skin, gown, hair, beard, and red and pale-blue rays, with Encanto Slim for the gold details. Hooks vary by component: 1.8 mm for the arms, 2.0 mm for most of the figure, 2.5 mm for the beard, and 1.5 mm for the gold chest motif. Yardage is not specified.
Can I embroider the eyes instead of using locking eyes?
Yes. The embroidered-eye option places them between rounds 56 and 57 with four stitches of separation. Locking eyes use a different placement: between rounds 57 and 58 with five stitches of separation. Choose one option and keep its corresponding placement.
Is this a mini Jesus keychain or baby Jesus pattern?
No. It is a standing Divine Mercy Jesus doll with a long gown, hair and beard, chest motif, and red and pale-blue ray fans. The instructions do not include keychain hardware, a miniature conversion, or a Nativity baby figure.
Does the pattern explain the gold-wire halo?
It lists 1.5 mm gold wire and shows a halo in the completed figure, but does not give a measured forming or attachment sequence. The written instructions therefore do not substitute an untested halo method, and the approximate 20 cm finished height is measured without the halo.
Essential crochet guides
Maker notes
Questions or finished-project notes?
Share what helped, ask about a step, or leave a thoughtful note for the next maker.
Loading maker notes...