Free Crochet Panda Pattern: Step-by-Step Amigurumi
Crochet a panda with a complete round-by-round amigurumi pattern, embroidered eyes, counted pieces, assembly guidance, and practical troubleshooting tips.

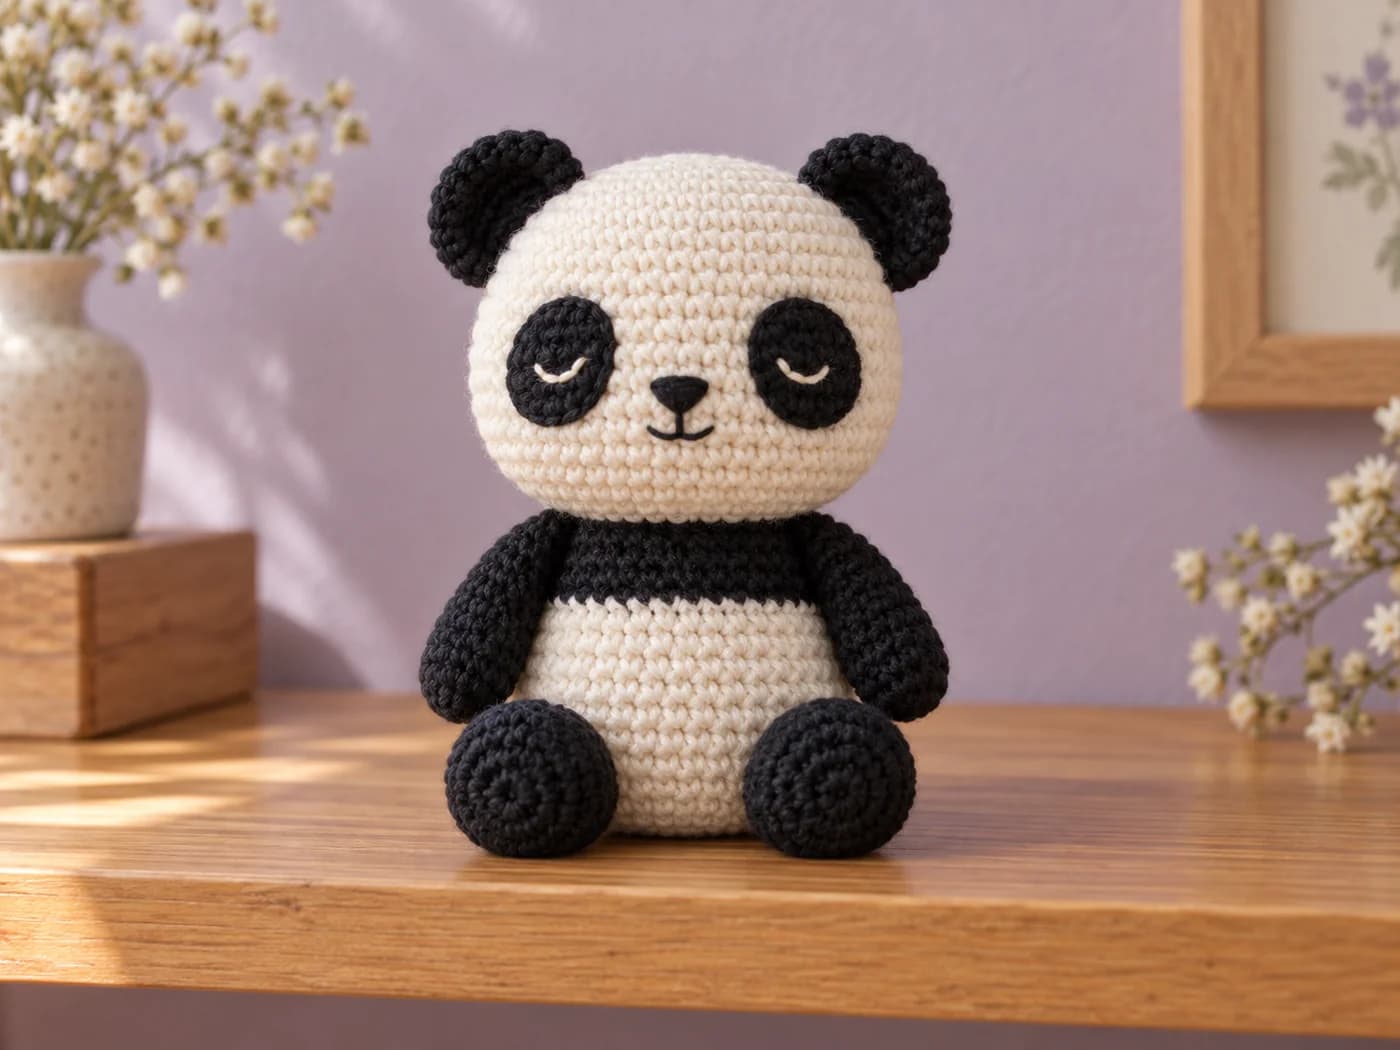
This free crochet panda pattern combines a cream head and body with black ears, eye patches, arms, feet, and a shoulder band. The sleepy eyes are embroidered onto small crochet patches, so you can finish the face without plastic eyes. Each piece has its own instructions below, followed by an assembly order that keeps the important joins accessible.
You should be comfortable working single crochet in a spiral, increasing, decreasing, and sewing pieces together. If those skills are new, start with our beginner amigurumi guide. Finished dimensions and yarn use have not been measured from a physical sample; check the size as you work rather than relying on a promised height.
Materials and yarn choices
- Smooth DK yarn in cream or white and black, using the same yarn range for both colors
- A 3 mm crochet hook as a starting point; adjust to make dense stitches that hold stuffing without gaps
- A short length of cream yarn for the embroidered eyes
- Toy stuffing, a blunt yarn needle, scissors, and a locking stitch marker
- Removable pins or spare yarn markers for positioning the pieces
Smooth yarn makes the black stitches easier to identify than fluffy or chenille yarn. Work under a bright lamp, and count each round before starting the next one. Our amigurumi yarn and hook guide explains how yarn choice changes stitch visibility and fabric density.
Before making the head, work the first few rounds and stretch the fabric gently. If wide holes appear, try a smaller hook without pulling each stitch painfully tight. Changing hook size changes the finished panda's size, so use the same hook for all pieces unless your tension requires a correction.
Abbreviations and pattern notes
This pattern uses US terms.
| Term | Meaning |
|---|---|
| sc | Single crochet |
| inc | Work 2 sc in the next stitch |
| dec | Single crochet 2 stitches together; an invisible decrease is suitable |
| MR | Magic ring |
| sl st | Slip stitch |
Work in continuous rounds unless a join is specifically stated. Mark the first stitch and move the marker after each round. Do not add a turning chain or join at the end of ordinary spiral rounds. A repeat such as (2 sc, inc) x 6 means one sc in each of the next two stitches, then two sc in the following stitch, repeated six times.
For an invisible decrease, insert the hook through the front loop of each of the next two stitches, yarn over and pull through both front loops, then yarn over and pull through the two loops on the hook. Each decrease consumes two stitches and produces one.
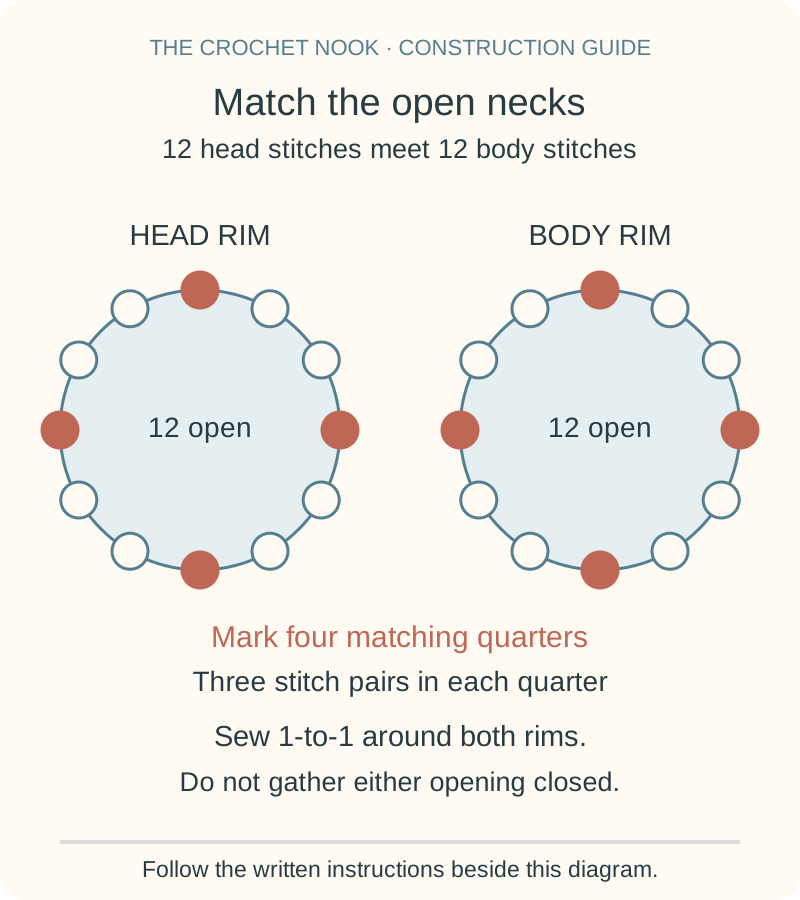
The head and body both finish with 12 open neck stitches. Leave these openings unclosed until you sew them together. Leave sewing tails long enough to pass around the relevant attachment edge twice, with extra length for weaving in.
Head: make one in cream
| Round | Instruction | Stitches |
|---|---|---|
| 1 | 6 sc in MR | 6 |
| 2 | inc x 6 | 12 |
| 3 | (1 sc, inc) x 6 | 18 |
| 4 | (2 sc, inc) x 6 | 24 |
| 5 | (3 sc, inc) x 6 | 30 |
| 6 | (4 sc, inc) x 6 | 36 |
| 7-12 | sc in each stitch | 36 |
| 13 | (4 sc, dec) x 6 | 30 |
| 14 | (3 sc, dec) x 6 | 24 |
| 15 | (2 sc, dec) x 6 | 18 |
| 16 | (1 sc, dec) x 6 | 12 |
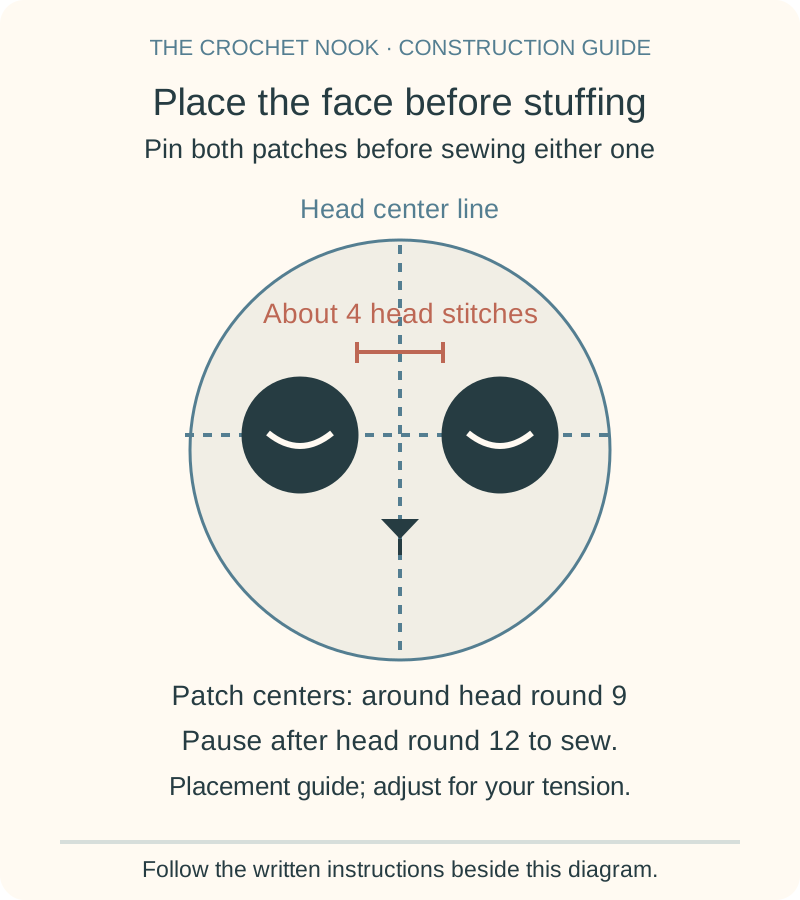
Pause after round 12 if you want to sew the eye patches and embroider the nose while the head is wide open. Make the patches below first. Temporarily add a little stuffing to judge placement, then remove it for sewing. Begin filling the head before the last decrease rounds, adding small amounts evenly rather than one hard lump. After round 16, fasten off with a sewing tail and leave the opening intact.
Eye patches: make two in black
Work 8 sc into a magic ring, tighten the center, and sl st into the first sc. The join does not count as a ninth stitch. Fasten off with a sewing tail. These are small, round patches; do not add another round.
Embroider a shallow cream curve across the middle of each patch using two or three short stitches. Keep the stitches loose enough that the patch remains flat, and secure the ends on its back. Pin both patches onto the front of the head before sewing either one down.
As a starting placement, center the patches around head round 9 with about four head stitches between their inner edges. Check from the front and above, then adjust for the actual patch size and your tension. Sew around each patch edge with its black tail, catching the head fabric without pulling it into a dent.
Embroider a small black triangular nose between the lower parts of the patches. Add a short vertical stitch below it and two short curves for the mouth if desired. Secure the embroidery inside the head while you can still reach it. See our amigurumi face tutorial for more placement help.
Body: cream base with a black shoulder band
Start in cream. At the final stitch of round 9, pull black through the last two loops to complete the stitch. Continue in black from round 10 onward. Secure both color tails inside; do not leave a tight strand across the body opening.
| Round | Instruction | Stitches |
|---|---|---|
| 1 | 6 sc in MR | 6 |
| 2 | inc x 6 | 12 |
| 3 | (1 sc, inc) x 6 | 18 |
| 4 | (2 sc, inc) x 6 | 24 |
| 5 | (3 sc, inc) x 6 | 30 |
| 6-9 | sc in each stitch | 30 |
| 10-11 | sc in each stitch | 30 |
| 12 | (3 sc, dec) x 6 | 24 |
| 13 | sc in each stitch | 24 |
| 14 | (2 sc, dec) x 6 | 18 |
| 15 | (1 sc, dec) x 6 | 12 |
Stuff the lower body as the opening narrows. Keep the base rounded without stretching the stitches apart. Fasten off and leave the 12-stitch neck open. Position the small step at the spiral color change toward the back during assembly.
Ears: make two in black
| Round | Instruction | Stitches |
|---|---|---|
| 1 | 6 sc in MR | 6 |
| 2 | inc x 6 | 12 |
| 3-4 | sc in each stitch | 12 |
Leave the ears unstuffed. Flatten each opening so six stitches lie against six stitches, then sew through the six opposing pairs to close the lower edge. Keep a tail for attaching the closed edge to the head. The curved portion stays free to form the rounded ear.
Arms: make two in black
| Round | Instruction | Stitches |
|---|---|---|
| 1 | 6 sc in MR | 6 |
| 2 | inc x 6 | 12 |
| 3-6 | sc in each stitch | 12 |
| 7 | (1 sc, dec) x 4 | 8 |
| 8-10 | sc in each stitch | 8 |
Add a little stuffing to the rounded lower end, keeping the upper part flexible. Flatten the last eight stitches into four opposing pairs and sew the opening closed. Leave a tail for attaching that edge to the black shoulder area. Make both arms before attaching them so you can compare their length and stuffing.
Feet and legs: make two in black
Each foot and short leg is one piece, with the starting circle forming the rounded toe.
| Round | Instruction | Stitches |
|---|---|---|
| 1 | 6 sc in MR | 6 |
| 2 | inc x 6 | 12 |
| 3 | (1 sc, inc) x 6 | 18 |
| 4-6 | sc in each stitch | 18 |
| 7 | (1 sc, dec) x 6 | 12 |
| 8-9 | sc in each stitch | 12 |
Stuff lightly, particularly around the toe, and leave each 12-stitch opening unclosed. During assembly you will sew the opening directly to the lower front of the body, allowing the toes to project forward. There are no separate paw pads in this pattern.
Tail: make one in cream
| Round | Instruction | Stitches |
|---|---|---|
| 1 | 6 sc in MR | 6 |
| 2 | inc x 6 | 12 |
| 3 | sc in each stitch | 12 |
| 4 | dec x 6 | 6 |
Add a small pinch of stuffing before the final round. Thread the tail through the front loops of the remaining six stitches and draw the opening closed. Keep enough yarn to sew the tail to the back of the body.
Assemble your crochet panda
Before sewing, you should have one head, one body, two eye patches, two ears, two arms, two feet, and one tail. Place paired pieces together to check that their sizes match. Use removable markers to establish a center line on the front of the body.
- Finish the face. Attach the patches and embroidery as described above if you have not already done so. Check that the expression is centered before securing the ends.
- Place the ears. Position their closed edges symmetrically near head rounds 3-5. Look from above as well as from the front, then sew each lower edge firmly to the head.
- Join the neck. Align the face with the body front and the color-change step with the back. Keep both 12-stitch rims open. Put four corresponding markers around each rim, three stitches apart, and match the quarters. Sew one head stitch to one body stitch: three pairs per quarter, 12 pairs in total. Add small pieces of stuffing before the final section closes. Make a second securing pass without cinching the neck into a narrow cord.
- Position the feet. Pin their open ends onto the lower front of the body, approximately across rounds 3-6. Rest the panda on a flat surface and adjust both feet together before sewing around each opening. Keep the toes facing forward and the legs level.
- Attach the arms. Sew each closed upper edge to the corresponding side of the black shoulder band, around body rounds 11-13. Check that the arms hang at the same height.
- Add the tail. Sew it to the lower back around body rounds 3-5, centered between the sides. Weave all tails through several directions inside the fabric and remove every positioning pin.
Round numbers give a starting region for placement, not an instruction to force a large attachment into a smaller space. Pin first and distribute your sewing around the actual edge of each piece. Avoid one loose strand carrying the whole attachment.
Tips & troubleshooting
The black stitches are difficult to count. Place a contrasting marker every six stitches during the wider rounds, and count under direct light. Remove extra markers once the count is confirmed. Do not add a stitch simply because the space beside the marker looks large.
The head wobbles at the neck. Check that all 12 stitches on each opening were joined and that the neck has enough evenly distributed stuffing. Reinforce the seam with yarn. A rigid internal support is not needed for this construction.
One eye patch looks higher. Count the head rounds at both patch centers before finishing the seam. Undo the placement stitches and move the patch; tightening its top edge will distort the face instead of fixing the position.
Stuffing shows through. Check whether the gaps were already present before filling. A smaller hook may be needed for the yarn, while an overfilled piece may only need some stuffing removed. Our common crochet mistakes guide can help separate tension issues from missed stitches.
Frequently Asked Questions
Is this a no-sew panda crochet pattern?
No. The head, ears, patches, arms, feet, and tail are sewn into place. Making the pieces separately lets you adjust the expression and sitting position before committing to the final seams.
Can I make this panda with chenille yarn?
The stitch counts can be followed with other yarns, but chenille changes the size, stitch visibility, and attachment bulk. This version is written for smooth yarn. Try a small piece first, use an appropriate hook, and check that paired parts and sewn edges sit comfortably together.
How big will the finished panda be?
There is no verified finished height for this pattern yet. Yarn thickness, hook size, tension, and stuffing all affect the result. Measure your own completed panda rather than using the illustration as a scale reference.
Is the panda suitable as a baby toy?
Treat this version as a decorative crochet project. Embroidered eyes remove the need for plastic eye parts, but they do not establish that the finished item meets toy safety requirements. Do not describe it as baby-safe or certified on the strength of this tutorial.
Choose your next small project
For another practice project, try the five-petal crochet flower. To plan your next amigurumi skills, visit the beginner amigurumi roadmap, where you can choose projects by the techniques you want to practice.
Essential crochet guides
Maker notes
Questions or finished-project notes?
Share what helped, ask about a step, or leave a thoughtful note for the next maker.
Loading maker notes...