Tapestry Crochet for Beginners: Tutorial & Free Pattern
Learn tapestry crochet with a free diamond coaster pattern, a color chart, written rows, and clear tips for changing colors and carrying yarn neatly.

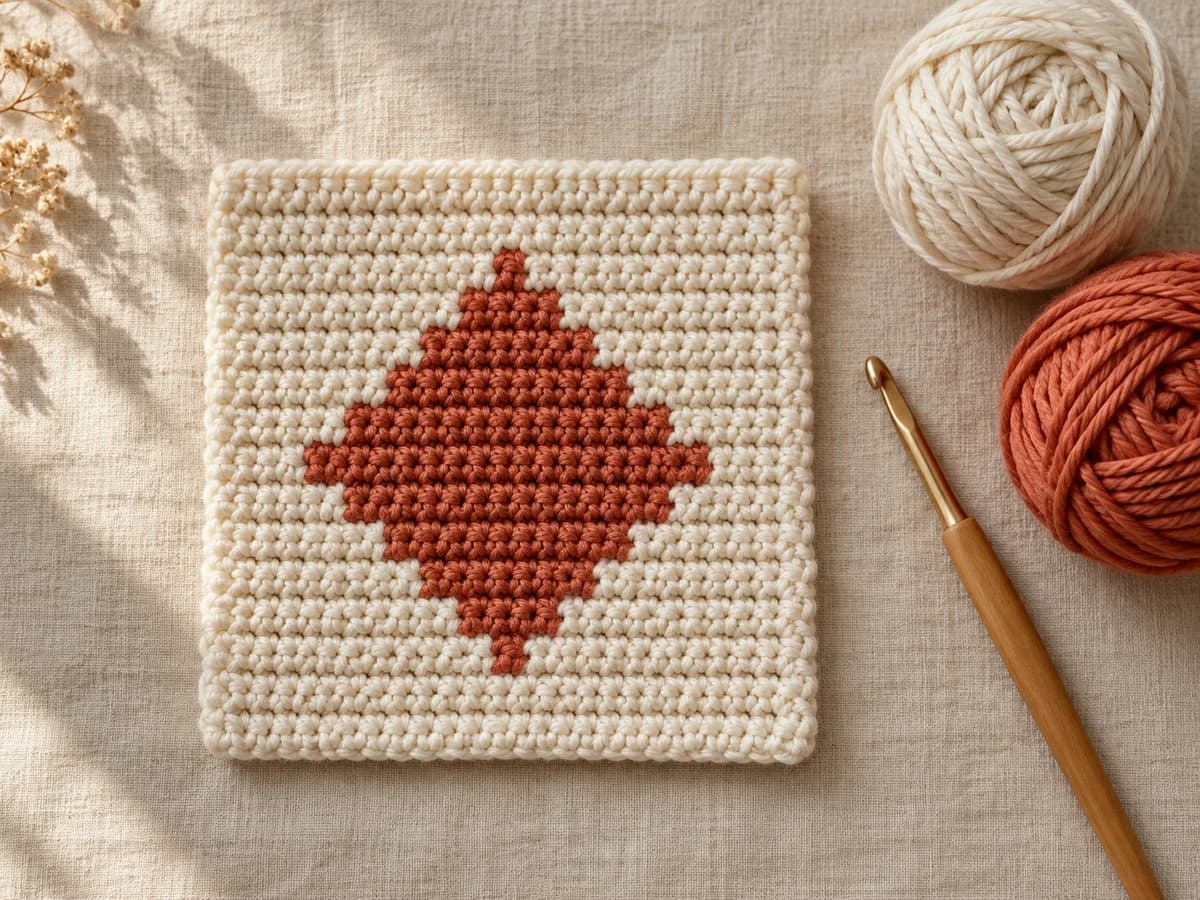
Tapestry crochet lets you draw with yarn: work a row of single crochet, switch colors where the design changes, and crochet over the unused strand so it travels inside the stitches. You use one color at a time, even when several colors appear in the same row.
This tutorial includes a free tapestry crochet pattern for a two-color diamond coaster, with a full chart and matching written rows. The small project gives you practice changing colors, carrying yarn, and keeping the fabric flat before you tackle a bag or blanket.
You should already be comfortable making a chain and working single crochet in rows. If those are new, start with our first crochet lesson, then return here.
Go straight to the free coaster pattern · View the color chart
What is tapestry crochet?
Tapestry crochet is a colorwork method in which the unused yarn runs inside the stitches you are making. A chart tells you which color to use at each position. This produces a relatively dense fabric, useful for small mats, pouches, and bags.
The word “tapestry” can also describe a wall hanging made with other crochet methods. When choosing a pattern, check how its designer handles unused colors; a picture on a crochet grid does not automatically mean tapestry construction.
| Method | How unused yarn is handled | What to check before starting |
|---|---|---|
| Tapestry crochet | Enclosed inside the working stitches | Carry tension and how many strands are inside the fabric |
| Intarsia crochet | Separate yarn supplies serve separate color areas | Where to join colors and how to manage bobbins |
| Stranded colorwork | Unused yarn travels in floats behind the fabric | Float length and whether the back will be visible |
| Overlay mosaic crochet | Usually one working color per row; longer stitches reach into earlier rows | The chart's special symbols and the designer's turning rules |
For this first project, you only need two colors and ordinary US single crochet through both loops. There are no special mosaic stitches, increases, or decreases.
How to change colors and carry yarn
Change on the last pull-through of the previous stitch
Suppose the instructions say 10 A, 1 B, 10 A. This means ten single crochet stitches in A, one in B, then ten in A. Prepare for a new color while completing the stitch immediately before it:
- Work nine sc in A. Begin the tenth sc with A: insert the hook, yarn over with A, and pull up a loop.
- With two A loops on the hook, yarn over with B and pull B through both loops. That completed stitch still counts as the tenth A stitch.
- Insert the hook into the next stitch. Yarn over with B and pull up a loop. Because only one B stitch is needed, use A for its final pull-through.
- Work the remaining ten sc in A.
You have made 21 stitches, not 23. Picking up a new color adds no stitch and needs no extra chain. For a visual demonstration of this basic movement, see Yarnspirations' tapestry crochet tutorial.
Enclose the strand instead of leaving a long float
Lay the unused strand along the tops of the stitches you are about to work. Insert your hook under both loops of the next stitch and beneath that strand, then make your sc with the active color. The new stitch wraps around the resting strand.
At each color change, the old working yarn becomes the strand you crochet over. Keep doing this even across the cream areas. In this coaster, both yarns travel through every row from Row 1, which helps keep the fabric thickness consistent.
After several stitches, spread the fabric gently to its normal width. Remove loose slack from the carried strand without cinching it. It needs enough length to lie inside the row when the coaster is flat.
Keep track of the right and wrong sides
Mark the face of Row 1 with a removable marker: that is the right side (RS). Odd-numbered rows are worked with RS facing; even-numbered rows are worked with wrong side (WS) facing.
Before the first stitch of an RS row, arrange the unused strand behind the fabric, away from you. Before a WS row, bring it toward you, onto the WS. Then lay it along the row and crochet over it. This keeps the little edge transitions on the same face of the coaster. Do not pull the strand diagonally across the front of the diamond.
How to read a tapestry crochet chart
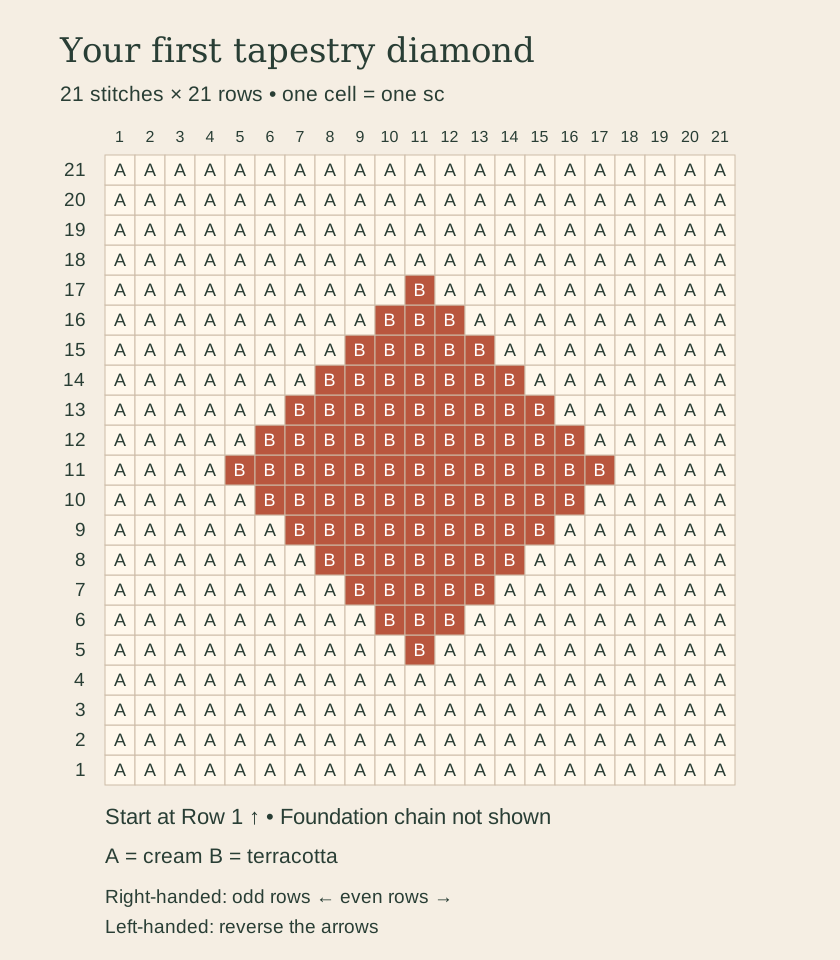
Read the chart from the bottom row upward. Each cell represents one sc; its letter and color tell you which yarn to use. The foundation chain and turning chains are not chart cells.
For right-handed crochet, read odd rows from right to left and even rows from left to right. For left-handed crochet, reverse those directions. This diamond is horizontally symmetrical, so the written sequence is the same either way. Direction still matters when you move on to letters or an off-center picture.
Cover the rows above your current row with a strip of paper, or tick off the written rows as you finish. Count the whole row as well as the colored section: a correct diamond inside a shrinking coaster still means an edge stitch was missed.
Free tapestry crochet pattern: diamond coaster
The coaster is a flat panel of 21 sc across and 21 rows high. The diamond widens from one colored stitch to thirteen, then narrows back to one. Four plain rows frame it at the bottom and four at the top. Leave the edges unbordered so your first project stays focused on colorwork.
Materials and supplies
- Color A: cream worsted-weight cotton; allow approximately 25 m / 28 yd.
- Color B: terracotta cotton in the same yarn range and weight; allow approximately 15 m / 17 yd.
- 4 mm crochet hook as a starting point, plus a nearby size if needed for comfortable, dense stitches.
- Three removable stitch markers (two for the edges and one for the right side), scissors, a yarn needle, and a ruler.
These are planning allowances for one small coaster, including carried strands and finishing tails; they are not measured sample usage. Allow extra yarn for a separate practice swatch. You need more B than the visible diamond suggests because B also travels inside the cream stitches. Choose smooth, solid colors so you can see each stitch clearly.
Gauge and finished size
A suggested planning gauge is 20 sc and 20 rows = 10 x 10 cm, measured in single crochet with a second strand carried inside the stitches. At that gauge, 21 stitches and 21 rows give approximately 10.5 x 10.5 cm / 4.1 x 4.1 in, before any optional edging.
Exact gauge is not essential for a coaster. Flat fabric and comfortable stitches matter more. If you get 20 stitches but 24 rows per 10 cm, the same pattern will be about 10.5 cm wide and 8.8 cm tall; equal chart dimensions do not guarantee a square in yarn. Keep the 21 written rows for your first practice piece and accept the different proportions.
Measure a practice swatch made with both colors, or check the width of this project after Row 4. If the fabric is open and B shows through everywhere, try a slightly smaller hook. If it is rigid and difficult to work, loosen your working tension or try a larger hook. Our crochet hook size guide explains how to compare hook sizes and gauge.
Abbreviations and pattern notes
US terms: ch = chain; sc = single crochet; st/sts = stitch/stitches; RS = right side; WS = wrong side. A and B are yarn colors. In the table, “8 A, 5 B, 8 A” means 8 sc in A, 5 sc in B, and 8 sc in A.
- Ch 1 and turn between rows. This turning chain does not count as a stitch.
- Work the first sc into the first actual stitch and the last sc into the last actual stitch. Do not work into the turning chain.
- Work through both loops from Row 2 onward.
- Carry the unused yarn inside every sc. Both colors remain attached until the end.
- Every row begins and ends in A. Use A for every turning chain.
- Follow the color-change method above: use the next color for the last pull-through before each new color section.
Foundation and Row 1
With A, ch 22. Leave a tail of about 15 cm / 6 in.
Lay B along the foundation chain, leaving its own 15 cm / 6 in tail at the starting edge. Hold B in place and crochet over it; do not make a separate B chain. Sc in the second chain from the hook and each remaining chain, using A and enclosing B. (21 sc)
The chain nearest the hook is skipped; the other 21 chains each receive one sc. Mark the first and last sc. Place an additional marker on the face just worked if you need help remembering RS.
Rows 2-21: written color sequences
Before each row, ch 1 in A and turn. Move the edge markers up as you work. The table is written in working order: read each sequence from left to right, regardless of which direction you read the chart.
| Row | Facing | Work this color sequence | Total sc |
|---|---|---|---|
| 1 | RS | 21 A (foundation row above) | 21 |
| 2 | WS | 21 A | 21 |
| 3 | RS | 21 A | 21 |
| 4 | WS | 21 A | 21 |
| 5 | RS | 10 A, 1 B, 10 A | 21 |
| 6 | WS | 9 A, 3 B, 9 A | 21 |
| 7 | RS | 8 A, 5 B, 8 A | 21 |
| 8 | WS | 7 A, 7 B, 7 A | 21 |
| 9 | RS | 6 A, 9 B, 6 A | 21 |
| 10 | WS | 5 A, 11 B, 5 A | 21 |
| 11 | RS | 4 A, 13 B, 4 A | 21 |
| 12 | WS | 5 A, 11 B, 5 A | 21 |
| 13 | RS | 6 A, 9 B, 6 A | 21 |
| 14 | WS | 7 A, 7 B, 7 A | 21 |
| 15 | RS | 8 A, 5 B, 8 A | 21 |
| 16 | WS | 9 A, 3 B, 9 A | 21 |
| 17 | RS | 10 A, 1 B, 10 A | 21 |
| 18 | WS | 21 A | 21 |
| 19 | RS | 21 A | 21 |
| 20 | WS | 21 A | 21 |
| 21 | RS | 21 A | 21 |
Checkpoints: At Row 5, the single B stitch sits in the center position, stitch 11. At Row 11, the diamond is thirteen stitches wide with four A stitches on either side. At Row 17, the final B stitch is back in position 11. Rows 18-21 are plain A, still crocheted over B.
Diamond color chart
This is the same pattern as the written rows, not an extra set of rows to add afterward. A = cream; B = terracotta. The chart includes all 21 rows, including the foundation row.
Finish the coaster
After Row 21, cut A and pull the tail through the last loop. Cut B, leaving both tails about 15 cm / 6 in long. Thread each tail onto a yarn needle and weave it through several stitches on the WS, changing direction before trimming. Keep terracotta tails inside terracotta stitches where practical so they do not shadow through the cream.
Wash or dampen according to the yarn label, lay the coaster flat, and gently straighten the edges. Let it dry completely. Do not stretch it hard to force a square: puckering needs a tension correction, not aggressive blocking. No border is required.
Tips & troubleshooting
The carried yarn shows through the cream
A few flecks can remain visible, especially with very high contrast. Check that you enclosed B inside each stitch and remove loose slack a few stitches at a time. If the fabric has gaps, compare a smaller-hook swatch. Avoid tightening so much that the coaster gathers. Catherine Crochets' guide to hiding carried yarn has more help with hook size, yarn thickness, and contrast.
The coaster pulls inward at each edge
Lay it down after every row. If the newest row is narrower despite having 21 stitches, the carried strand may be too short. Undo the tight section and remake it with the fabric spread to its natural width. Leave a little ease as B turns around the edge; it should follow the edge, not pull it into a curve.
The color change is one stitch late
Do not finish the last A stitch entirely in A and wait until the next stitch to pick up B. Make the final pull-through of that last A stitch with B. In Row 5, B is already on the hook before you insert into stitch 11.
The diamond leans or looks a little jagged
Single crochet stitches are not perfectly square pixels. Turned rows also show alternating stitch faces. First confirm that your B counts follow 1, 3, 5, 7, 9, 11, 13 and then decrease symmetrically. Small texture differences are expected; a missing or extra colored stitch needs correction before the next row.
The yarn balls twist together
Keep one ball on each side and pause to untwist them when needed. Turn the work one way at one row end and the opposite way at the next, checking that B still sits on the intended WS. You do not need to cut a yarn every time you change color.
The back looks different from the front
The back can have more visible transition bars, and the row texture differs. It should not have long loose strands across the diamond in this pattern. If it does, you carried the unused yarn behind the fabric without enclosing it. Check the insertion path on the next practice stitches.
For dropped edge stitches and accidental increases, use the counting examples in common crochet mistakes and their fixes.
Choosing your next tapestry crochet pattern
After this coaster, choose another two-color project with both a chart and written instructions. Look for stated dimensions, yarn quantities, turning rules, and an explanation of how the yarn travels. A chart alone does not tell you how to construct a pouch or attach a handle.
For more projects, Nordic Hook's beginner tapestry collection links to small accessories with written patterns, charts, and photo instructions. Their yarn and hook choices differ from this coaster, so follow the materials for the project you select.
If you enjoy making small pieces for your table, our crochet coaster and table decor patterns offer other shapes to try.
Frequently Asked Questions
Is tapestry crochet suitable for beginners?
Yes, once you can keep an even single crochet stitch count. Begin with two colors and a small symmetrical chart. This coaster introduces changing colors and carrying yarn without shaping or sewing pieces together.
Do I carry the second color through plain rows?
In this pattern, yes: carry B inside every A stitch, including Rows 1-4 and 18-21. Other designs may handle unused colors differently, so follow their individual instructions.
Can I work tapestry crochet in the round?
Yes. In an unturned round, the same face stays toward you. Follow a pattern written for rounds, including its join and chart rules. This coaster is worked flat; joining its row ends would change the project.
How do I use more than two colors?
The color-change movement stays the same, but you have more yarn to manage. Carrying several strands inside every stitch adds bulk. Practise with two first, then use a pattern that specifies which strands to carry and where to introduce or leave a color.
Can I make my own tapestry crochet grid?
Yes. Use graph paper or a grid editor and assign one cell to each stitch. Start with a small two-color geometric shape. Measure your stitch and row gauge before drawing a larger picture: rectangular stitches can stretch or squash an image drawn on square cells. A pattern maker can create a grid, but you still need to plan the foundation, row direction, yarn handling, and finishing.
Can I use this chart for a blanket?
Treat it as a practice motif, not a complete blanket pattern. A blanket needs its own width, repeats, yarn estimate, edges, and gauge calculation. Make and wash a swatch first, especially because carrying yarn changes the fabric's thickness and drape.
Essential crochet guides
Maker notes
Questions or finished-project notes?
Share what helped, ask about a step, or leave a thoughtful note for the next maker.
Loading maker notes...