Lace Crochet Shawl Pattern: An X-Stitch Rectangle Wrap
Crochet an airy rectangular lace shawl with an X-stitch repeat, checked row counts, an easier scalloped edge, blocking advice, and clear fit tips.

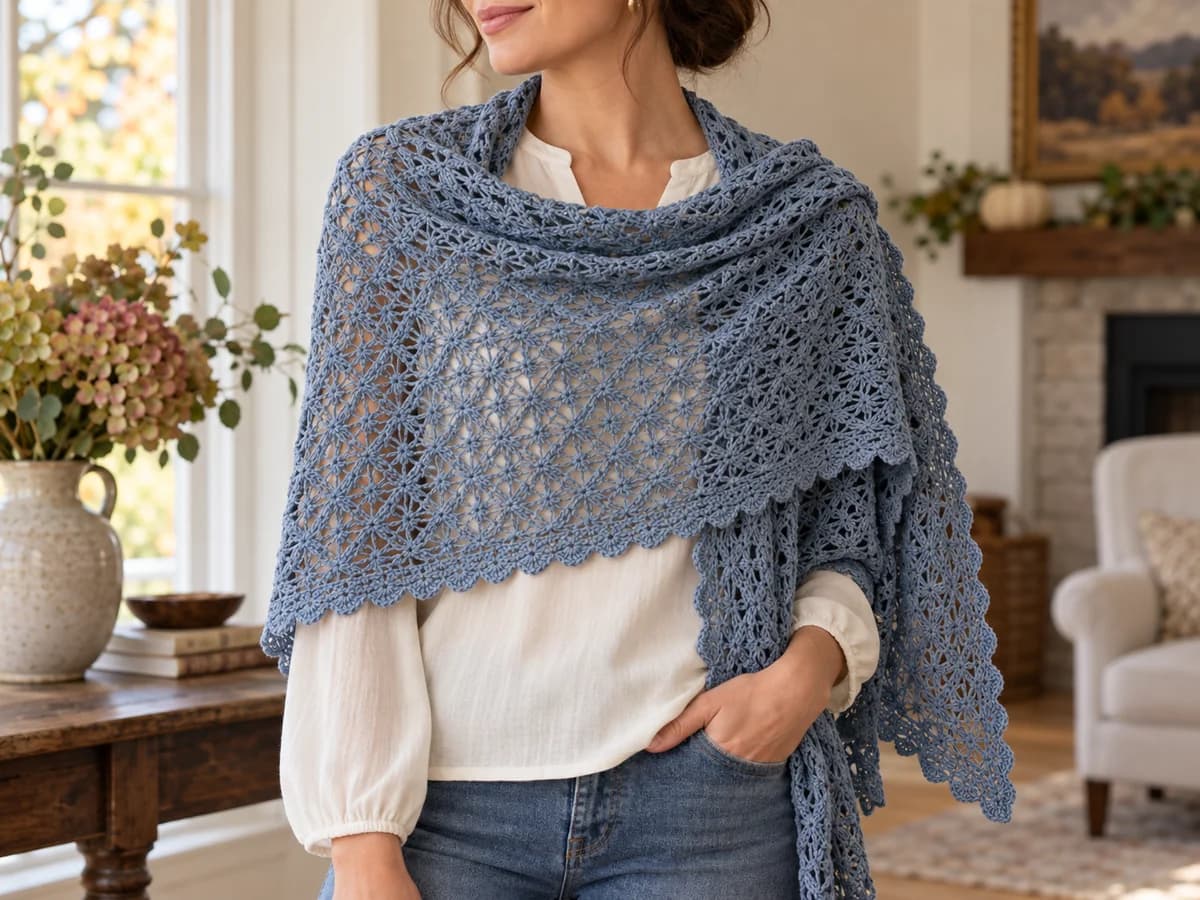
This lace crochet shawl pattern makes a long, airy rectangle that can be worn across the shoulders as a wrap or folded lengthwise like a generous scarf. Its crossed X-stitches create open columns, while a small scallop along each long edge gives the fabric a finished look. There is no shaping or seam, but the crossed stitch takes some attention; this is an intermediate project rather than a first-ever scarf. The cover photo shows the draped styling; use the stitch diagrams below for the exact X-stitch layout.
This guide is an adaptation of Tammy Hildebrand's Quick Weekend Shawl for Red Heart. The designer and Yarnspirations deserve credit for the original X-stitch wrap. We retain the source's main-panel counts and repeat, then add clearer checkpoints. The PDF finishes one long edge with a six-row decorative border and the other with one row of single crochet. Our version instead uses the same simpler three-row scalloped edging on both long edges. For the designer's exact finish, download the free original PDF from Yarnspirations and follow both of its edging sections.
Before you start: size, yarn, and gauge
The original wrap is listed at 21 inches tall by 60 inches long (about 53.5 × 152.5 cm) after finishing. Those are the publisher's dimensions, not a guarantee for a yarn substitution or for our simpler border. The chain sets the short side; repeating rows builds the long side. Measure your own fabric after blocking before deciding it is too short.
- Yarn: The source calls for three balls of Red Heart Luster Sheen in Mid Blue. That is a sport/fine-weight yarn. The original listing is about 921 yards (842 m); three 335-yard balls provide roughly 1,005 yards. Our shorter border may use less, but buy by the yarn label's yardage and leave enough for a swatch and both edges. A smooth yarn makes the crossed stitches easier to see than a fuzzy one.
- Hook: Start with a 5 mm / US H-8 hook, then change size if needed to match gauge and achieve a supple fabric.
- Other tools: Stitch markers, tape measure, yarn needle, scissors, and a row counter.
- Source gauge: 16 stitches and 6 pattern rows per 4 inches / 10 cm. Make a swatch at least 6 inches / 15 cm wide, work the two-row repeat several times, lightly block it as you intend to block the wrap, and measure the middle 4 inches. More stitches than 16 means your fabric is tighter; fewer means it is looser. The final dimensions can vary considerably with the amount of blocking.
These instructions use US terms: ch = chain, sc = single crochet, dc = double crochet, tr = treble crochet, sp = space, and st = stitch. The beginning ch 3 on a solid row counts as one dc. The beginning ch 5 on an openwork row counts as one tr plus ch 1. Mark the turning chain's top if you often miss it. If these abbreviations are new, keep our crochet pattern-reading guide nearby.
Understand one X-stitch before making the shawl
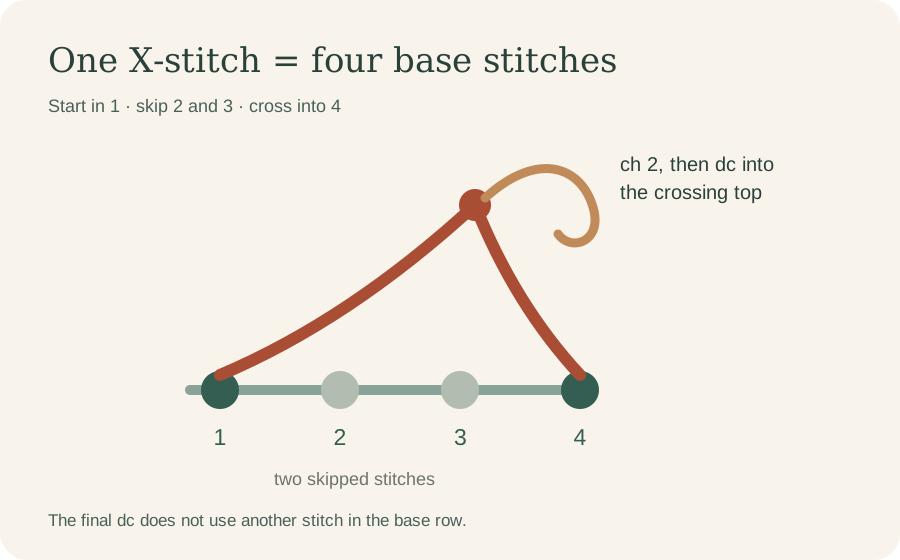
An X-stitch uses four stitches of the row below: you start a tall stitch in the first, jump over two, complete its crossing leg in the fourth, then make a small chain opening and a dc into the top of the crossing. Work one trial repeat in scrap yarn before starting the full wrap.
- Yarn over twice and insert the hook into the first stitch of the four-stitch group. Yarn over, draw up a loop (4 loops on the hook); yarn over and draw through 2 loops (3 remain).
- Yarn over, skip the next two base stitches, insert into the fourth stitch, yarn over, and draw up a loop (5 loops). Yarn over and draw through 2 loops twice (3 remain). Yarn over and draw through 2 loops twice more to finish the crossed tall stitch.
- Ch 2, then work one dc into both loops at the top of the crossing. That dc is worked into the crossed stitch, not into another base stitch. One X-stitch is complete.
Crochet the rectangular lace panel
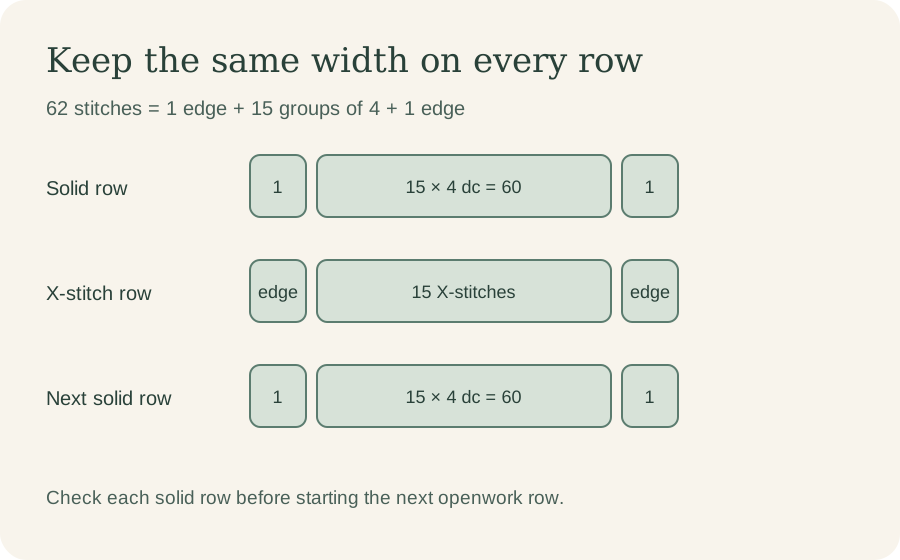
Foundation: Ch 64. Work dc in the fourth chain from the hook and every remaining chain. Count the skipped three chains as your first dc: 62 dc total at the end of Row 1. Turn.
Row 2 — openwork: Ch 5 (counts as tr and ch 1). Working from the second stitch of the previous row, make one X-stitch over each consecutive four-stitch group 15 times. There should be one dc left at the far edge. Ch 1, tr in that last dc, and turn. Checkpoint: 15 X-stitches, two edge tr, and two edge ch-1 spaces.
Row 3 — reset to solid stitches: Ch 3 (counts as the first dc). Skip the first edge ch-1 space. For each of the 15 X-stitches, work one dc in its first top stitch, 2 dc into its ch-2 space, and one dc in the dc after that space. Skip the last edge ch-1 space; work a dc into the fourth chain of Row 2's beginning ch 5. Turn. Checkpoint: 1 edge dc + (15 × 4 dc) + 1 edge dc = 62 dc. The fifth chain is the edge ch-1 space, not the place for your final dc.
Rows 4–71: Repeat Rows 2 and 3 thirty-four more times. Every openwork row should have 15 X-stitches; every solid row should return to 62 dc. Row 71 is a solid row. Place a removable marker every ten rows so the long rectangle is easier to track.
Add the simpler scalloped long-edge finish
This is our alternative border, not the PDF's six-row lower border and one-row upper edging. It preserves the panel construction but is easier to count. Make the same border on each long edge, one at a time. The first preparation row places 213 sc across the 71 row ends:
- With the right side facing, work along one long side. Ch 1, then place 3 sc in the first row end and 4 sc in the next. Across the next 68 row ends, alternate 2 sc in one row end, 4 sc in the next (34 pairs). Work 2 sc in the final row end. Turn. Checkpoint:
3 + 4 + (34 × 6) + 2 = 213 sc. If an edge seems crowded in your yarn, distribute the stitches evenly but keep the total at 213 for the next row. - Ch 3 (counts as dc), dc in each of the next 2 sc. Repeat (ch 2, skip 2 sc, dc in each of the next 3 sc) across, 42 times. Turn. Checkpoint: 43 groups of 3 dc separated by 42 ch-2 spaces; all 213 sc from the preparation row have been used.
- Ch 1, sc in the middle dc of the first 3-dc group. Repeat (dc, tr, tr, dc) into the next ch-2 space; sc in the middle dc of the next 3-dc group across all 42 spaces. Fasten off. You now have 42 modest scallops separated by sc anchors.
Join yarn at the other long side with the right side facing and repeat these three rows across its 71 row ends. The short ends stay plain. If you prefer the larger, more ornate border pictured in the source, use the official Quick Weekend Shawl PDF for that part; do not combine its later border rows with our three-row version because their stitch layouts differ.
Finishing and blocking
Weave tails through several stitches without pulling the lace tight. Soak according to the care label of the yarn you actually used. Lift the wet wrap with both hands, squeeze it gently in a towel rather than twisting, then lay it flat and open the X-stitch columns with your fingers. Measure the rectangle and let it dry fully before wearing. Stretch gently; pinning a lightweight lace fabric too aggressively can distort the crossings. Our hook-size and gauge guide can help if the swatch and finished fabric differ from the target.
Tips & troubleshooting
My solid row has fewer than 62 stitches. Where did they go?
Check the last edge first. Row 3 ends in the fourth chain of the previous ch 5, after skipping its ch-1 space. Then inspect each motif: it must become four dc—one on each side of the ch-2 space and two inside it. Undo only to the first incorrect motif rather than adding a compensating dc at the edge.
Why does one long edge look tighter or wavy?
Uneven turning-chain tension or an extra stitch into an edge chain changes the shape. Mark the first and last true stitches and confirm 15 X-stitches before turning. For the border, recount the 213 sc preparation row before making the 42 spaces; crowding extra sc into a few row ends can make the edge ripple.
Why is the X-stitch hard to see?
Try a smooth, lighter-colored sport yarn for a practice swatch. Work the hook under both top loops at the crossing's top when you make the final dc, and gently spread the ch-2 space with your fingers. A fuzzy yarn can hide the crossing even when the count is correct.
My wrap seems short after 71 rows. Should I add more?
First compare a blocked swatch with the source gauge and check the rectangle after blocking. If you still want extra length, add complete Row 2–3 pairs and finish on a solid row. The fixed 213-sc edging above fits exactly 71 row ends, so for a longer panel work a new evenly distributed preparation row and adjust the border repeat; do not use its original counts unchanged.
Frequently Asked Questions
Is this a scarf or a shawl?
It is a rectangular shawl or wrap at the source size of about 21 × 60 inches. Fold it lengthwise to wear it as a broad scarf. A narrow neck scarf would require a different starting count and a recalculated border, so it is a separate size rather than the result of simply using a smaller hook.
Can I use worsted-weight yarn instead of sport yarn?
You can, but the same 64-chain start and 71 rows will produce a larger, heavier wrap and may need substantially more yarn. Make and block a swatch, then decide whether you like the drape and finished dimensions. A yarn-weight label alone cannot predict the result.
Do I need to block a crochet lace shawl?
Blocking helps the openwork sit flat and reveals the crossing. Follow the chosen yarn's care label and stretch gently to even out the fabric. If your fiber must stay dry, use a method suitable for that yarn rather than automatically soaking it.
Can I use the original border with this guide?
Yes. Work the 62-stitch, 71-row panel, then follow the publisher's entire border sequence from the free designer pattern. Start from its first border row on each side; do not begin with our alternative edging and switch midway.
What to make next
For another wearable project, try our cozy oversized crochet sweater pattern or beginner crochet bucket hat. To plan yarn and hook substitutions more confidently, read how crochet hook sizes affect gauge. If you want a smaller project after this wrap, browse our free crochet pattern library.
Essential crochet guides
Maker notes
Questions or finished-project notes?
Share what helped, ask about a step, or leave a thoughtful note for the next maker.
Loading maker notes...