How to Crochet a Hello Kitty-Inspired Amigurumi (Free Pattern & Tutorial)
Crochet an unofficial character-inspired amigurumi with an oval head, separate body, shaped ears, compact bow, embroidered face, and assembly steps.

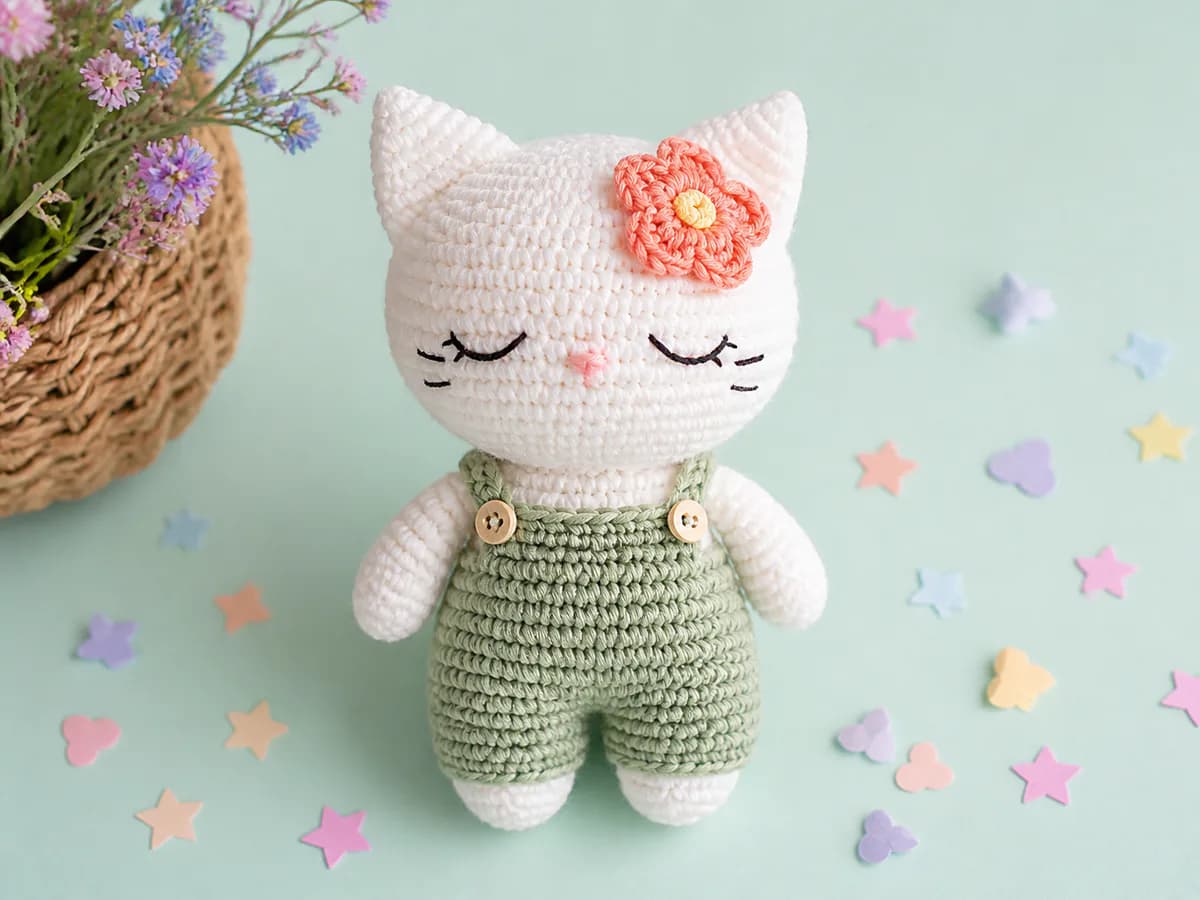
Make an unofficial cat-inspired amigurumi with a white oval head, two ears, a plain colored body, white arms and legs, and a small crochet bow. The sections below explain each piece, how to embroider the face while the head is open, and how to sew the pieces together.
About the collection image: the pictured sage overalls, straps, buttons, flower, and sleepy-eye styling are inspiration. This pattern makes a simpler doll with a plain colored torso, embroidered oval eyes, a yellow nose, and a bow; it does not reproduce the pictured outfit or flower. The construction diagrams show the written version schematically, not a measured finished sample.
Unofficial fan project: intended for personal use, with no affiliation with or endorsement by Sanrio. Follow the intended-use guidance at the end of this page.
Materials and size planning
- Smooth DK cotton in white for the head, ears, arms, and legs
- A contrasting DK color for the plain body, plus pink or red for the bow
- Black and yellow embroidery yarn or floss; choose a thickness that fits your stitches without forcing them apart
- A 2.75-3.5 mm hook as a starting range, adjusted to make dense but workable fabric
- Small amounts of stuffing, a blunt yarn needle, scissors, and removable markers
- Pins for temporary assembly positioning; remove every pin when finishing
Keep the main yarn weight consistent across the pieces. Exact finished dimensions, yarn quantities, and working time have not been established with a completed sample. Measure and weigh your first doll before planning several copies; reserve matching yarn for both limbs in each pair and leave sewing tails when directed.
The fabric should contain stuffing without visible gaps. If it is open, try a smaller hook before beginning the full head; adding more stuffing will not fix loose fabric. Our amigurumi yarn and hook guide explains this choice.
Terms and construction order
Use US terms: ch = chain, sc = single crochet, inc = 2 sc in one stitch, dec = sc2tog over the next two stitches, MR = magic ring, and FO = fasten off. Numbers in parentheses give the stitch count after the round. Each decrease consumes two stitches and produces one.
Work the head, ears, body, arms, and legs in continuous rounds without joining or turning. Move the start marker into the first stitch of every new round. Only the bow uses turned rows; its ch-1 turning chain does not count as a stitch.
Make the head first and embroider before its final closure. Then make two ears, one body, two arms, two legs, and one bow. Pin all pieces together before sewing permanently. This is a confident-beginner project: it combines oval increases, decreases, embroidery, and assembly.
White oval head
Use white yarn. The foundation chain runs left to right across the crown; you work down one side of it, around the far end, and back along its underside. The turning chain next to the hook is skipped.
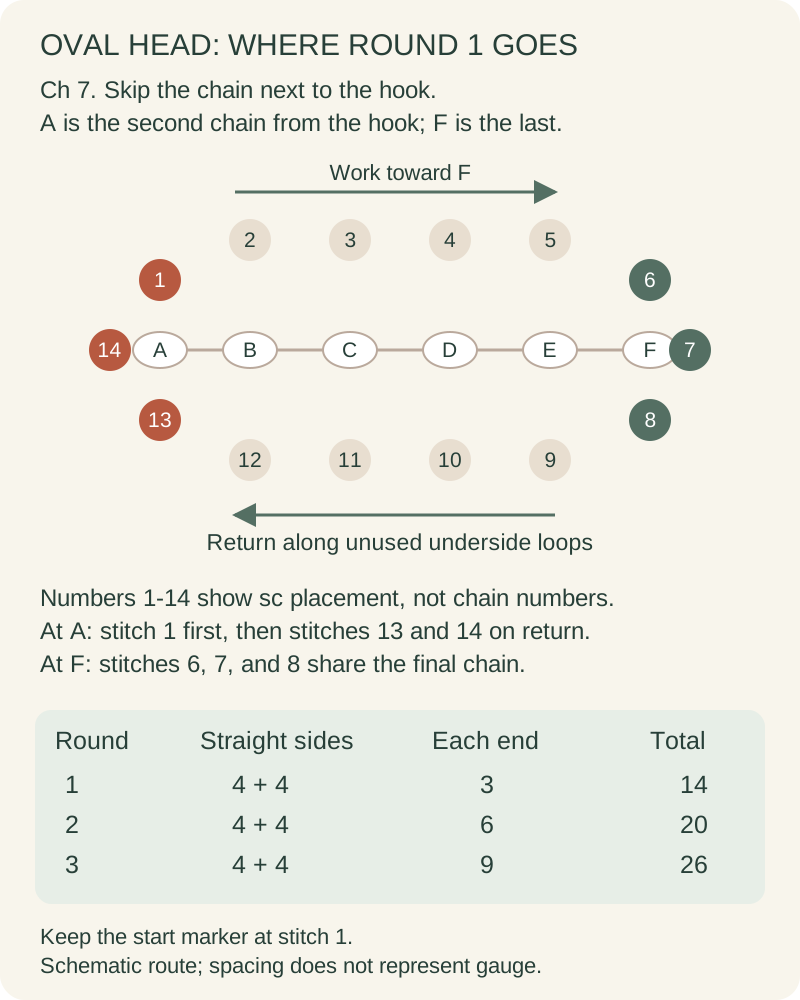
- Round 1: Ch 7; sc in the second chain from the hook and in the next 4 chains, then 3 sc in the last chain. Rotate the foundation to reach its unused underside loops, sc in the next 4 positions, and work 2 more sc in the same chain as the first sc. Do not join. (14)
- Round 2: Inc in the first stitch, sc 4, inc in each of the next 3 stitches, sc 4, and inc in each of the final 2 stitches. (20)
- Round 3: Work (sc, inc) once, sc 4, (sc, inc) 3 times, sc 4, then (sc, inc) twice. (26)
- Rounds 4-10: Sc in every stitch. (26 per round; seven rounds)
- Round 11: Repeat (sc, dec) once, sc 4, repeat (sc, dec) 3 times, sc 4, then repeat (sc, dec) twice. (20)
Pause here to add the face using the next section. Temporarily add a little stuffing to judge the shape, then remove enough to reach the inside for securing embroidery ends.
- Round 12: Dec, sc 4, dec in each of the next 3 positions, sc 4, and dec twice. Each dec uses the next two unworked stitches. (14)
- Add stuffing in small pieces, keeping the head evenly filled without stretching open the stitches.
- Round 13: Repeat (sc, dec) 4 times, then sc in the final 2 stitches. (10)
- Round 14: Dec 5 times. (5) FO with a tail for closing. Thread it through the front loops of the remaining five stitches, pull gently closed, secure, and bury the end inside. This closure is the underside of the head, where it will meet the body.
Count check: 14, 20, 26, seven rounds at 26, then 20, 14, 10, 5. In rounds 1-3, each straight side stays at four sc; increases are concentrated at the rounded ends.
Embroider the face before closing the head
Choose one broad side as the front, with the foundation chain running horizontally across the top. Mark its visual center with a removable thread. Do not use the spiral's start marker as the face center: that marker sits near a rounded end.
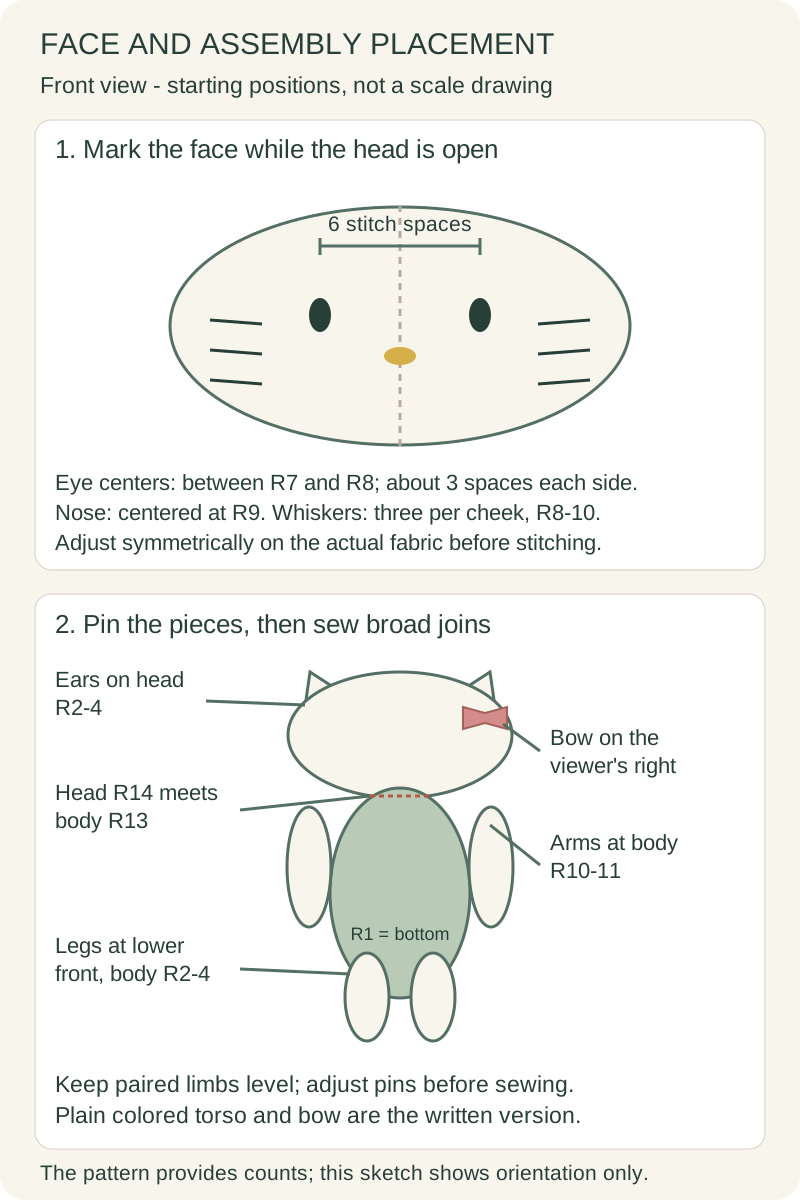
- Mark eye centers: place them between head rounds 7 and 8, starting roughly three stitch spaces to either side of the front-center line. This means about six stitch spaces from center to center, not six empty stitches between the outer edges of finished eyes. Recount on the actual curved fabric and adjust the markers symmetrically if needed.
- Embroider the eyes: with black thread, make short parallel vertical passes at each marked center to form a small oval. Keep the passes close together and use matching height and width on both eyes; avoid pulling the fabric into a dent.
- Add the nose: center a small horizontal yellow oval around round 9, below the midpoint between the eyes. Build it with a few adjacent horizontal passes rather than one bulky knot.
- Add whiskers: make three short black straight stitches on each outer cheek, spaced across rounds 8-10. Angle the upper and lower whiskers slightly while keeping their lengths balanced. No mouth is included in this version.
- Secure embroidery ends inside with small anchoring stitches and weave them through nearby fabric on the wrong side. Check the expression straight on, remove all face markers, and continue with head round 12.
For illustrated stitch methods, see the embroidered amigurumi face guide. The diagram below gives starting positions, not a requirement to force the same spacing onto every yarn and tension.
Two white ears
Make two identical pieces in white.
- Round 1: Work 4 sc in an MR. (4)
- Round 2: Repeat (sc, inc) twice. (6)
- Round 3: Repeat (2 sc, inc) twice. (8)
- Rounds 4-5: Sc around. (8 per round)
Leave the ears unstuffed. Flatten each opening so four stitches on one side meet four on the other, FO with a sewing tail, and whipstitch through the paired stitches to close the base. The MR tip points upward; the flattened edge is the base that will be sewn to the head.
Plain colored body
Use your chosen body color throughout. This gives a single-color torso, not removable clothing or overalls. Round 1 is the bottom; the last round is the neck end.
- Round 1: Work 6 sc in an MR. (6)
- Round 2: Inc 6 times. (12)
- Round 3: Repeat (sc, inc) 6 times. (18)
- Rounds 4-11: Sc around. (18 per round; eight rounds)
- Round 12: Repeat (sc, dec) 6 times. (12)
- Add stuffing evenly. Keep the upper end supported, but do not pack it so tightly that the fabric gaps.
- Round 13: Dec 6 times. (6)
FO with a long sewing tail. Draw it through the six front loops to close the neck end, secure the closure, and retain the tail for joining the head. The seam will pass through fabric around both closures, not just the cinched centers.
Two white arms
Make two in white.
- Round 1: Work 6 sc in an MR. (6)
- Rounds 2-6: Sc around. (6 per round; five even rounds)
Stuff only the lower portion lightly, leaving the opening flexible. Flatten the top so three stitches meet three, FO with a sewing tail, and whipstitch through the three paired stitches to close it. Keep the remaining tail for attaching the arm.
Two white legs
Make two in white.
- Round 1: Work 6 sc in an MR. (6)
- Round 2: Repeat (2 sc, inc) twice. (8)
- Rounds 3-7: Sc around. (8 per round; five even rounds)
Stuff lightly toward the closed end. Flatten the open edge so four stitches meet four, FO with a sewing tail, and whipstitch the paired stitches closed. Leave the remaining tail for assembly. These are simple small limbs; the pattern does not include shaped shoes or trouser legs.
Small crochet bow
Use pink or red yarn and work in rows.
- Row 1: Ch 6. Starting in the second chain from the hook, sc in each chain across. (5)
- Rows 2-4: Ch 1, turn, sc in each of the five stitches. (5 per row) Do not work into the turning chain.
FO and weave in the row ends. Pinch the rectangle at its center, wrap a separate strand around the center eight times, and secure it on the back with a knot and anchoring stitches. Leave tails for sewing the center and both upper corners to the head.
Assembly: pin first, sew second
- Set the front: place the body with round 13 at the top and round 1 at the bottom. Pick a front and mark it. Hold the face toward that same front, with the head's foundation chain horizontal.
- Pin the legs: position their flattened attachment edges at the lower front of the body, around body rounds 2-4, on opposite sides of the front-center marker. Keep the feet level and slightly apart. These are starting positions, not a promise that the finished doll will stand unaided.
- Pin the arms: place each closed upper edge at one side of the body, around rounds 10-11, below the neck end. Let the unstuffed attachment edges bend so the arms can rest alongside the torso.
- Join limbs: check the pair lengths from the front and sides, then sew each flattened edge to several neighboring body stitches. Make a second pass along the join if needed, secure the tail, and weave it through the body. Do not attach a whole limb through one stitch.
- Join head to body: center head round 14 over body round 13. Use the body's retained tail to take small stitches alternately through firm fabric around the underside of the head and the top of the body. Work completely around the contact area twice, checking the face direction between passes. Secure and bury the tail; use fresh matching yarn if the retained tail is too short.
- Position ears: pin the flattened bases symmetrically at the upper left and upper right corners of the head, across head rounds 2-4. View from the front before sewing, then attach both sides of each closed base to the head fabric. Hide the sewing ends.
- Attach the bow: place it near the ear on the viewer's right. Sew its wrapped center and two upper corners to the head, keeping the ears' outline visible. Secure and weave in the ends.
- Remove all pins and markers. Check for loose tails, exposed stuffing, and moving seams, and adjust before display. Embroidery and secure seams alone do not establish that a handmade item is suitable for a baby or young child.
Tips & troubleshooting
My head count is wrong after round 1
Count fourteen sc, not the seven foundation chains. The second chain from the hook receives three sc in total: one at the start and two when you return. The far chain receives three together; the four middle positions are worked once on each side.
My head twists while I embroider
Lightly fill it to judge the shape, mark both rounded ends, and find the center of a broad side. Remove enough stuffing to reach inside for embroidery. A slight spiral slant is normal; keep the visual face centered rather than lining it up with the start-of-round marker.
The arms or legs stick straight out
Remove stuffing near their flattened attachment edges so those edges bend. Pin the limbs lower or closer to the sides as appropriate, then check the pose before resewing. Do not pull the attachment seam so tightly that it puckers the body.
The head feels loose
Check that the seam goes around a broad contact area through intact fabric on both pieces, rather than only through their closing threads. Reposition the head if it is off-center and repeat the seam with matching yarn. More stuffing cannot repair a weak join.
My doll does not look like the outfit in the main image
The written version has a plain colored torso, white limbs, a bow, and embroidered oval eyes. Overalls, straps, buttons, the flower, and sleepy eyes in the image are separate styling ideas, not missing rounds. Use the assembly sketch to check the intended arrangement of the pieces you made.
Frequently Asked Questions
Is this suitable for my first amigurumi?
It is better after you have practiced single crochet in rounds, increases, decreases, and sewing small pieces. Start with our amigurumi beginner guide if those steps are new. The oval foundation needs more attention than a simple round ball.
How large will the finished doll be?
That depends on your yarn, hook, tension, stuffing, and assembly. No measured sample size or yarn quantity is supplied. Measure your completed version before planning fitted clothing or matching gifts, and record the yarn used.
Why are both the head and body closed before joining?
They are separate stuffed pieces. Closing both contains the stuffing while you position them; the final seam joins the surrounding fabric into a broad attachment. Keep the two closures centered against each other, with the face aimed toward the body's marked front.
Does this include the pictured overalls and flower?
No. It includes a plain colored body and a rectangular crochet bow. The introductory image note and assembly diagram distinguish those instructions from the more elaborate styling shown in the main image.
May I sell the finished item?
This unofficial character-inspired tutorial is presented for personal use. Do not market it as an official or licensed pattern or finished product.
Keep exploring
Choose colors with the kawaii yarn-color guide, compare cute kawaii projects and tutorials, or browse the crochet pattern library.
Essential crochet guides
Maker notes
Questions or finished-project notes?
Share what helped, ask about a step, or leave a thoughtful note for the next maker.
Loading maker notes...