Easy Crochet Baby Cardigan Pattern
Plan a made-to-measure baby cardigan using five body-size references, washed gauge, panel calculations, sleeve shaping, and button-band guidance.

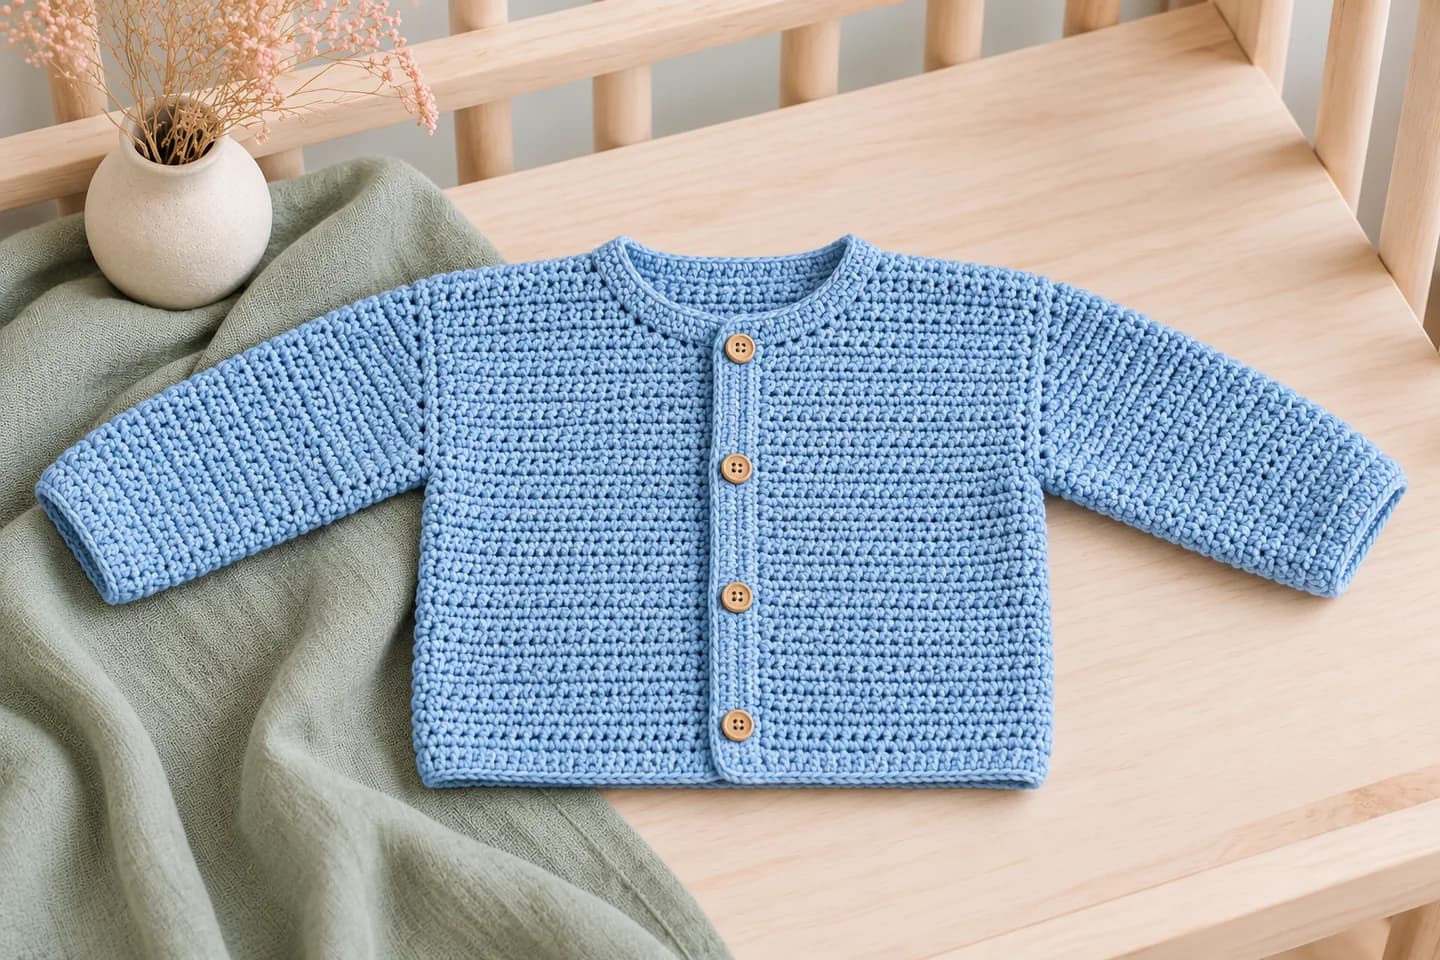
This made-to-measure baby cardigan uses a back panel, two front panels, and sleeves worked into the armholes. The five age labels below are body-measurement references, not five fixed sets of stitch counts. Choose the fit first, then calculate from your washed gauge.
The cardigan image illustrates the drop-shoulder shape described below. Your finished fabric, neckline, and fit depend on your own gauge and measurements.
Materials and supplies
- Machine-washable DK yarn
- 3.5-4.5 mm hook
- Flexible tape measure
- Locking stitch markers
- Yarn needle; embroidered details only for young children
- Flat washable buttons appropriate for the intended age
Crochet terms used
The instructions in Easy Crochet Baby Cardigan Pattern use US terms: ch (chain), sl st (slip stitch), sc (single crochet), hdc (half double crochet), and hdc2tog (half double crochet two stitches together, removing one stitch). A turning ch 2 and a joining sl st do not count as stitches in this method.
Multi-size cardigan construction
The body measurements below follow the Craft Yarn Council baby-size chart. The target chest adds about 5 cm of ease; measure the child or a well-fitting cardigan whenever possible. Back-waist length is a body measurement, not a complete cardigan length: choose the shoulder-to-hem length from a garment with the desired fit.
| Planning size | Body chest | Target finished chest | Back-waist length |
|---|---|---|---|
| 3 months | 40.5 cm / 16 in | 45.5 cm / 18 in | 15.5 cm / 6 in |
| 6 months | 43 cm / 17 in | 48 cm / 19 in | 17.5 cm / 7 in |
| 12 months | 45.5 cm / 18 in | 50.5 cm / 20 in | 19 cm / 7.5 in |
| 18 months | 48 cm / 19 in | 53 cm / 21 in | 20.5 cm / 8 in |
| 24 months | 50.5 cm / 20 in | 55.5 cm / 22 in | 21.5 cm / 8.5 in |
Calculate panels from washed gauge
Make a washed hdc swatch in the chosen yarn. Measure the central 10 cm in both directions and divide by 10 to find stitches per cm and rows per cm. Keep the turning chain out of the stitch count.
Plan button bands before calculating the fronts. Let C be the desired closed chest circumference, B the finished width of each band, and O the amount the bands overlap when buttoned. Use a back width of C / 2 and a front width of (C / 2 - 2B + O) / 2 for each front. This accounts for two bands but subtracts their shared overlap once. Compare those widths with a well-fitting cardigan before crocheting.
For a calculation example only, C = 48 cm, B = 2 cm, and O = 2 cm give a 24 cm back and two 11 cm fronts. At a reader-measured gauge of 1.5 hdc per cm, 24 cm needs 36 stitches and a foundation of 38 chains. Each 11 cm front needs 16.5 stitches, rounded to 17, so chain 19. After rounding, the panel widths are approximately 24 + 11.3 + 11.3 cm; adding both bands and subtracting their overlap gives about 48.7 cm closed. Recalculate for your own gauge and fit instead of treating these example counts as a graded size.
Multiply your chosen shoulder-to-hem length by rows per cm for a starting row count. Measure the actual fabric as you work and stop at the planned length. Reserve yarn for both bands, cuffs, and seams; panel estimates alone do not cover a full cardigan.
Work and assemble the panels
- For each panel, multiply its width in cm by stitches per cm and round to a whole stitch. Chain that stitch count plus two, not the width in centimeters. Hdc in the third chain and across; the two skipped chains do not count as a stitch.
- Ch 2, turn, and hdc in each stitch for subsequent rows. Keep the same count and work to the planned shoulder-to-hem length. Make the two fronts with identical stitch and row counts.
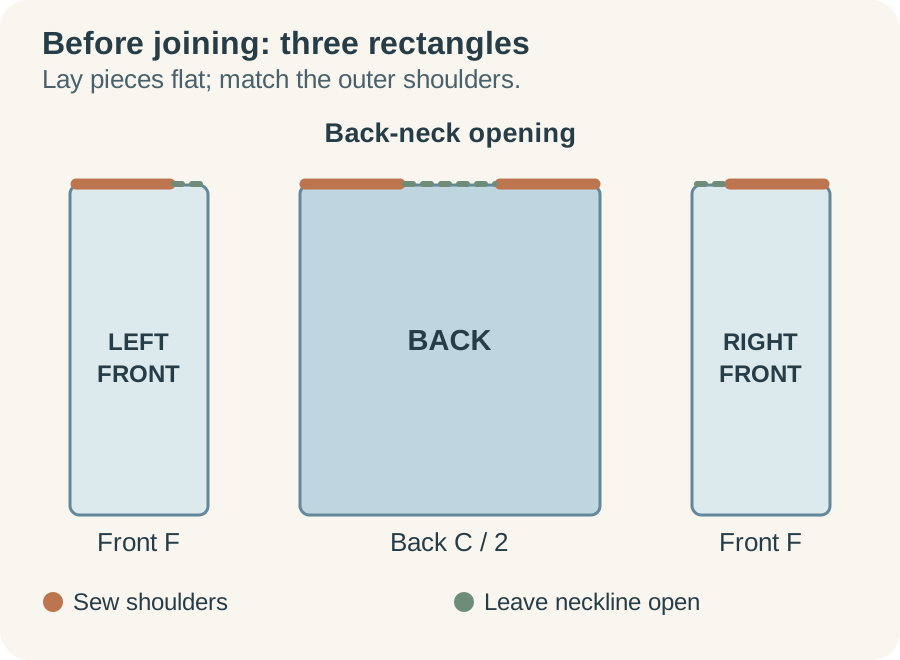
- Wash and dry the panels according to the yarn label. Mark a centered neck opening on the back using a well-fitting garment as a reference. The remaining back width on each side is the shoulder-seam length; it must fit within the width of its matching front. Align each front's outer shoulder edge with the back's outer edge and seam inward only for that measured shoulder length. Leave the center back neck and the inner top edge of each front unseamed to make the neckline. For the 24 cm back and 11 cm fronts in the calculation example, an 8 cm back-neck gap leaves two 8 cm shoulder seams and 3 cm unseamed at the top of each front. These are example measurements, not a prescribed baby neckline.
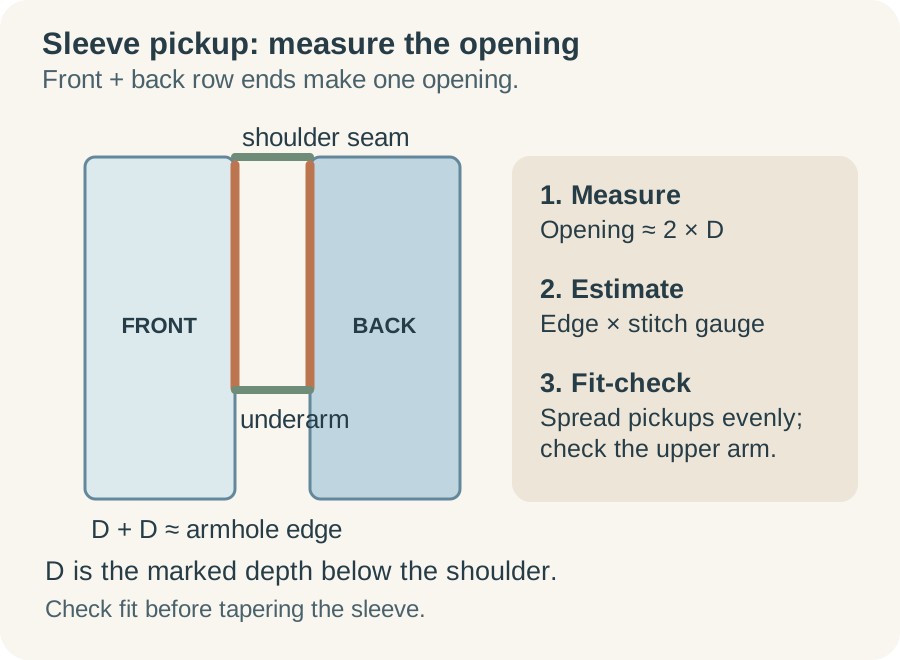
- Measure the intended armhole depth D from a well-fitting garment and mark that distance down from each shoulder on both front and back. Seam the sides from the hem to those marks, leaving equal openings. Each armhole edge is approximately 2 × D around: one front edge plus one back edge. Compare that circumference with the child's upper arm (or a well-fitting sleeve) plus room to move before adding sleeves. If it is too small, lower both underarm marks equally; do not try to force extra stitches into a tight opening.
Shape the sleeves
Estimate the first sleeve-round count from the measured armhole circumference × washed stitch gauge. Round to a workable whole number, preferably even if you want paired decreases. Join yarn at an underarm. Ch 2 (does not count), then distribute that number of hdc evenly around the front and back row ends, placing about half on either side of the shoulder seam. You may need to skip some row ends: one stitch in every row end can make the sleeve flare if there are more row ends per centimeter than the stitch gauge calls for. Join with a slip stitch to the first hdc. Measure the new round around the upper arm and redo the pickup if it pulls or balloons; do not rely on the calculation alone. Record the first-round count and match it on the second sleeve. Work joined rounds, keeping the underarm marked and the joining slip stitch out of the count.
Convert the measured wrist plus 2-3 cm of ease to a stitch count. Choose a nearby whole count with the same odd/even parity as the first sleeve round. Subtract that wrist count from the first-round count and divide by 2; this is the number of decrease rounds required. Each decrease round removes two stitches: hdc2tog over the first two stitches, hdc across to the last two, then hdc2tog. On other rounds, hdc in every stitch.
Measure sleeve length from the assembled drop shoulder to the wrist, allowing for the cuff. Use row gauge to estimate the available rounds and distribute the decrease rounds evenly over that length. As a calculation example, a 9 cm-deep armhole has about 18 cm around its edge. At a reader-measured gauge of 1.5 hdc per cm, that suggests 27 pickup stitches; 28 evenly spaced stitches would measure about 18.7 cm if the fabric behaves like the swatch. If a measured wrist plus ease calls for 20 stitches, work four paired-decrease rounds to go from 28 to 20. Across 24 available sleeve rounds, one decrease round about every sixth round is a starting schedule. These are not fixed counts for a 6-month size: recheck the actual armhole, upper arm, wrist, and sleeve length before working the second sleeve. If the wrist target is not smaller, or the required decreases do not fit the available rounds, revisit the measurements before proceeding.
Add bands, buttonholes, and cuffs
Work an sc edging along the front openings and back neck, distributing stitches so it lies flat. Add rows until each front band reaches the planned width B; keep measuring because the overlap affects the closed chest. Check the neckline against the reference garment and avoid a tight opening.
Choose button spacing on the finished bands with markers. On a separate swatch in the same band stitch, make a chain-space buttonhole by skipping the same number of stitches as chains, then work one sc into each chain on the return row. Adjust the opening so the chosen button passes through without falling out easily. Use that checked chain count at the marked positions on one band and sew buttons opposite on the other. There is no universal chain count for every button and yarn.
Finish the cuffs with sc, ensuring each opening still passes over the hand comfortably. Secure buttons with suitable sewing thread and inspect them and all yarn ends before use and after washing. Remove the garment from use if an attachment loosens. Never add neck ties or dangling cords.
Tips & troubleshooting
The fronts do not meet neatly
Check both front widths, band widths, and button overlap. Adding band allowance to each front and then adding it again during edging makes the closed chest wider than planned. Measure with the bands in their buttoned position.
The sleeves feel too long
A drop shoulder extends beyond the wearer's shoulder. Measure sleeve length from the assembled armhole rather than adding a full shoulder-to-wrist measurement to it. Match both sleeves by their recorded round counts and measured length.
The edge flares or pulls inward
Too many stitches along a row-end edge create waves; too few pull it tight. Undo the affected band and redistribute the pickup stitches. Blocking cannot reliably correct a large count mismatch.
Frequently Asked Questions
Are these fixed stitch counts for five sizes?
No. The table supplies five body-size references; the panel and sleeve counts come from your washed gauge and chosen fit. The worked calculation demonstrates the method. For more help distinguishing body and finished measurements, use the crochet garment sizing guide.
Can I use a different yarn weight?
Yes, if the resulting fabric suits the garment, but recalculate every panel, sleeve, and band from a new washed swatch. Changing only the hook while keeping old counts can change both fit and fabric density.
How much yarn do I need?
A weighed swatch can estimate panel yarn from fabric area, but sleeves, bands, cuffs, seams, and the desired length also need to be included. No single skein count applies to all five body sizes or every DK yarn. Confirm the meterage on the actual yarn label when planning your purchase.
Keep exploring
For a different type of handmade gift, compare the bear lovey and its supervised-use guidance. For more planning help, continue with Baby and Kids Crochet Patterns and Safety Guides, Crochet Toy Safety Guide and Beginner Pattern, Crochet Baby Booties and Hat Set (Free Pattern). For a broader route through the site, use the Ultimate Free Crochet Pattern Library.
Essential crochet guides
Maker notes
Questions or finished-project notes?
Share what helped, ask about a step, or leave a thoughtful note for the next maker.
Loading maker notes...