Cottagecore Crochet Dress Pattern
Make a cottagecore crochet dress with a measured bodice, two straps, a flared skirt and a back zipper. Includes gauge calculations and assembly diagrams.

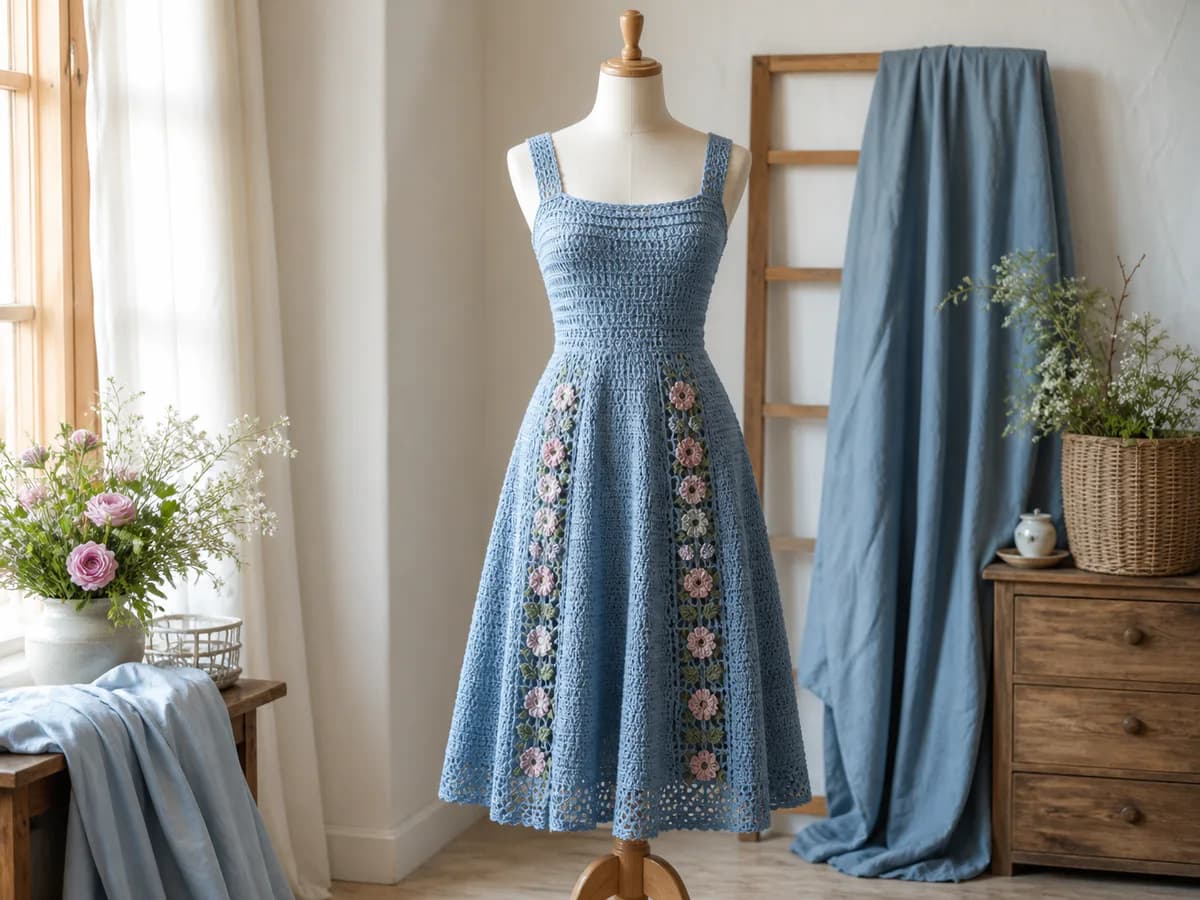
This cottagecore crochet dress uses a straight, square-neck bodice, two shoulder straps, and a gradually flared skirt. Work the body flat in half double crochet, then sew a center-back seam and insert a zipper. The opening lets you put on the dress without stretching its upper section over your hips.
This is a made-to-measure construction method, not a graded S/M/L pattern. The bodice has a relaxed waist rather than fitted waist shaping. The floral granny-square panels in the main image are styling inspiration and are not included in these plain-fabric instructions. Counts have been reviewed on paper; finished fit, yardage, drape and strap stretch have not been verified on a completed sample.
Materials and supplies
- DK or light worsted garment yarn with suitable drape
- A 4-5 mm hook as a starting point; choose the final hook from your washed swatch
- Tape measure, locking stitch markers, scissors and a yarn needle
- A closed-end dress zipper, sewing thread, sewing needle and basting thread
- Blocking supplies and the slip or undergarment you intend to wear
Choose a zipper long enough to open from the upper bodice edge to at least full-hip level. Confirm its length against the blocked piece before sewing it in. Buttons and elastic are not alternative closures for these instructions.
There is no verified yarn quantity. For a purchasing estimate, weigh a washed swatch and divide its weight by its area. Multiply that grams-per-square-centimeter figure by the planned area of the bodice, skirt and both straps, including seam allowances. Reserve extra for the hem, swatching and adjustments. This is a planning estimate, not measured pattern yardage; keep the same dye lot for the whole dress.
Crochet terms and construction
These instructions use US terms: ch (chain), sl st (slip stitch), sc (single crochet), hdc (half double crochet), and dc (double crochet). An increase means 2 hdc in one stitch unless the hem instructions specify sc.
Work the bodice and skirt in turned rows, starting at the upper bodice edge and working downward. Ch 2 before each new hdc row; this turning chain never counts as a stitch. Work under both top loops. The first and last stitches of each row are real hdc stitches, not turning chains.
The two vertical edges become the center back. Reserve a narrow strip of stitches at each edge for the seam and zipper; those stitches do not contribute to the finished circumference. The diagrams are construction maps, not stitch-symbol charts or scale drawings of your size.
Measure and calculate your starting counts
Wear the intended undergarment while measuring. Record full bust, full hip, upper-bodice-edge-to-waist depth, waist-to-full-hip depth, and waist-to-hem length. Set the upper edge below the underarms at a comfortable height. Compare with a comfortable sleeveless dress if you have one. Our crochet garment sizing guide explains body measurements, finished dimensions and ease.
Make an hdc swatch larger than 10 cm square. Wash and dry it as you will the dress, then measure stitches and rows across an interior area. Record g = stitches per cm and r = rows per cm. Check again after letting the fabric hang; if it grows substantially, reconsider the yarn or gauge before making a heavy skirt.
- Choose finished bust and hip circumferences with positive ease. Adding 4 cm to each body measurement is one starting example, not a fit guarantee. Allow the movement and drape you prefer.
- Multiply the finished bust target by g. Round up to a multiple of 4. Call this usable bodice count C. Its calculated circumference is C divided by g.
- Reserve about 1 cm at each back edge: E = g rounded up to a whole stitch. Your complete row has N = C + 2E stitches. Keep both E-stitch edge strips unchanged throughout the skirt.
- Multiply the finished hip target by g and round up to a multiple of 4. Call this H, but never make H smaller than C; this version does not narrow the skirt.
- Calculate K = (H - C) / 4, the number of four-increase rows needed by full-hip level. Calculate R = waist-to-hip depth multiplied by r, rounded to a whole row, with a minimum of one row.
K must be no greater than R: this method adds at most four stitches per row. If your proportions need more shaping, a wider starting bodice helps only if that fit is acceptable; otherwise choose a dress pattern with shaping for your proportions. Do not rely on stretching an undersized hip section.
Worked example, not a garment size
Suppose your washed gauge is 15 hdc and 12 rows per 10 cm: g = 1.5 and r = 1.2. A 90 cm bust plus 4 cm ease gives a 94 cm target: 94 × 1.5 = 141, rounded up to C = 144. Its calculated usable width is 96 cm. E = 2 stitches per edge, so N = 148 and the starting chain is 150.
For a 106 cm hip plus 4 cm ease, 110 × 1.5 = 165, rounded up to H = 168. Its calculated usable width is 112 cm. You need K = 6 increase rows. A 20 cm waist-to-hip depth at 1.2 rows/cm gives R = 24 skirt rows: increase on rows 4, 8, 12, 16, 20 and 24. These are arithmetic examples, not measurements from a crocheted dress.
Work the straight bodice
Ch N + 2. Row 1: hdc in the third chain from the hook and in every remaining chain: N hdc. Do not join into a tube.
Rows 2 onward: ch 2, turn, hdc in every stitch: N hdc. Continue until the bodice reaches the measured upper-edge-to-waist depth, including row 1 in the length. Mark the boundary after the first E stitches and before the last E stitches to separate the allowances from the usable fabric.
Temporarily fold the edge strips inward and baste the back edges together. Hold the bodice at its intended height or attach temporary shoulder ties, try on over your slip, and check bust coverage, armhole height and comfort. The waist stays the same circumference as the bust. Adjust the count or depth now, then remove the basting to work the skirt flat.
Shape the skirt to your hips
Continue directly from the bodice. Start a separate skirt-row count at 1.
For K greater than zero, the j-th increase happens on j × R / K, rounded up, for j = 1 through K. Write the row numbers down before starting. If K is zero, work even through the hip depth.
Plain row: ch 2, turn, hdc in every stitch. Keep both edge strips marked.
Increase row: ch 2, turn. Hdc in the first E stitches. Divide the current usable count into four equal groups; call each group's count q. Work (2 hdc in the next stitch, hdc in each of the next q - 1 stitches) four times, then hdc in the last E stitches. This uses every old stitch once while adding 4 stitches. Update the usable count by four before calculating q for the next increase row. Reposition group markers after turning; never increase in an edge allowance.
In the worked example, the first increase row has q = 144 / 4 = 36: work 2 edge stitches, repeat (2 hdc in next stitch, hdc in next 35 stitches) four times, then work the final 2 edge stitches.
| After skirt row | Usable stitches | Total including both edge strips |
|---|---|---|
| 0 | 144 | 148 |
| 4 | 148 | 152 |
| 8 | 152 | 156 |
| 12 | 156 | 160 |
| 16 | 160 | 164 |
| 20 | 164 | 168 |
| 24 | 168 | 172 |
At full-hip depth, baste the back and check the fit standing and sitting. Correct the shaping now if the actual gauge or fit differs from the calculation.
Below the hip, either work even for a straighter skirt or continue the same four-increase row every fourth row for more flare. Count those four rows from the hip checkpoint. Stop at your waist-to-hem length, allowing for the optional shell edging. Fasten off, wash and dry the piece, let its weight settle, and recheck the length before assembly.
Close the back and insert the zipper
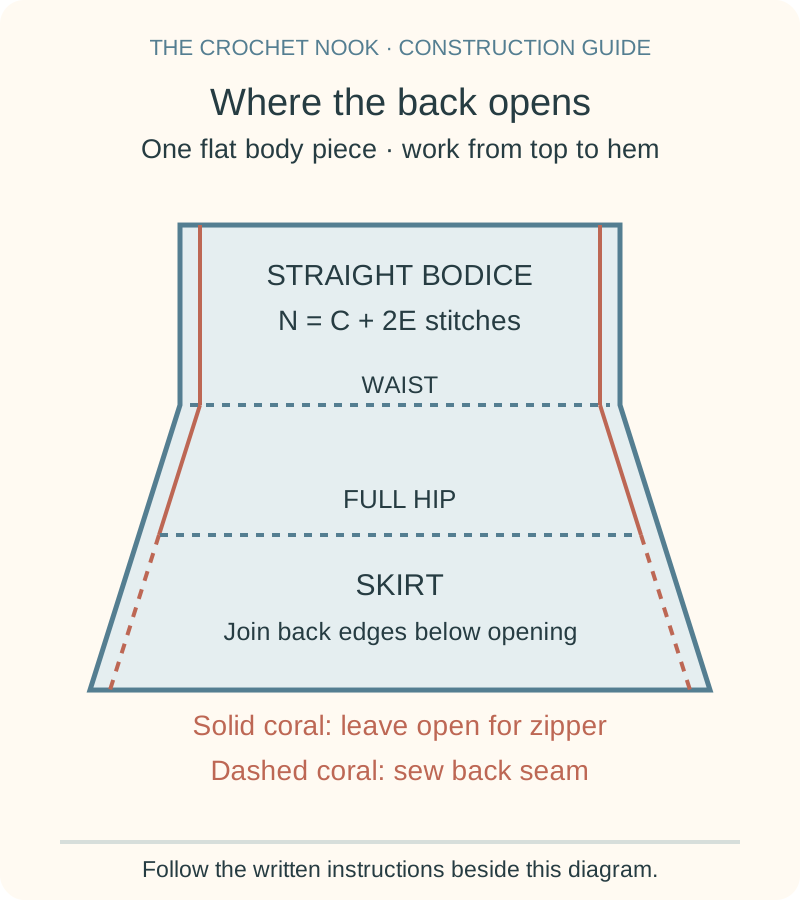
Lay the blocked piece flat. Mark where the zipper opening ends: at or below full-hip level, adjusted downward to match the chosen zipper length. Leave that opening clear from the upper bodice edge to the mark.
With right sides together, align the back edges row for row. Sew from the hem to the opening mark along a line E stitches in from each edge, catching substantial fabric rather than single loose loops. Leave both allowances inside. Do not cut the crochet fabric. Turn right side out and check that the seam lies flat.
Fold the remaining opening's E-stitch allowances inward. Baste the folded edges together, position the closed zipper underneath with its teeth centered beneath the meeting edges, and baste the zipper tape to the allowances. Set the upper stops just below the top edge and the lower stop at the opening's bottom.
Remove the basting that closes the opening, open the zipper, and sew each tape securely to its folded edge with small backstitches through sound crochet fabric. Keep stitches clear of the teeth and do not stretch the fabric. Fold excess top tape inward and secure it; secure the bottom tape without stitching over the teeth. Remove the positioning basting and test the zipper several times. Correct catches or ripples before attaching the straps.
Make two straps and attach four ends
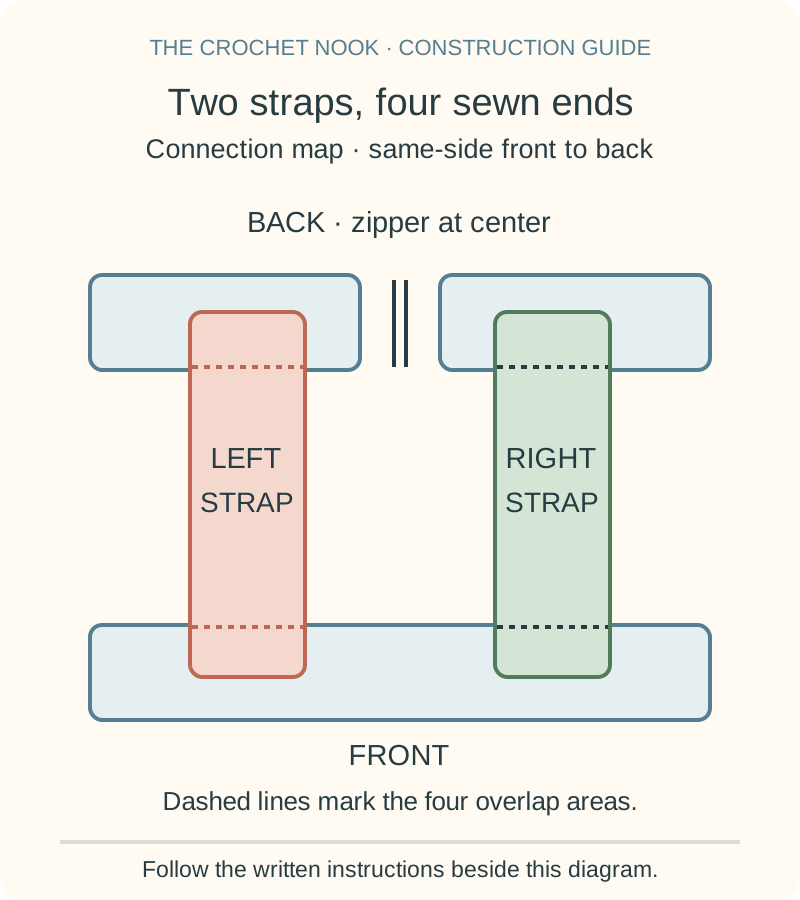
Choose a strap width of about 4-6 cm, or the width needed to cover your undergarment straps. Multiply that width by g and round up to a whole stitch: W. Make two separate rectangles, one per shoulder.
For each strap, ch W + 2. Row 1: hdc in the third chain from the hook and across: W hdc. Next rows: ch 2, turn, hdc in every stitch: W hdc. Continue to the measured front-to-back distance over the shoulder, allowing extra length for a two-row overlap at each end. Wash and dry both straps before fitting.
With the dress zipped, mark front and back centers and pin two attachment positions on the front and two on the back. One strap connects front left to back left; the other connects front right to back right. Keep the back positions clear of the zipper. Overlap each end by two rows inside the bodice, try on, and adjust until the upper edge sits level without digging into the underarms.
Sew across the full width of each end and along its short overlap sides, distributing stitches through both layers. Secure and weave in the tails. You now have two straps and four sewn ends, not four straps. Recheck after the skirt has hung under its own weight.
Optional shell hem and finishing
You may leave the upper edges plain after weaving in ends. Wear over a slip if the fabric is not opaque; a sewn lining needs its own fitting work and is not included here.
Count the usable stitches along the bottom, excluding the tucked-in E-stitch strips at the back seam. Call this T. Join yarn at the back seam and work one sc into each usable hem stitch, with this adjustment so the final count is divisible by 6:
- If T is already a multiple of six, make no increases.
- Otherwise, let D be the number needed to reach the next multiple of six (1-5). Divide T by D and round down to p. Repeat (sc in the next p - 1 stitches, 2 sc in the next stitch) D times, then sc in any remaining stitches. You have T + D sc.
Join with a sl st to the first sc; the join does not count. Ch 1, then repeat (skip 2 stitches, 5 dc in the next stitch, skip 2 stitches, sl st in the next stitch) around. Each repeat consumes six base stitches. Fasten off after the last repeat and use the tail to close any small gap at the start without adding another shell.
A 168-stitch usable hem needs no adjustment and takes 28 shells. A 172-stitch usable hem needs 2 increases: p = 86, so repeat (sc in next 85 stitches, 2 sc in next stitch) twice to make 174 sc and 29 shells. Seam-allowance stitches are excluded from both examples.
Tips & troubleshooting
My skirt reaches the hip width too late
Check row gauge and increase placement. Hip width must be reached at your waist-to-hip depth, not just somewhere before the hem. Rework the upper skirt using the measured row count; adding length will not compensate for missing width.
The dress is loose at the waist
That is the straight-bodice construction. A decorative belt changes the silhouette without changing stitch counts. A fitted waist with bust shaping needs different calculations; do not subtract waist stitches without redrafting the bodice and skirt start.
The zipper ripples
Check that corresponding rows line up and neither edge stretched during sewing. Undo the affected section, lay it flat and baste again. Keep the edge allowance consistent.
The straps become longer when worn
Refit after the washed dress has settled under its own weight. Shorten both straps as needed; you can sew non-stretch ribbon to their undersides at the fitted length. Test that reinforced length comfortably over the shoulder before reattaching.
Frequently Asked Questions
Is this a beginner dress pattern?
The hdc fabric is straightforward, but measuring, scheduling increases, fitting straps and inserting a zipper make this an intermediate project. Get help with zipper insertion if sewing is new to you.
Does this make the floral dress in the picture?
The instructions cover the plain bodice, straps and flared skirt. They do not include the pictured floral granny-square panels. Use the picture for color and styling ideas, not as a stitch-by-stitch preview.
Can I use a different garment yarn?
Yes, if the washed hdc fabric has suitable drape and opacity. Recalculate stitches and rows from that swatch and check the hanging fabric. Similar yarn labels do not guarantee matching gauge or garment weight.
Can I leave out the zipper?
Not without redesigning the opening. A closed dress must pass over the body, while this version relies on an opening to at least hip level. Do not simply sew the whole back closed after following these measurements.
May I sell the finished item?
Small-scale sales of finished items from this pattern are allowed with credit to Cottagecore Crochet Dress Pattern. Do not copy, sell, or republish the written instructions or site images.
Keep exploring
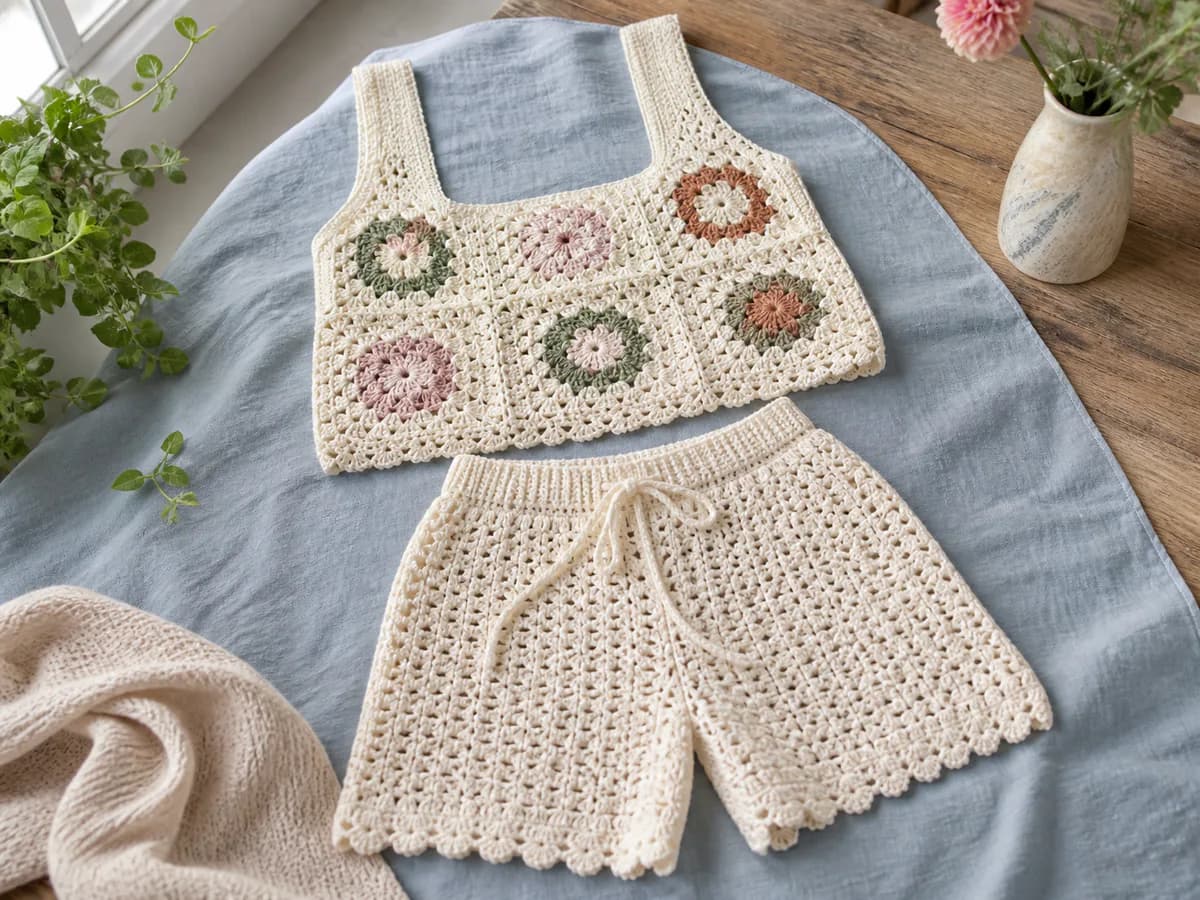
Try the boho crochet cardigan, oversized crochet sweater, or crochet top and shorts set. For a light wrap to wear over a dress, see the lace crochet shawl pattern. Browse the free crochet pattern library for smaller practice projects.
Essential crochet guides
Maker notes
Questions or finished-project notes?
Share what helped, ask about a step, or leave a thoughtful note for the next maker.
Loading maker notes...